
ViA has an internal battery slot on the rear panel designed for high performance RRC2057 Lithium-ion batteries. Only use this battery in the codec.
|
Caution: 1.Please read the important safety and user information in the manufacturer user manuals for both the battery and any external charger purchased separately before use. 2.The internal BATTERY is delivered in shipping-mode (status display off, no measurable voltage at the connector). Attach the codec power supply to the POWER SOCKET to charge the battery. When you start the charge cycle the BATTERY will be activated. Charge fully before first use. 3.If the codec is off the BATTERY continues to charge when external power is applied to the codec. |

Inserting the Battery
1.Push down on the BATTERY CASE CLIP to open the lid to the battery compartment.
2.Insert the BATTERY carefully and ensure the grooves at the bottom of the BATTERY line up correctly with the bottom of the BATTERY COMPARTMENT. Note: It should slide in smoothly.
3.Replace the BATTERY CASE CLIP carefully by lining up the two protruding plastic lugs with the base of the compartment, then push the center of the BATTERY CASE CLIP to close it fully.
Removing the Battery
1.Push down on the BATTERY CASE CLIP to open the lid for the BATTERY COMPARTMENT.
2.Pinch the tag on the BATTERY to pull it slowly out of the BATTERY COMPARTMENT.
Charging the Battery
When the power supply is connected to the codec's POWER SOCKET it will charge the internal BATTERY in less than 4 hrs.
Battery Indications
The battery has a charge status button to verify its charge state when it is [ON]. The POWER ![]() button is green when the power supply is connected to the codec's power socket. When the codec is operating on battery power it provides the following battery level indications:
button is green when the power supply is connected to the codec's power socket. When the codec is operating on battery power it provides the following battery level indications:
1.The Battery symbol and charge remaining is visible in the Status Bar in the top right corner of the TOUCH SCREEN.
2. When operating on battery power the POWER ![]() button indications are as follows:
button indications are as follows:
|
LED Indication |
Battery State |
|
GREEN LED (Solid) |
Battery level is between 21 - 100 % |
|
ORANGE LED (Solid) |
Battery level is between 11 - 20 % |
|
RED LED (Solid) |
Battery level is between 6 - 10 % |
|
RED LED (Flashing) |
Battery level is 5% or lower |


Low Battery Headphone Alarm Tones
A low battery alarm is audible in the headphones when the battery level reaches 20%, 10% and 5%.
1.Alarm tones are audible in the left headphone output of HP 1-3.
2.A warning dialog is displayed on the TOUCH SCREEN until acknowledged.
3.The ALARM LED flashes until acknowledged, and then turns solid red.
Tap the TOUCH SCREEN or touch any codec controls to acknowledge the alarm and stop the alarm tones.
Touch Screen Battery Indications
The percentage of battery charge remaining is displayed next to the battery symbol in the Status Bar on the TOUCH SCREEN. In addition:
•When power is attached to the codec the BATTERY symbol is green and the white Power  symbol is displayed.
•When operating on battery power the BATTERY symbol is white.
Symbol |
Battery State |
|
Power is attached to the codec and the battery is charging. |
|
The battery is fully charged and no power is attached to the codec. |
|
The battery is fully charged and the external power supply is in use. |
|
Unknown battery error while the external power supply is attached. The battery should immediately be removed from the codec. Please contact Tieline if this situation persists. |
|
Unknown battery error. The battery should immediately be removed from the codec. Please contact Tieline if this situation persists. |
|
The battery is too hot or too cold. Move the codec to a cooler or warmer location as required.
|
|
An external power supply is attached and the battery is too hot or too cold and not charging. For safety reasons, the battery is prevented from charging if the internal temperature is above or below pre-set thresholds. Move the codec to a cooler or warmer location as required, to allow the battery to continue charging. |
|
The battery has overheated or is dead. For safety reasons the battery is prevented from charging, or discharging and powering the codec. The battery should be removed from the codec and allowed to cool. |


HTML5 Toolbox Web-GUI Low Battery Indications
A low battery icon is displayed in the HTML5 Toolbox Web-GUI when the battery level is 20 percent or lower. This flashes until it is acknowledged on the unit itself.
Touch Screen Power Management
By default the TOUCH SCREEN has Screen Sleep mode enabled to preserve battery power. The default Screen Timeout setting is 1 minute. The TOUCH SCREEN will "reawaken" from sleep mode when a button or rotary encoder is adjusted, or the TOUCH SCREEN is tapped or swiped. It is also possible to:
•Adjust Screen Brightness.
•Enable Adaptive Brightness Adjustment.
To adjust these settings:
1.Press the HOME ![]() button to return to the Home screen, then tap Settings
button to return to the Home screen, then tap Settings  .
.
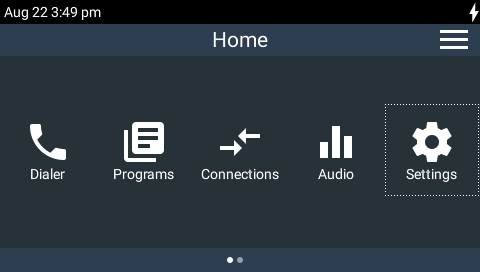
2.Tap to expand the Display and Power Management menu and then tap Display  .
.

3.Tap the On/Off button to toggle between enabling and disabling Screen Sleep (default setting On).
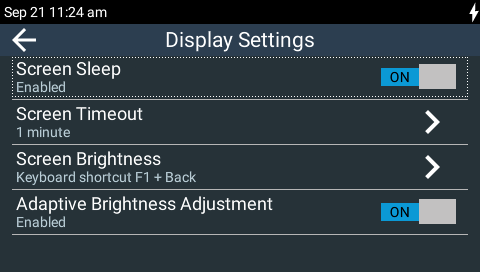
4.Tap Screen Timeout to adjust the number of minutes, then tap Done in the top right-hand corner of the TOUCH SCREEN.

5.Tap Screen Brightness and then use the left  and right
  NAVIGATION buttons to adjust brightness.
6.Tap the On/Off button to toggle between enabling and disabling Adaptive Brightness Adjustment (default setting On). Note: The codec has an ambient light sensor and is able to adjust optimum screen brightness automatically when this feature is enabled.
Advanced Power Management
Other ways to conserve battery power when operating without a power supply include the following:
Power Management Mode |
Explanation |
Audio Power Setting (default setting High) |
Power consumption can be reduced by lowering the audio output threshold from +22dBU to +16dBU. Tap Audio Power Setting to make this adjustment |
Low Battery Screen Power Saving (default setting On) |
This feature is activated when the battery charge level is 15%. The TOUCH SCREEN brightness is reduced and 'sleep mode' is enabled with a 1 minute time-out. This setting overrides the Screen Timeout setting in the Display |
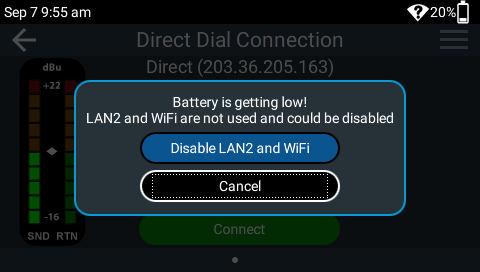
Low Battery Network Power Saving (default setting On) |
This feature is activated when the battery charge level is 20%. The codec launches a dialog suggesting any unused network interfaces be disabled to conserve power.
If LAN2 is being used and LAN1 is inactive, a dialog will appear and suggest switching to LAN1 as this consumes less power. |
|
Caution: Low power mode lowers the threshold at which audio will distort. Ensure audio levels do not exceed -6dBFS (+16dBU) in this mode of operation. |
To adjust these settings:
1.Press the HOME ![]() button to return to the Home screen, then tap Settings .
button to return to the Home screen, then tap Settings .
2.Tap to expand the Display and Power Management menu and then tap Power Manager .
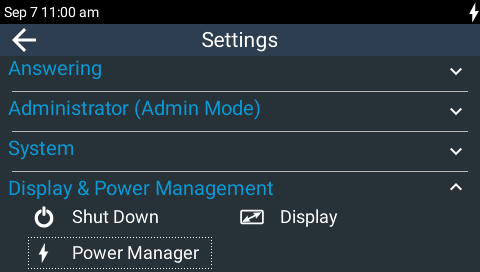
3.Tap to adjust each option.

