The following sections provide an overview of the different configuration panels available within the codec's HTML5 Toolbox Web-GUI. Navigate with the mouse pointer to the Menu bar at the top of the Web-GUI screen and click to select and open each panel in turn.

HTML GUI Menu Bar for Opening Panels
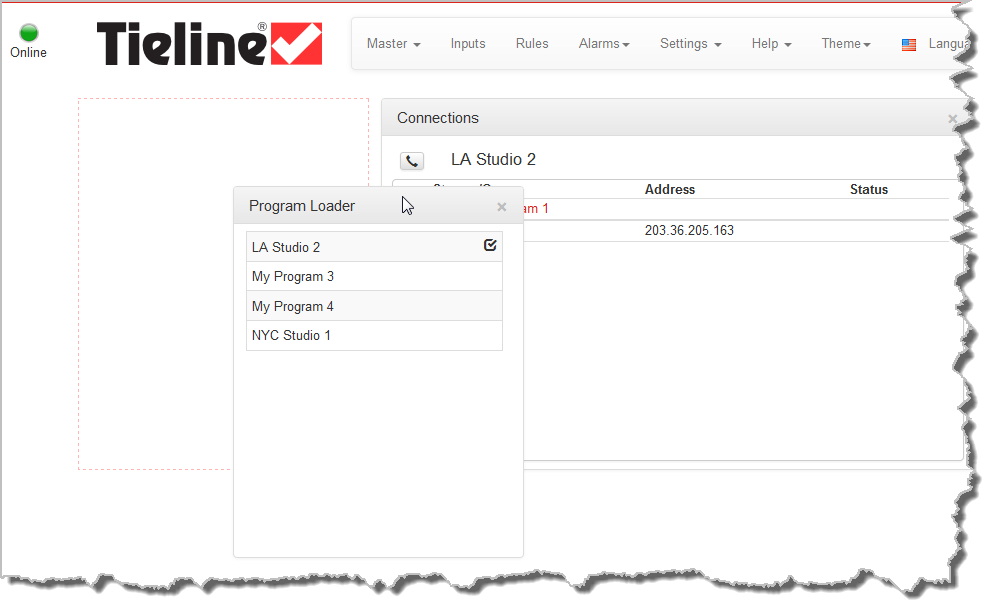
When you first open the HTML5 Toolbox Web-GUI the Program Loader panel, Connections panel and PPMs panel are loaded by default. If you retain cookies in your browser, any panels opened previously in the Web-GUI are automatically populated when you log in next. The default panel view is displayed on login if cookies have been cleared.
Adjusting the Theme
To adjust the Theme or 'skin' of the HTML5 Toolbox Web-GUI, navigate to the Menu bar at the top of the screen and click Theme, then click to select your preferred option. Note: this manual uses the White theme for most images.

Opening a Panel & Adjusting Screen Position
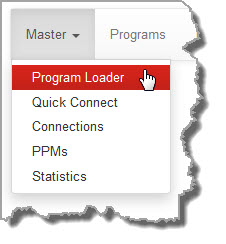
Click an item in the Menu bar to display available panel options, then click to select and open a panel. New panels automatically open in the top left of the screen.
Position the mouse pointer over a panel's Title bar and click and drag to move a panel and reposition it in a preferred screen position.
 Master Panels: Load Programs & Manage Audio Streams
Program Loader Panel
|
Feature
|
Description
|
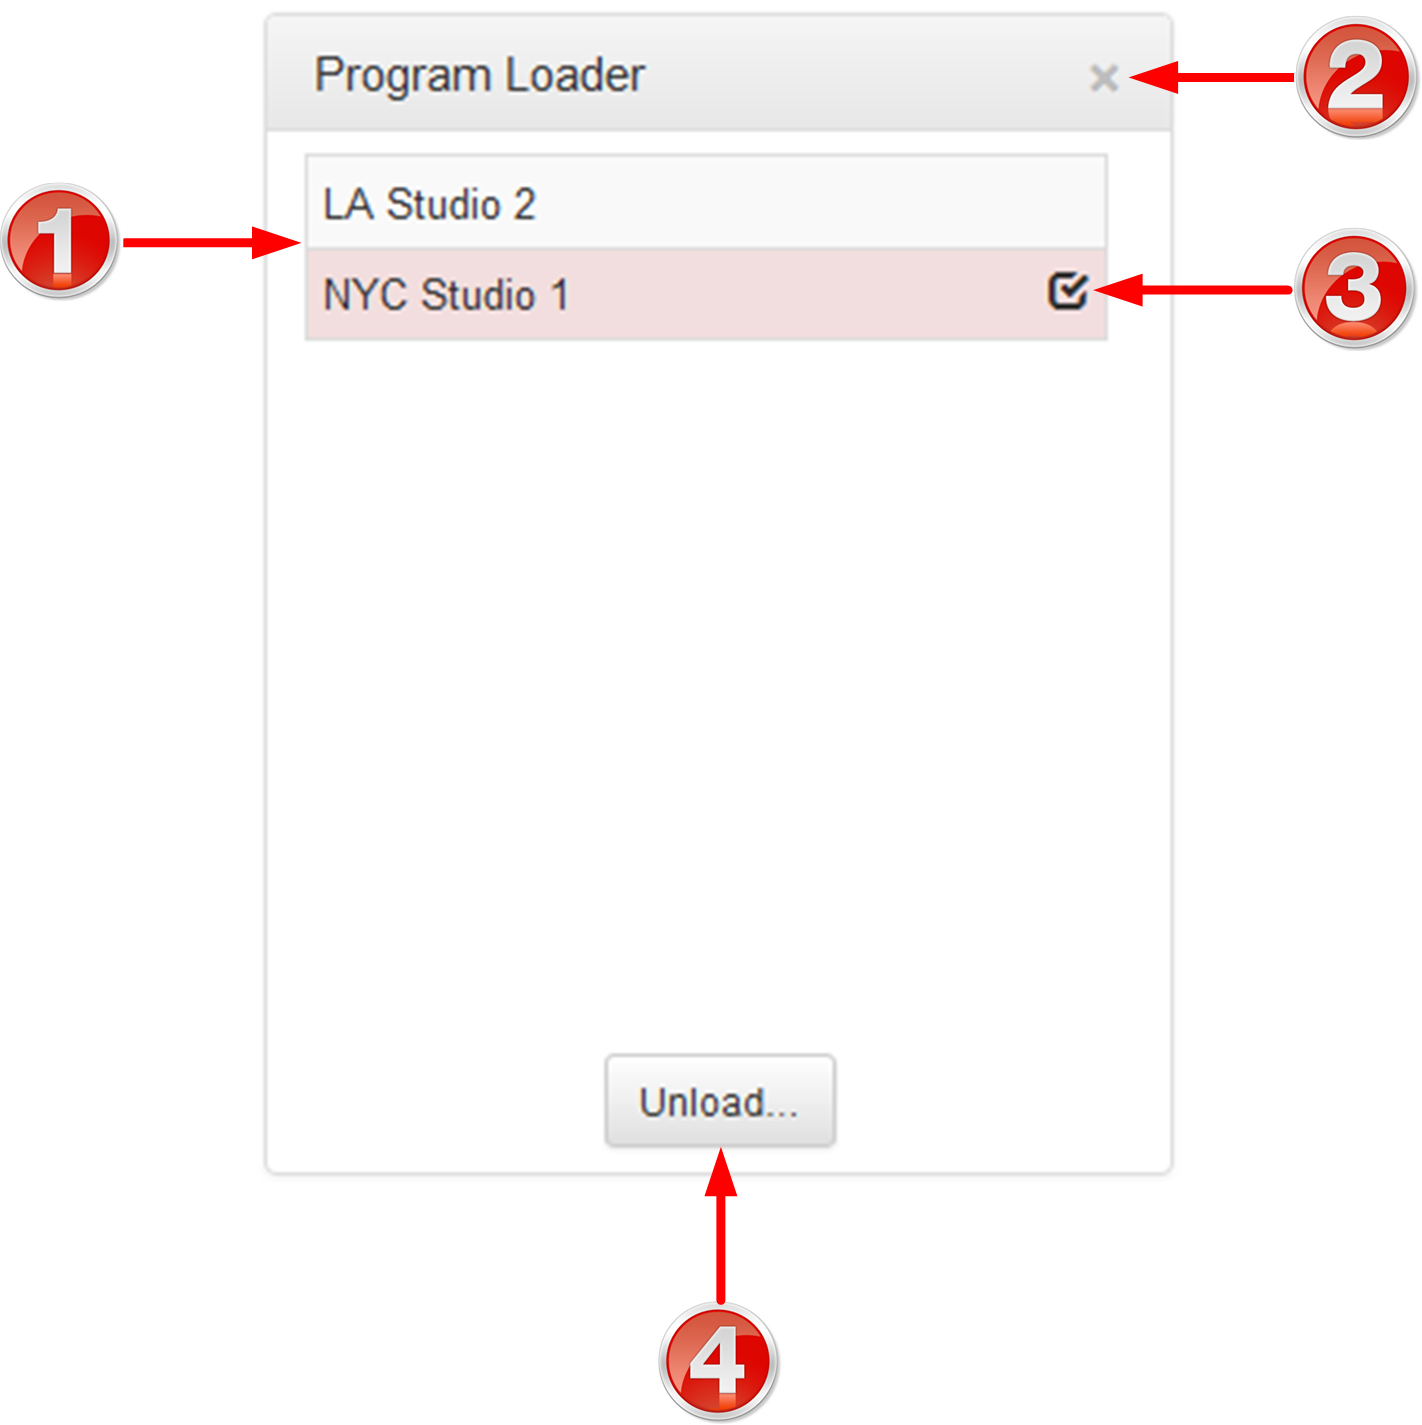
1
|
Programs list
|
Lists all configured programs which have been added into the codec. Click to select a program before loading.
|
2
|
Close button
|
Click to close the panel.
|
3
|
Check-box symbol
|
The Check-box symbol identifies the currently loaded program in the codec.
|
4
|
Load and Unload button
|
Click Load to load the currently selected program in the Programs list; the button changes automatically to Unload after loading, to allow unloading of a program when required.
|
Connections Panel
|
Feature
|
Description
|
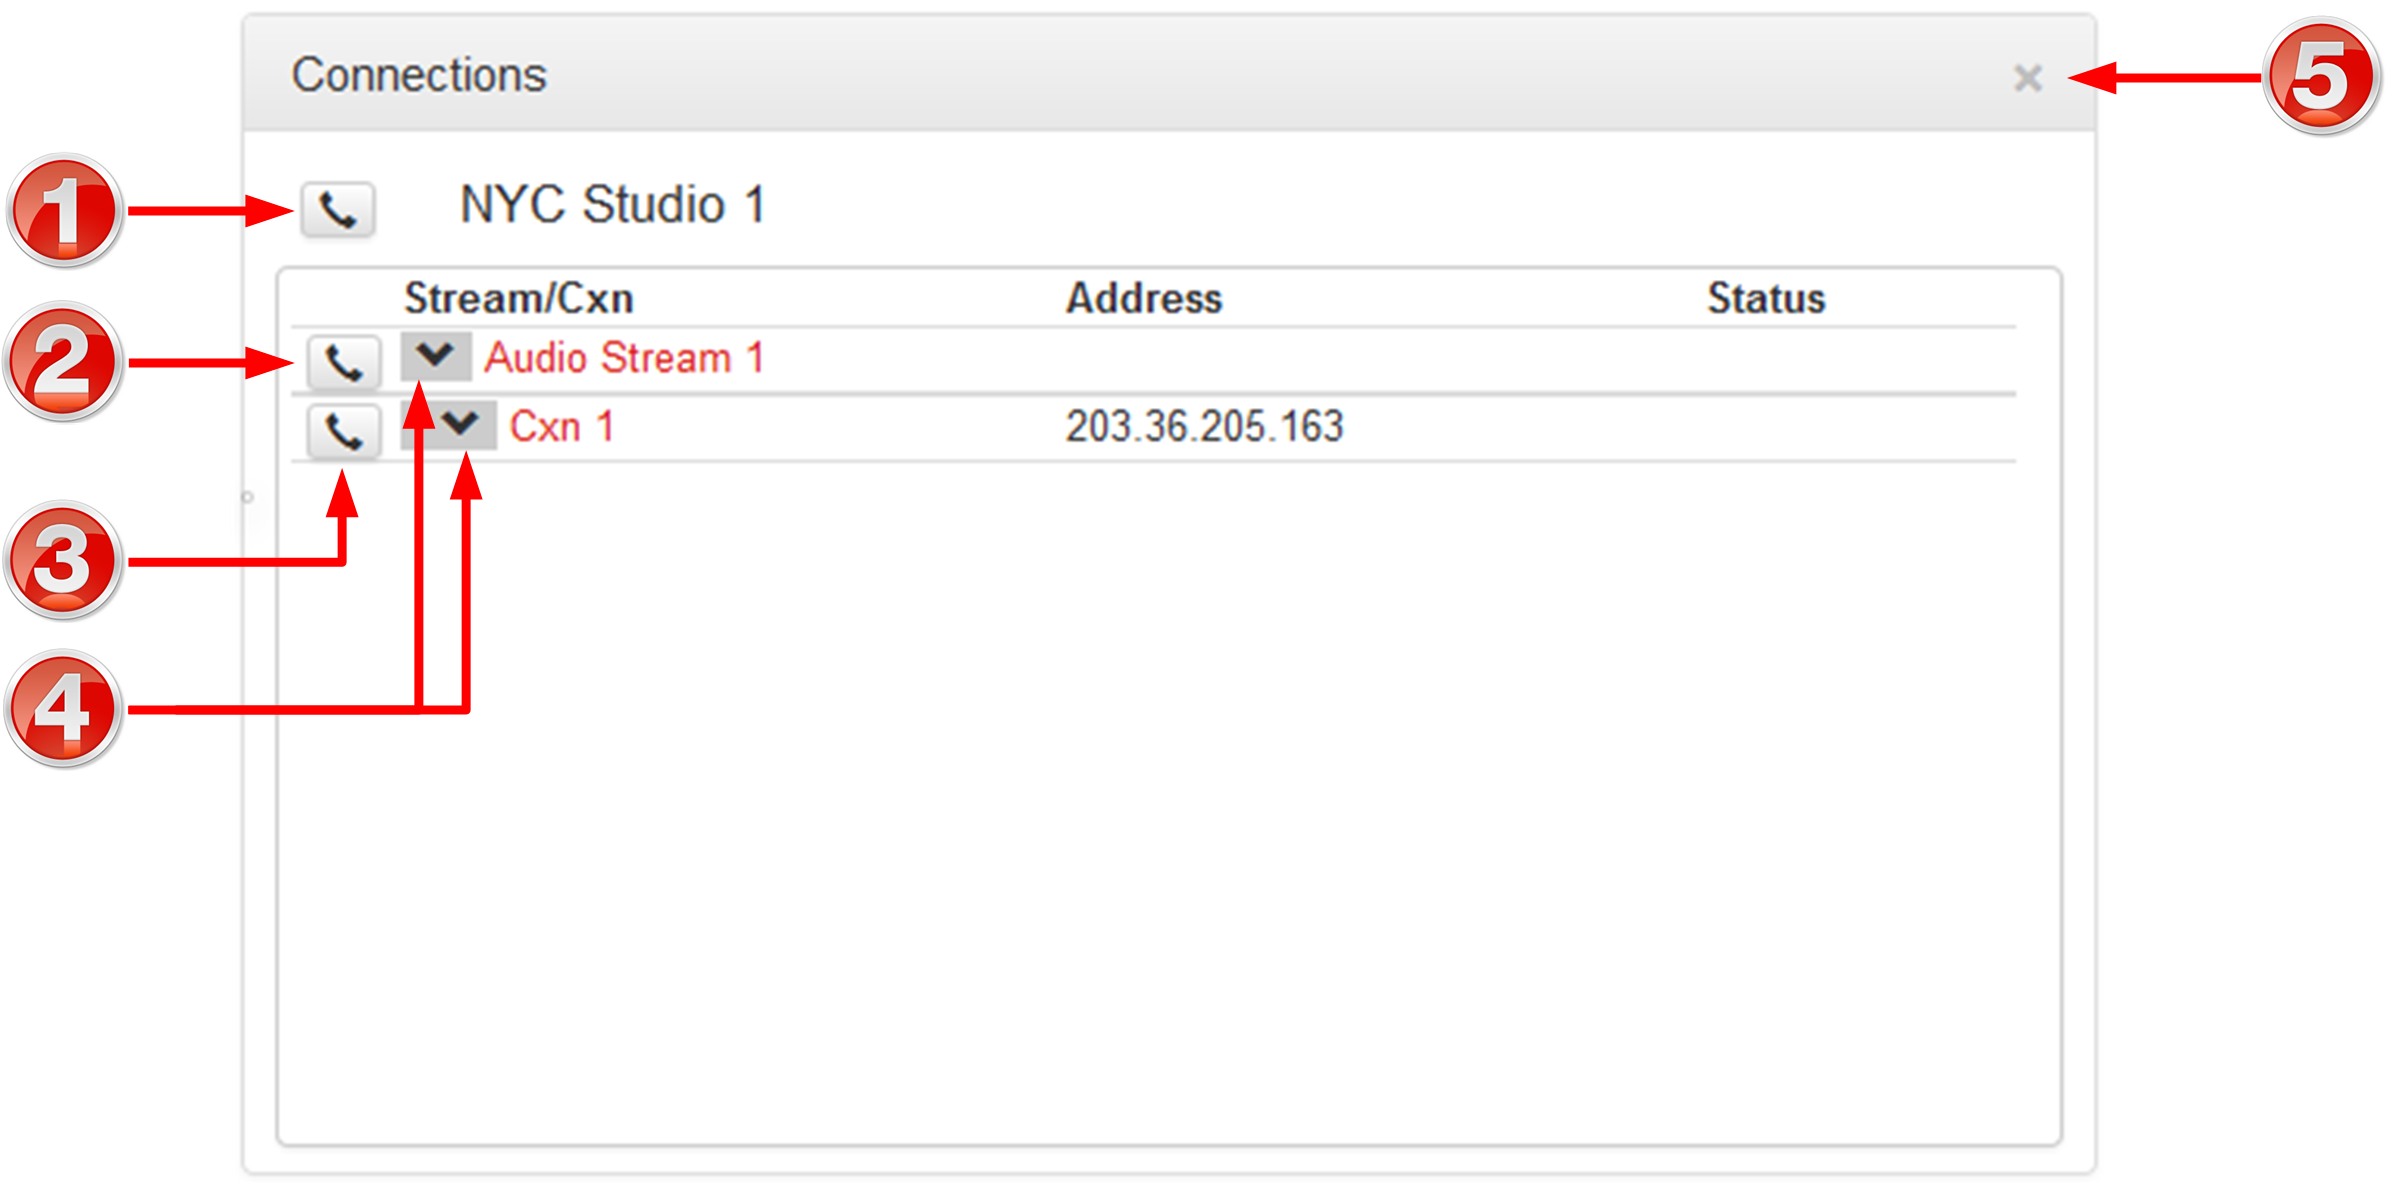
1
|
Program Connect/Disconnect button
|
Click to connect/disconnect all audio streams in a program.
|
2
|
Audio Stream Connect/Disconnect button
|
Click to connect/disconnect all connections in an audio stream.
|
3
|
Connection Connect/Disconnect button
|
Click to connect/disconnect an individual connection.
|
4
|
Show/Hide Arrow
|
Click to show/hide audio stream and connection details.
|
5
|
Close button
|
Click to close the panel.
|
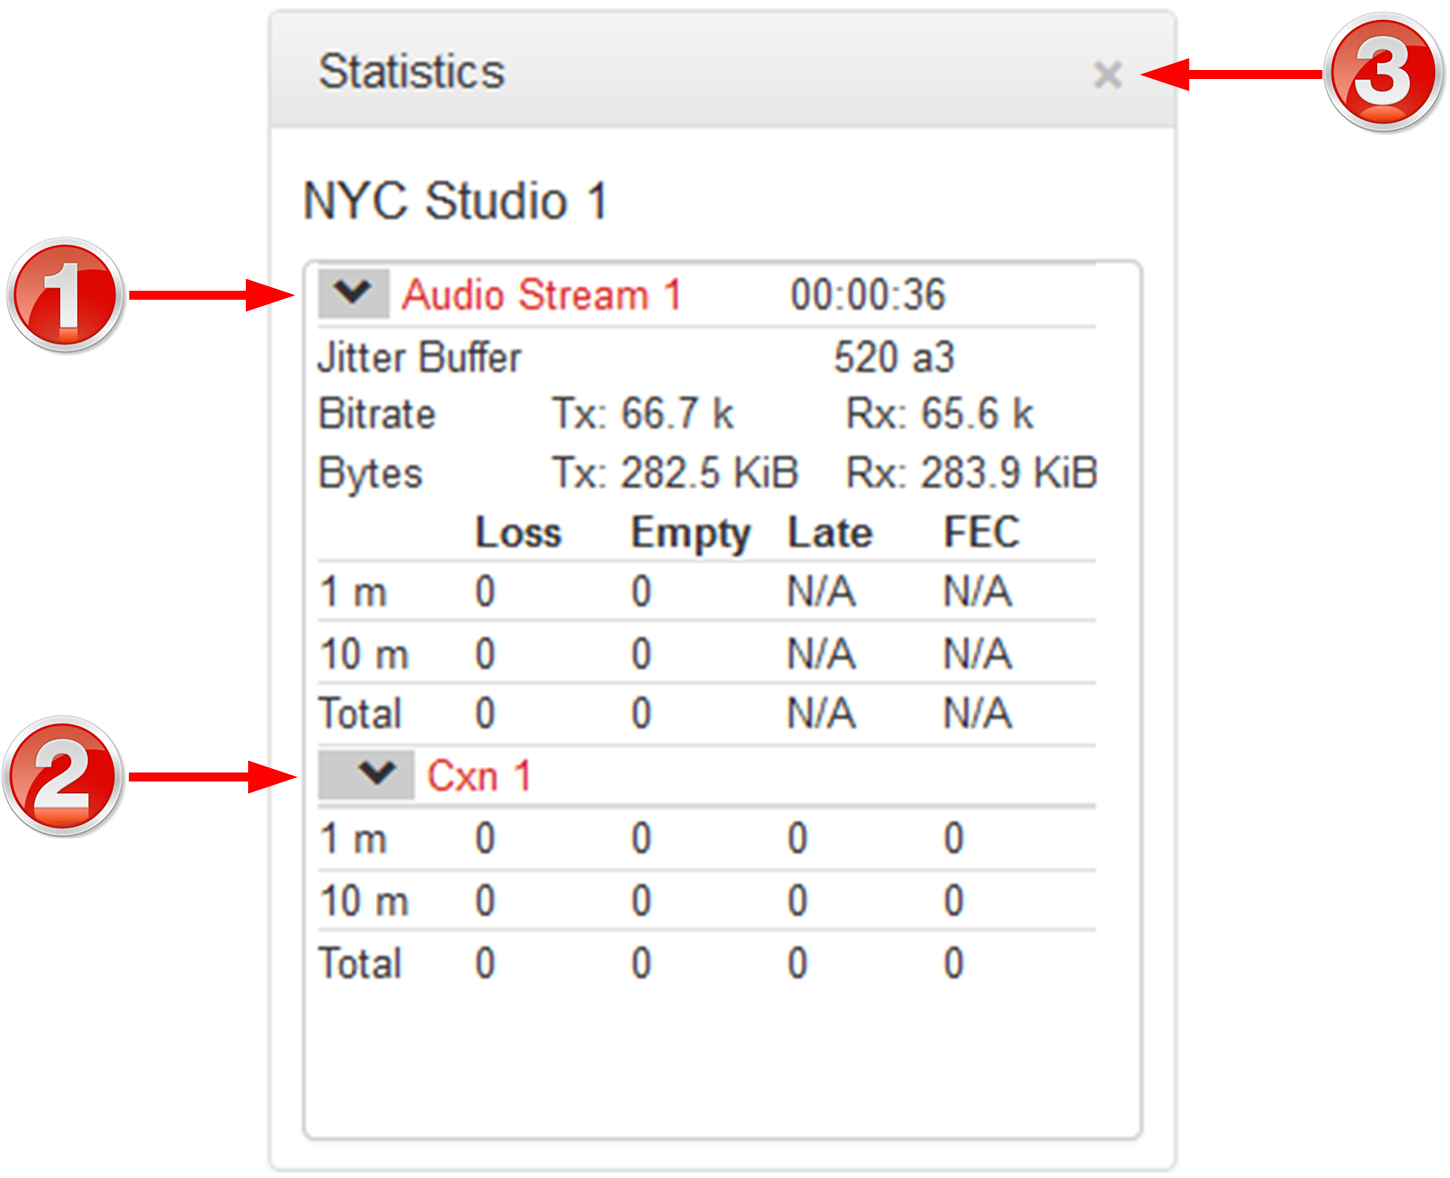
Statistics Panel
|
Feature
|
Description
|
1
|
Show/Hide Arrow
|
Click to show/hide audio stream statistics.
|
2
|
Show/Hide Arrow
|
Click to show/hide individual connection statistics.
|
3
|
Close button
|
Click to close the panel.
|
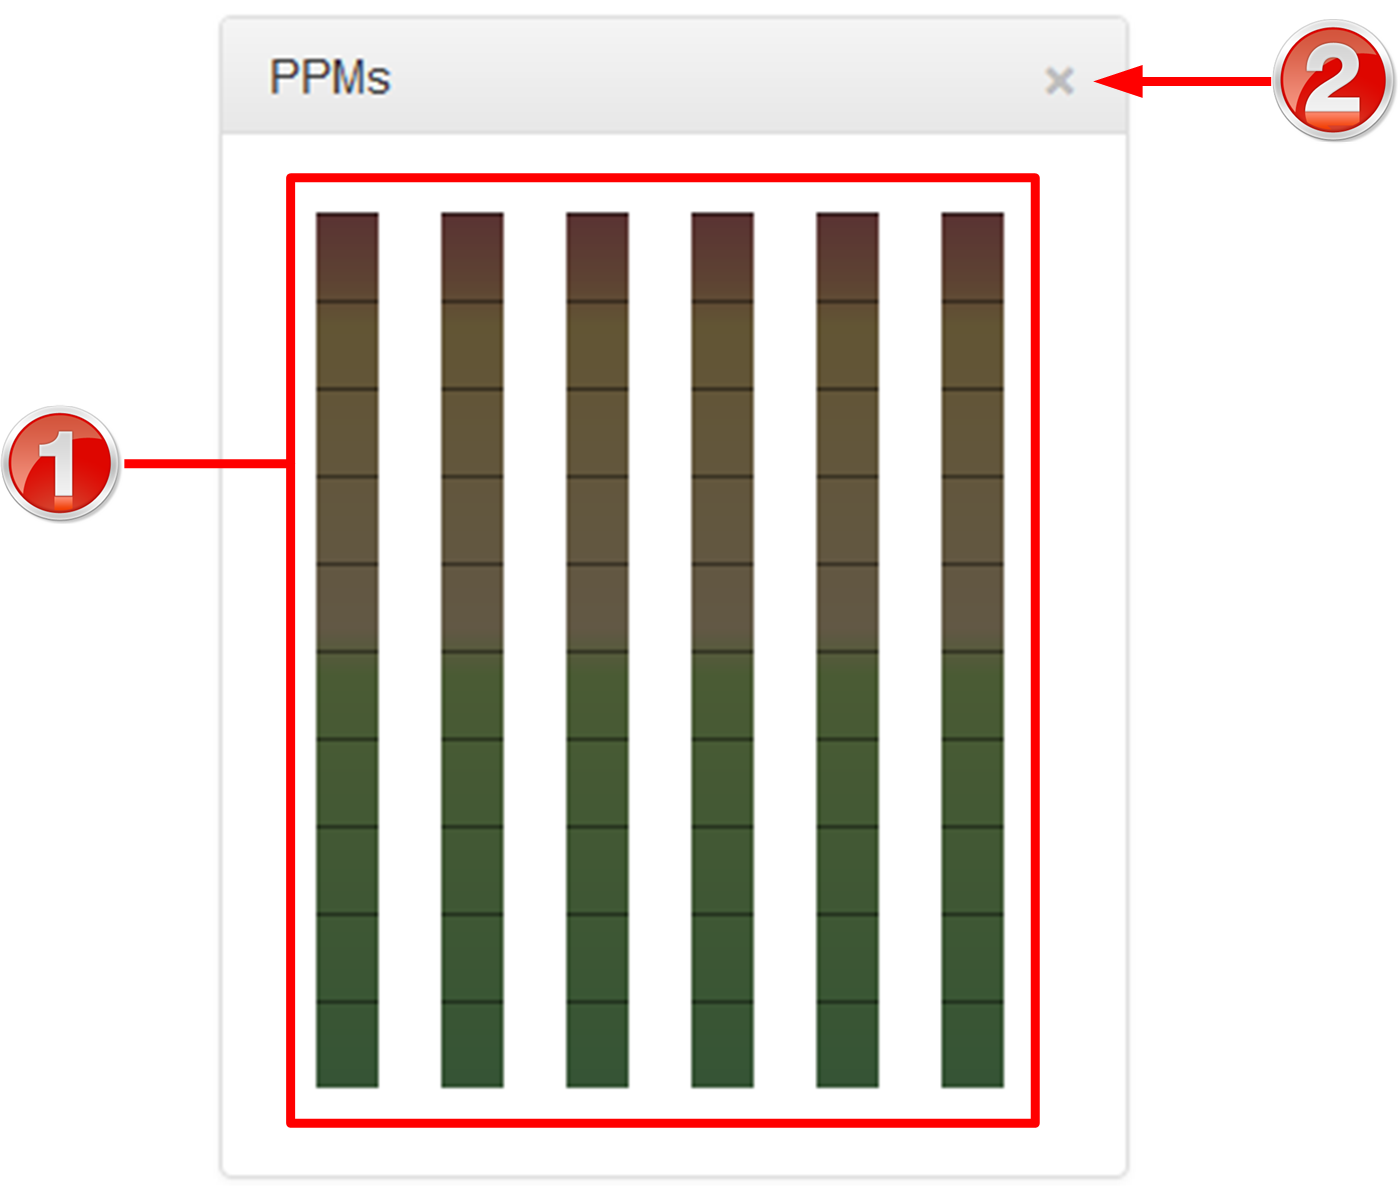
PPMs Panel
|
Feature
|
Description
|
1
|
PPM Meters
|
6 PPM meters.
|
2
|
Close button
|
Click to close the panel.
|
|
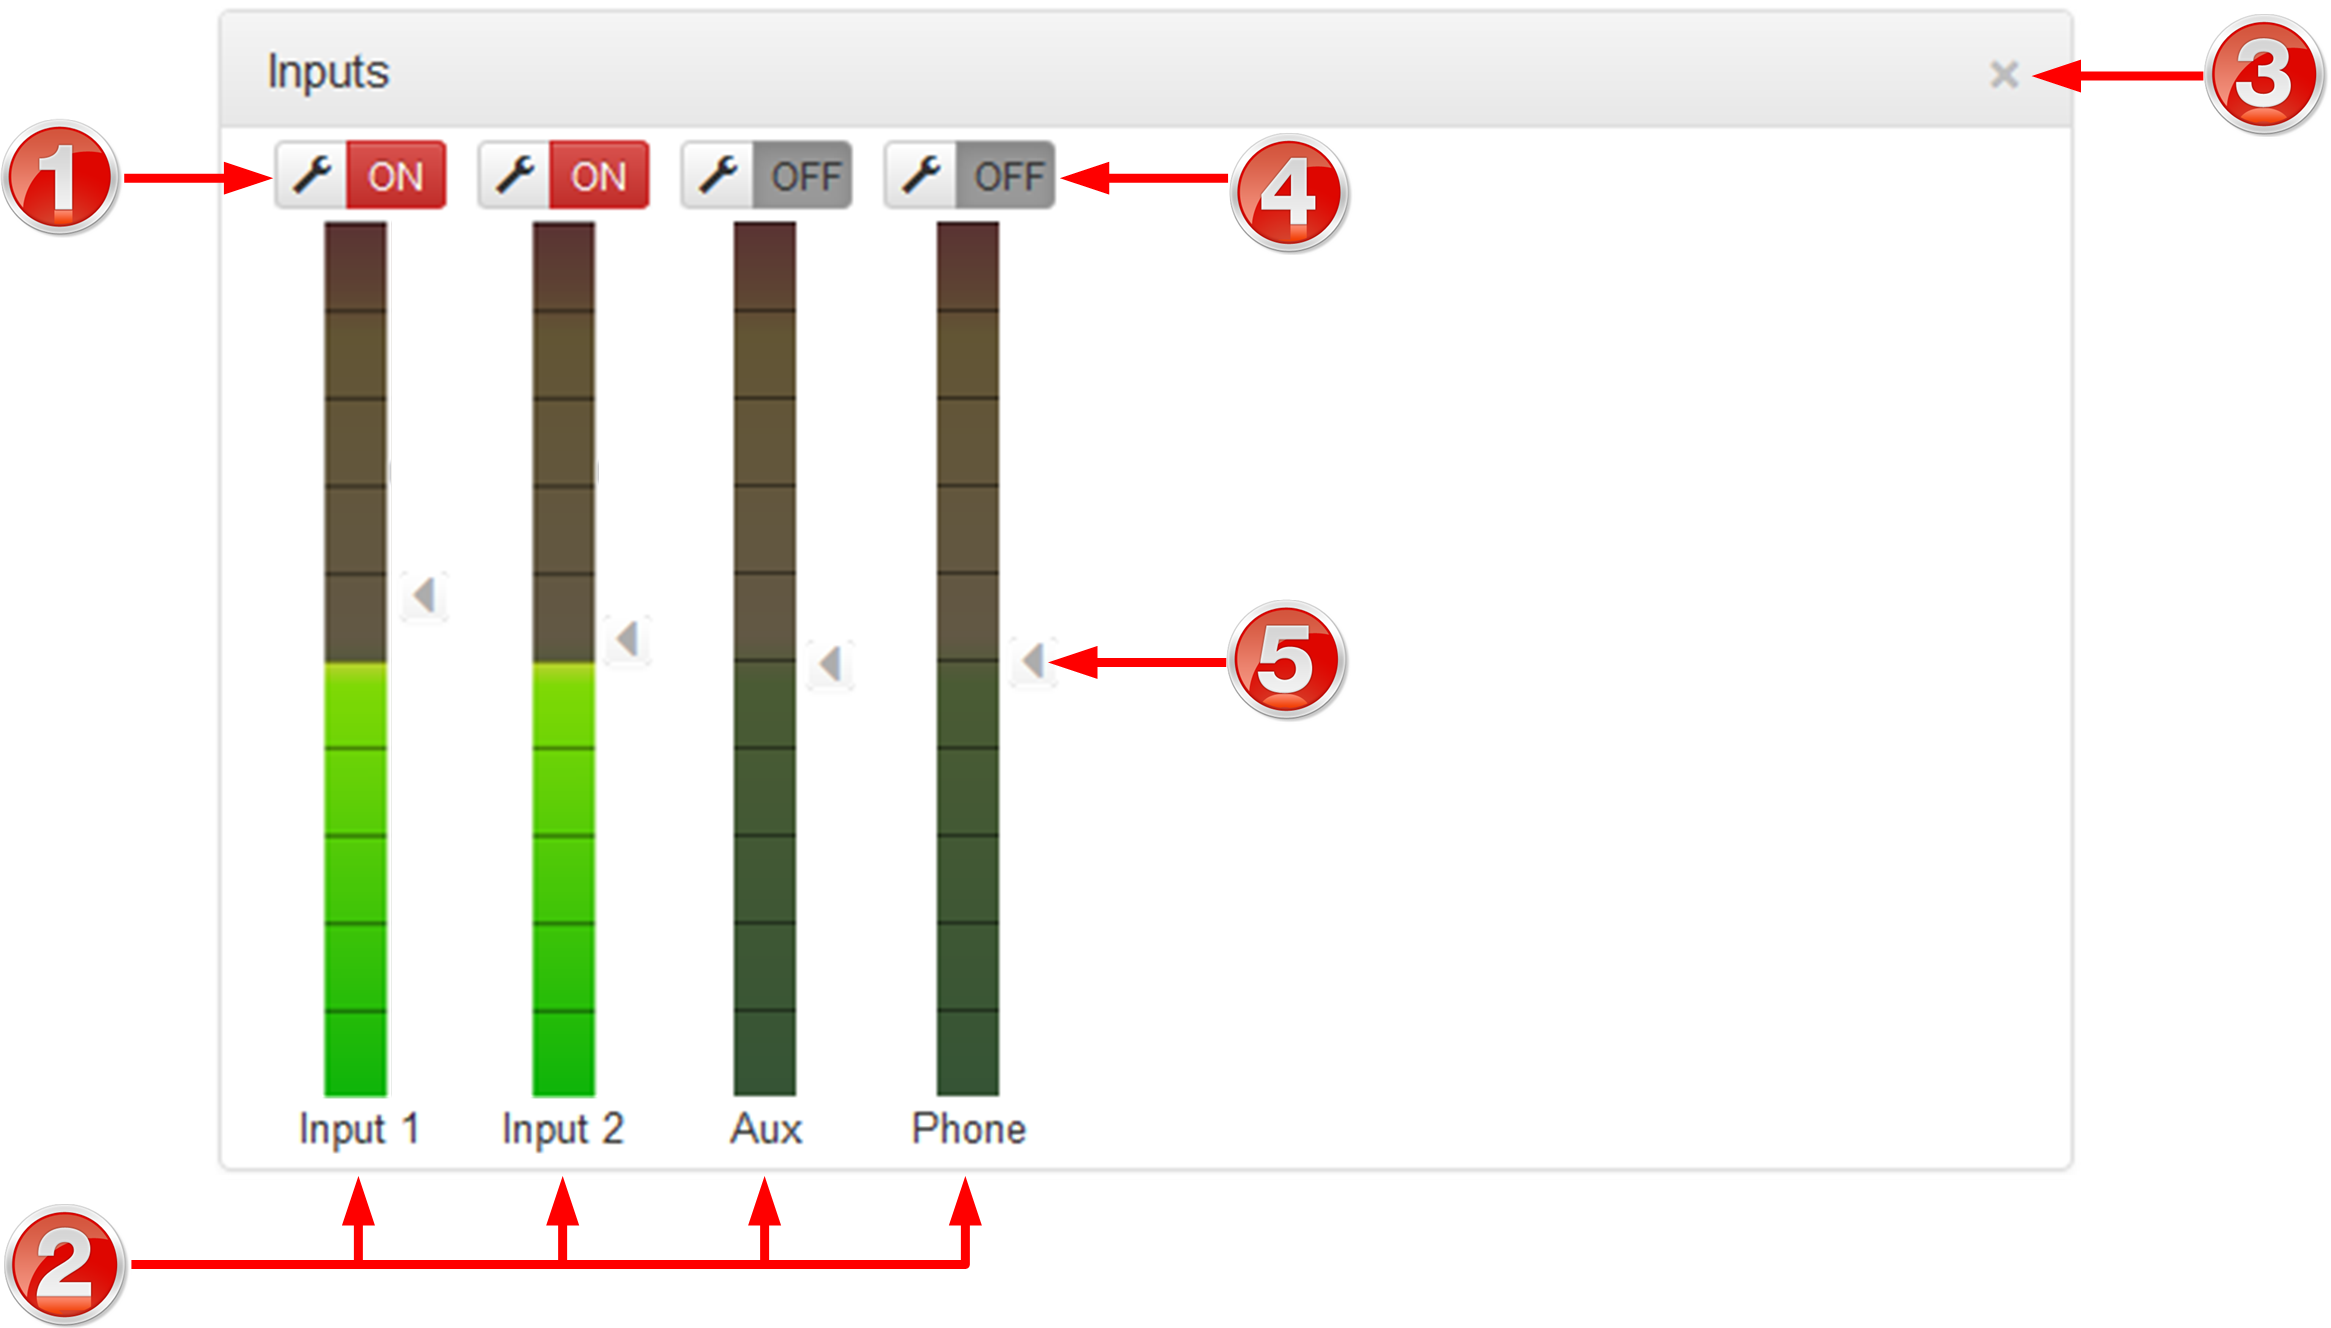
 Inputs Panel for Input Adjustments

|
Important Note: Tieline codecs have different input configurations, therefore the image shown may not reflect the number of inputs displayed in your codec Web-GUI.
|
|
Feature
|
Description
|
1
|
Settings button
|
Click to adjust input Name, Type and IGC.
|
2
|
Input PPM meter
|
Input PPM meter.
|
3
|
Close button
|
Click to close the panel.
|
4
|
On/Off button
|
Click to toggle an input on or off.
|
5
|
Input Sliders/Faders
|
Input gain control sliders/faders.
|
|
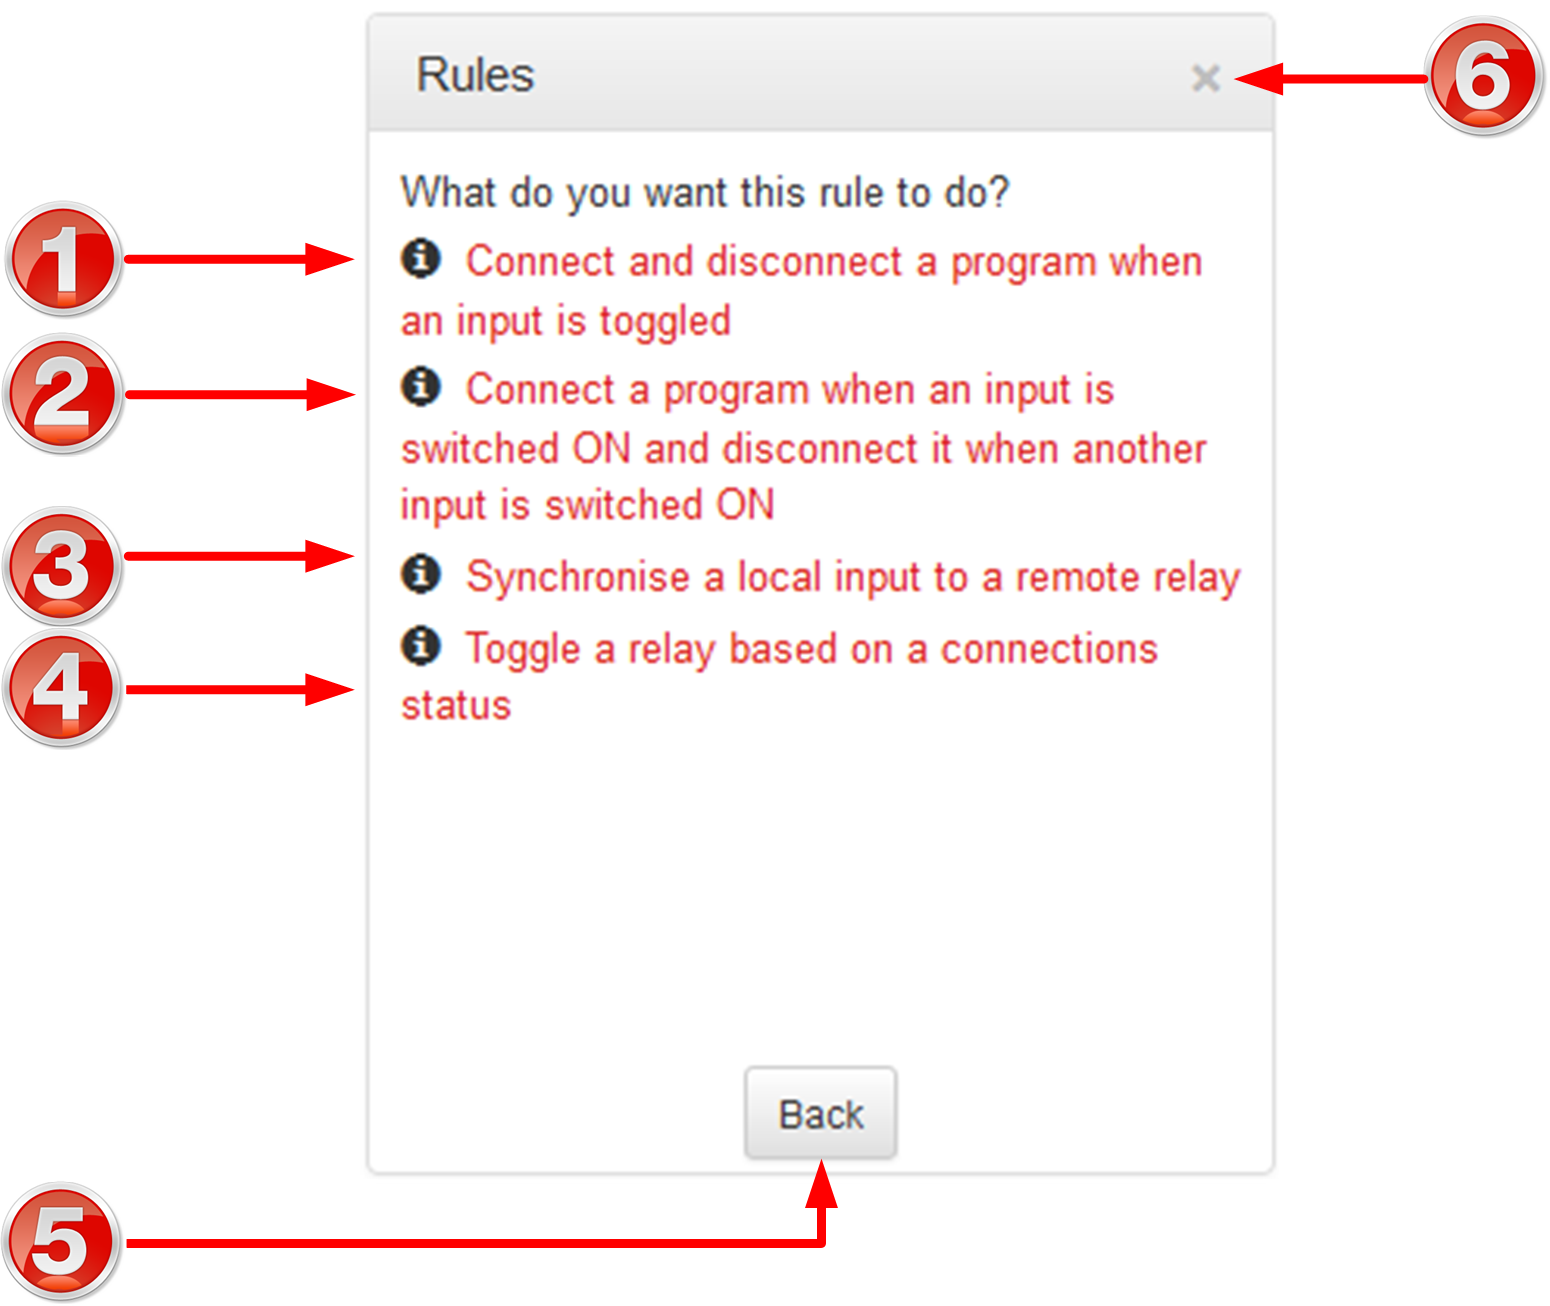
 Rules Panel for Creating Relay Activation Rules
|
Rule
|
Description
|
1
|
Connect and disconnect a program when an input is toggled
|
Click to configure connection and disconnection by toggling an input.
|
2
|
Connect when an input is switched ON; Disconnect when another input is switched ON
|
Click to configure connection and disconnection after different relay inputs are switched ON.
|
3
|
Synchronise a local relay input with a remote relay output
|
Click to configure a local relay input to synchronise with the state of a remote relay output.
|
4
|
Toggle a relay based on a connection's status
|
Click to configure a relay to toggle based on connection status.
|
5
|
Back / Add New Rule button
|
Click to add a new rule, or exit the rule creation function.
|
6
|
Close button
|
Click to close the panel.
|
|
 Alarm Panels: Configure & Monitor Alarms
Configure Alarms Panel

|
Feature
|
Description
|
1
|
List of alarm types
|
Click to select an alarm type to configure.
|
2
|
Scroll bar
|
Click and drag the scroll bar to view all listed alarms.
|
3
|
Enable Alarm check-box
|
Click the Enabled check-box to enable the currently selected alarm.
|
4
|
Edit / Save button
|
Click to edit an alarm, or save configured alarm settings when in edit mode.
|
5
|
Alarm Severity Setting
|
Click the drop-down arrow to select an alarm severity setting.
|
6
|
Close button
|
Click to close the panel
|
Alarm Dissemination Panel
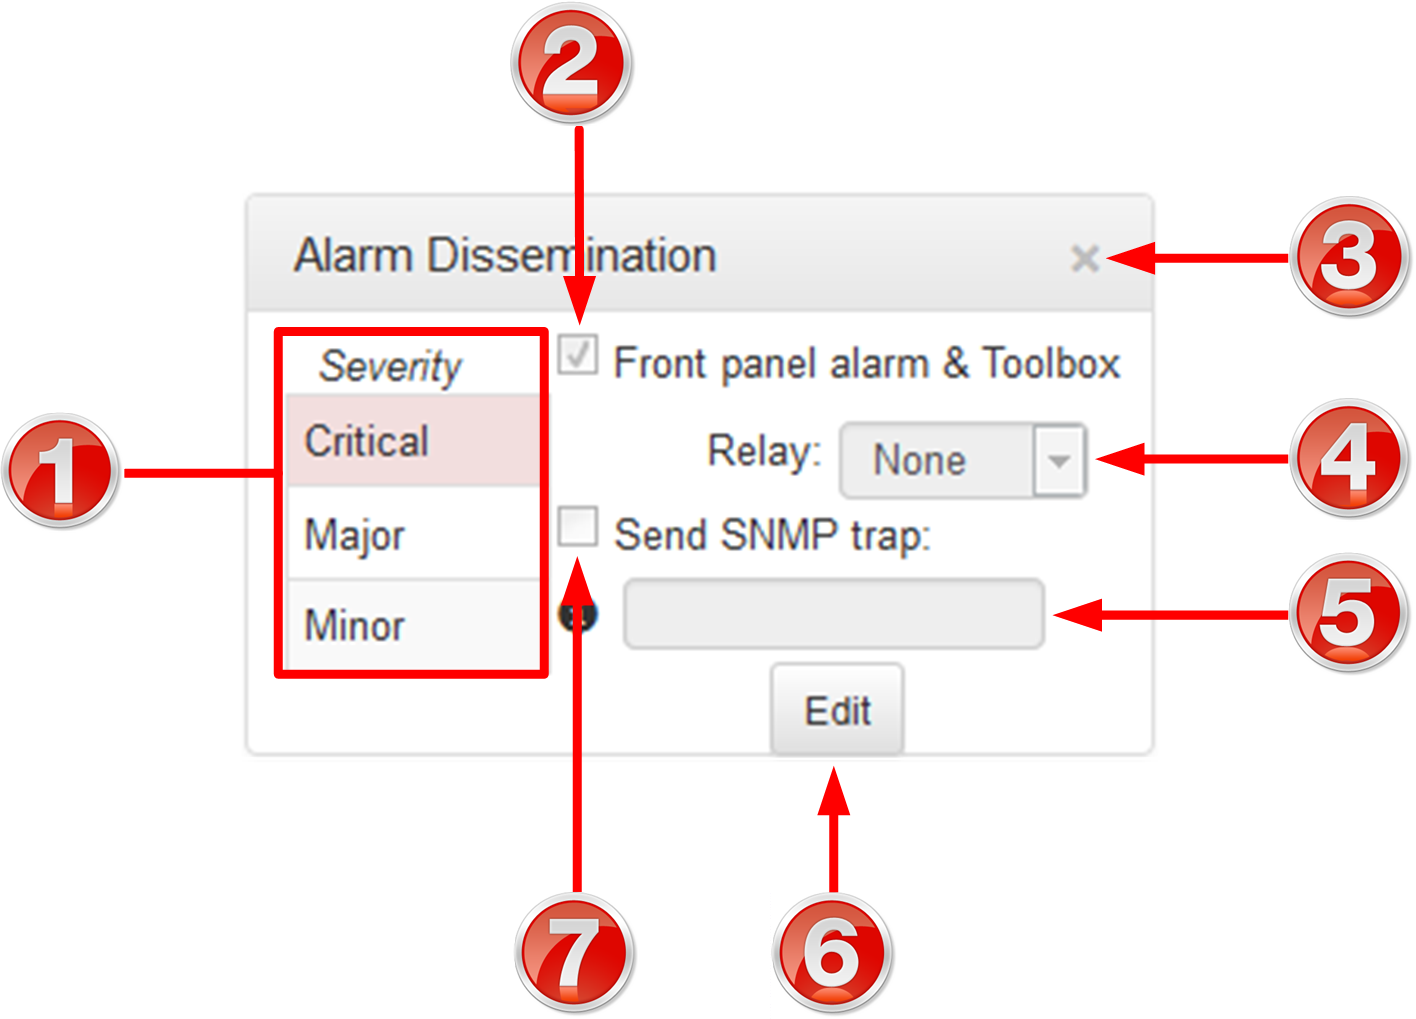
Alerts for each alarm severity level are configured using the Alarm Dissemination tab
|
Feature
|
Description
|
1
|
List of alarm severity levels
|
Click to select an alarm severity level to configure it.
|
2
|
Front panel alarm & Toolbox check-box
|
Select the check-box (default enabled) to deliver front panel ALARM LED notifications and HTML5 Toolbox Web-GUI alarm notifications.
|
3
|
Close button
|
Click to close the panel.
|
4
|
Relay drop-down selection
|
Click the drop-down arrow to select a relay to open when an alarm using the current severity level is activated.
|
5
|
SNMP Trap Target text-box
|
Click in the text box in edit mode to enter the SNMP trap target for alarms using the currently selected severity level.
|
6
|
Edit / Save button
|
Click to edit alarm dissemination settings, or save configured settings when in edit mode.
|
7
|
Send SNMP trap check-box
|
Select the check-box to enable SNMP traps to be sent (for alarms using the selected severity level).
|
Current Alarms
|
Feature
|
Description
|
1
|
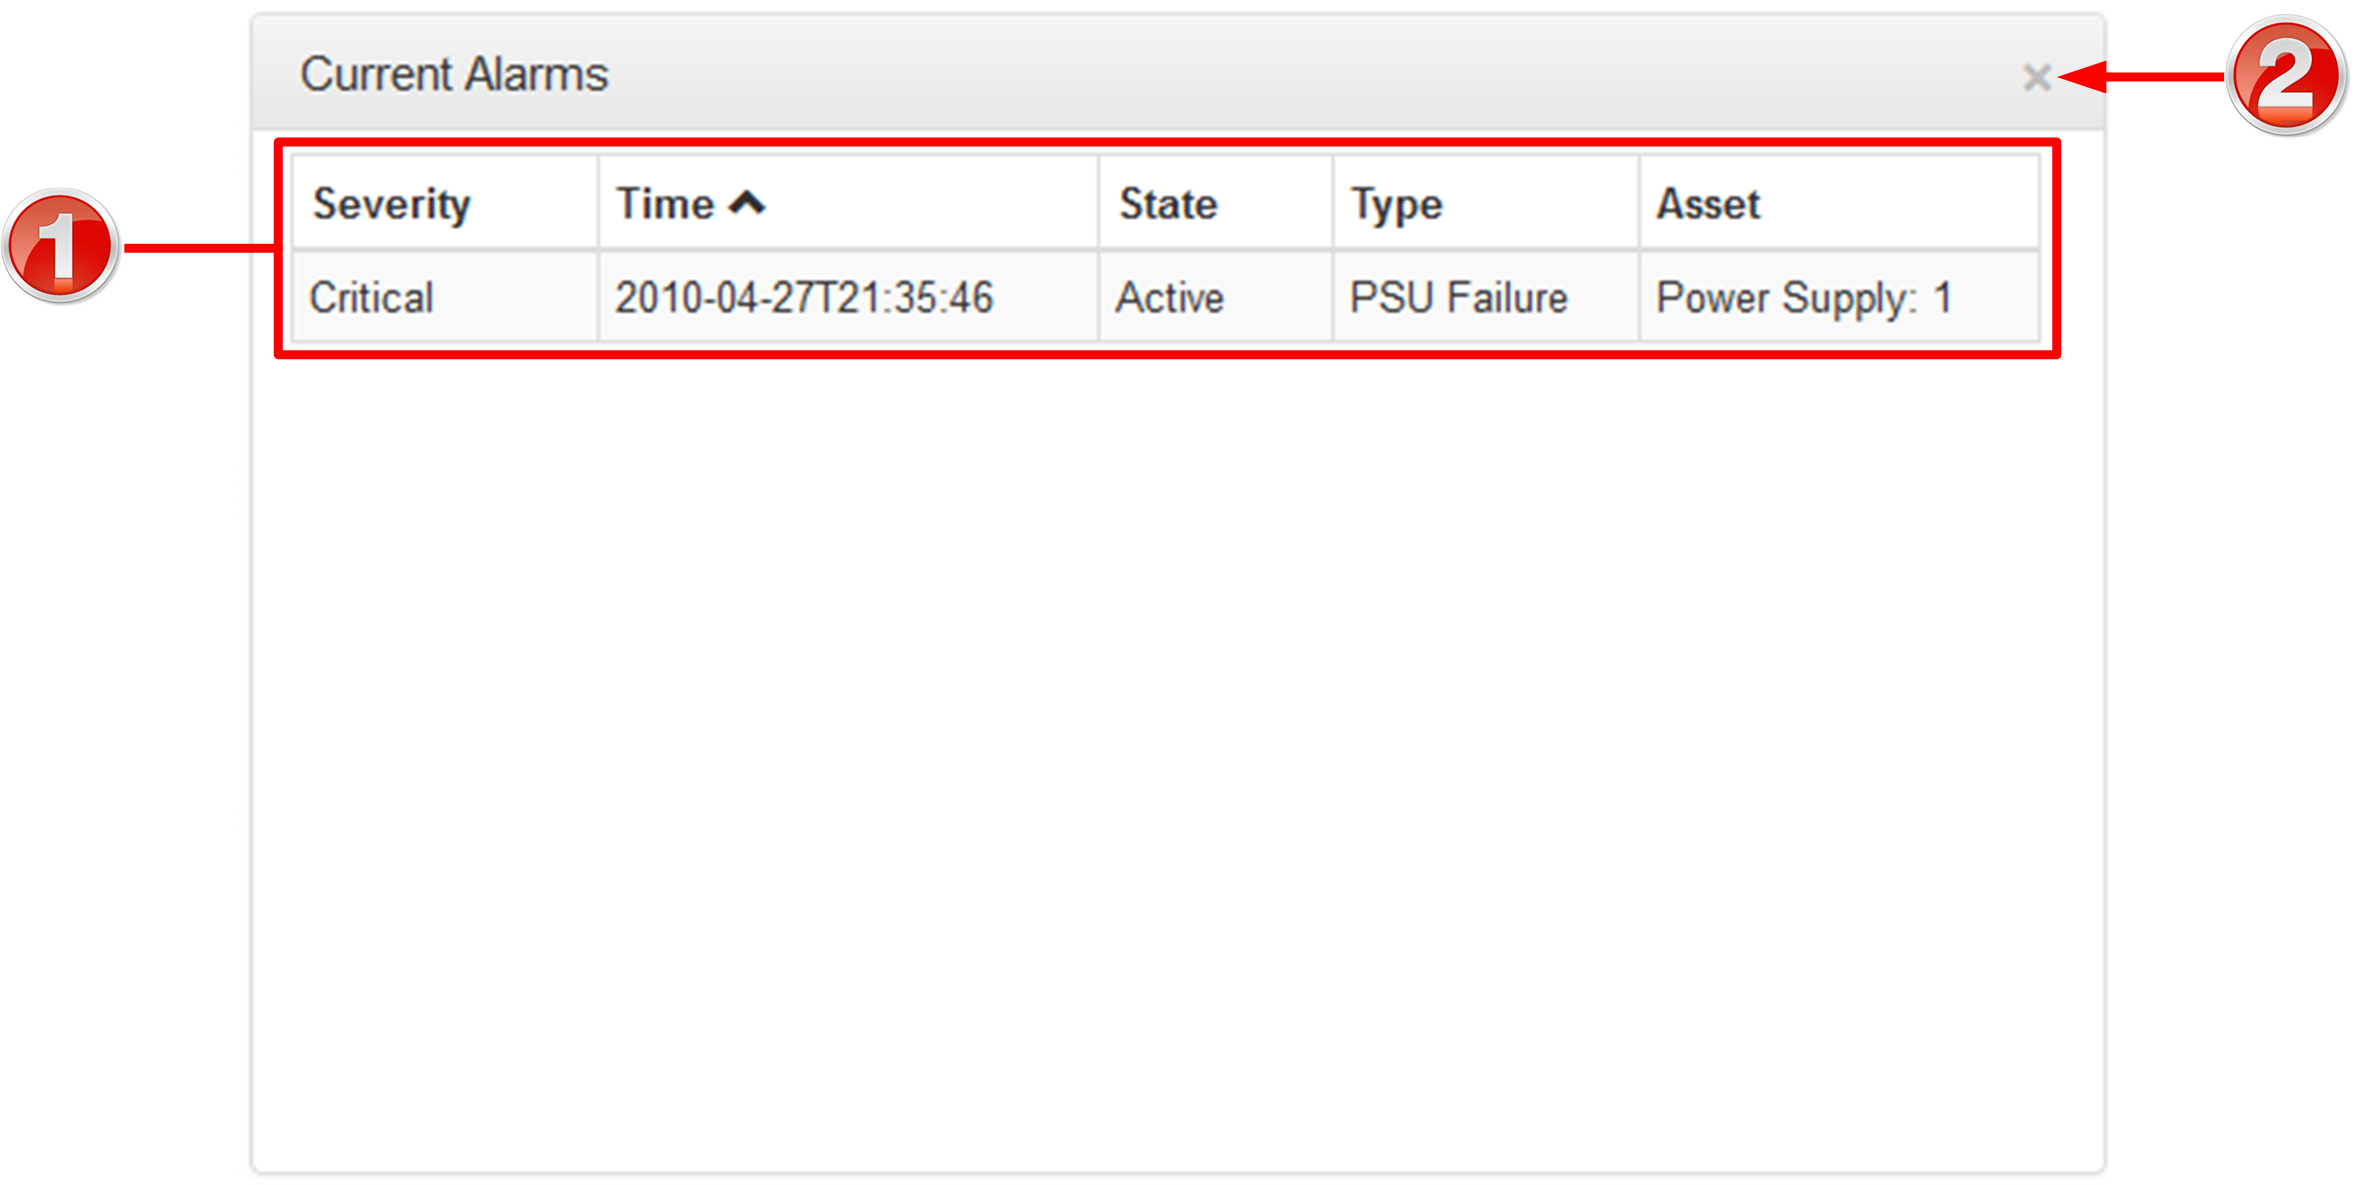
Current alarm description
|
View a list of active alarms in the codec
|
2
|
Close button
|
Click to close the panel
|
Alarm History
|
Feature
|
Description
|
1
|
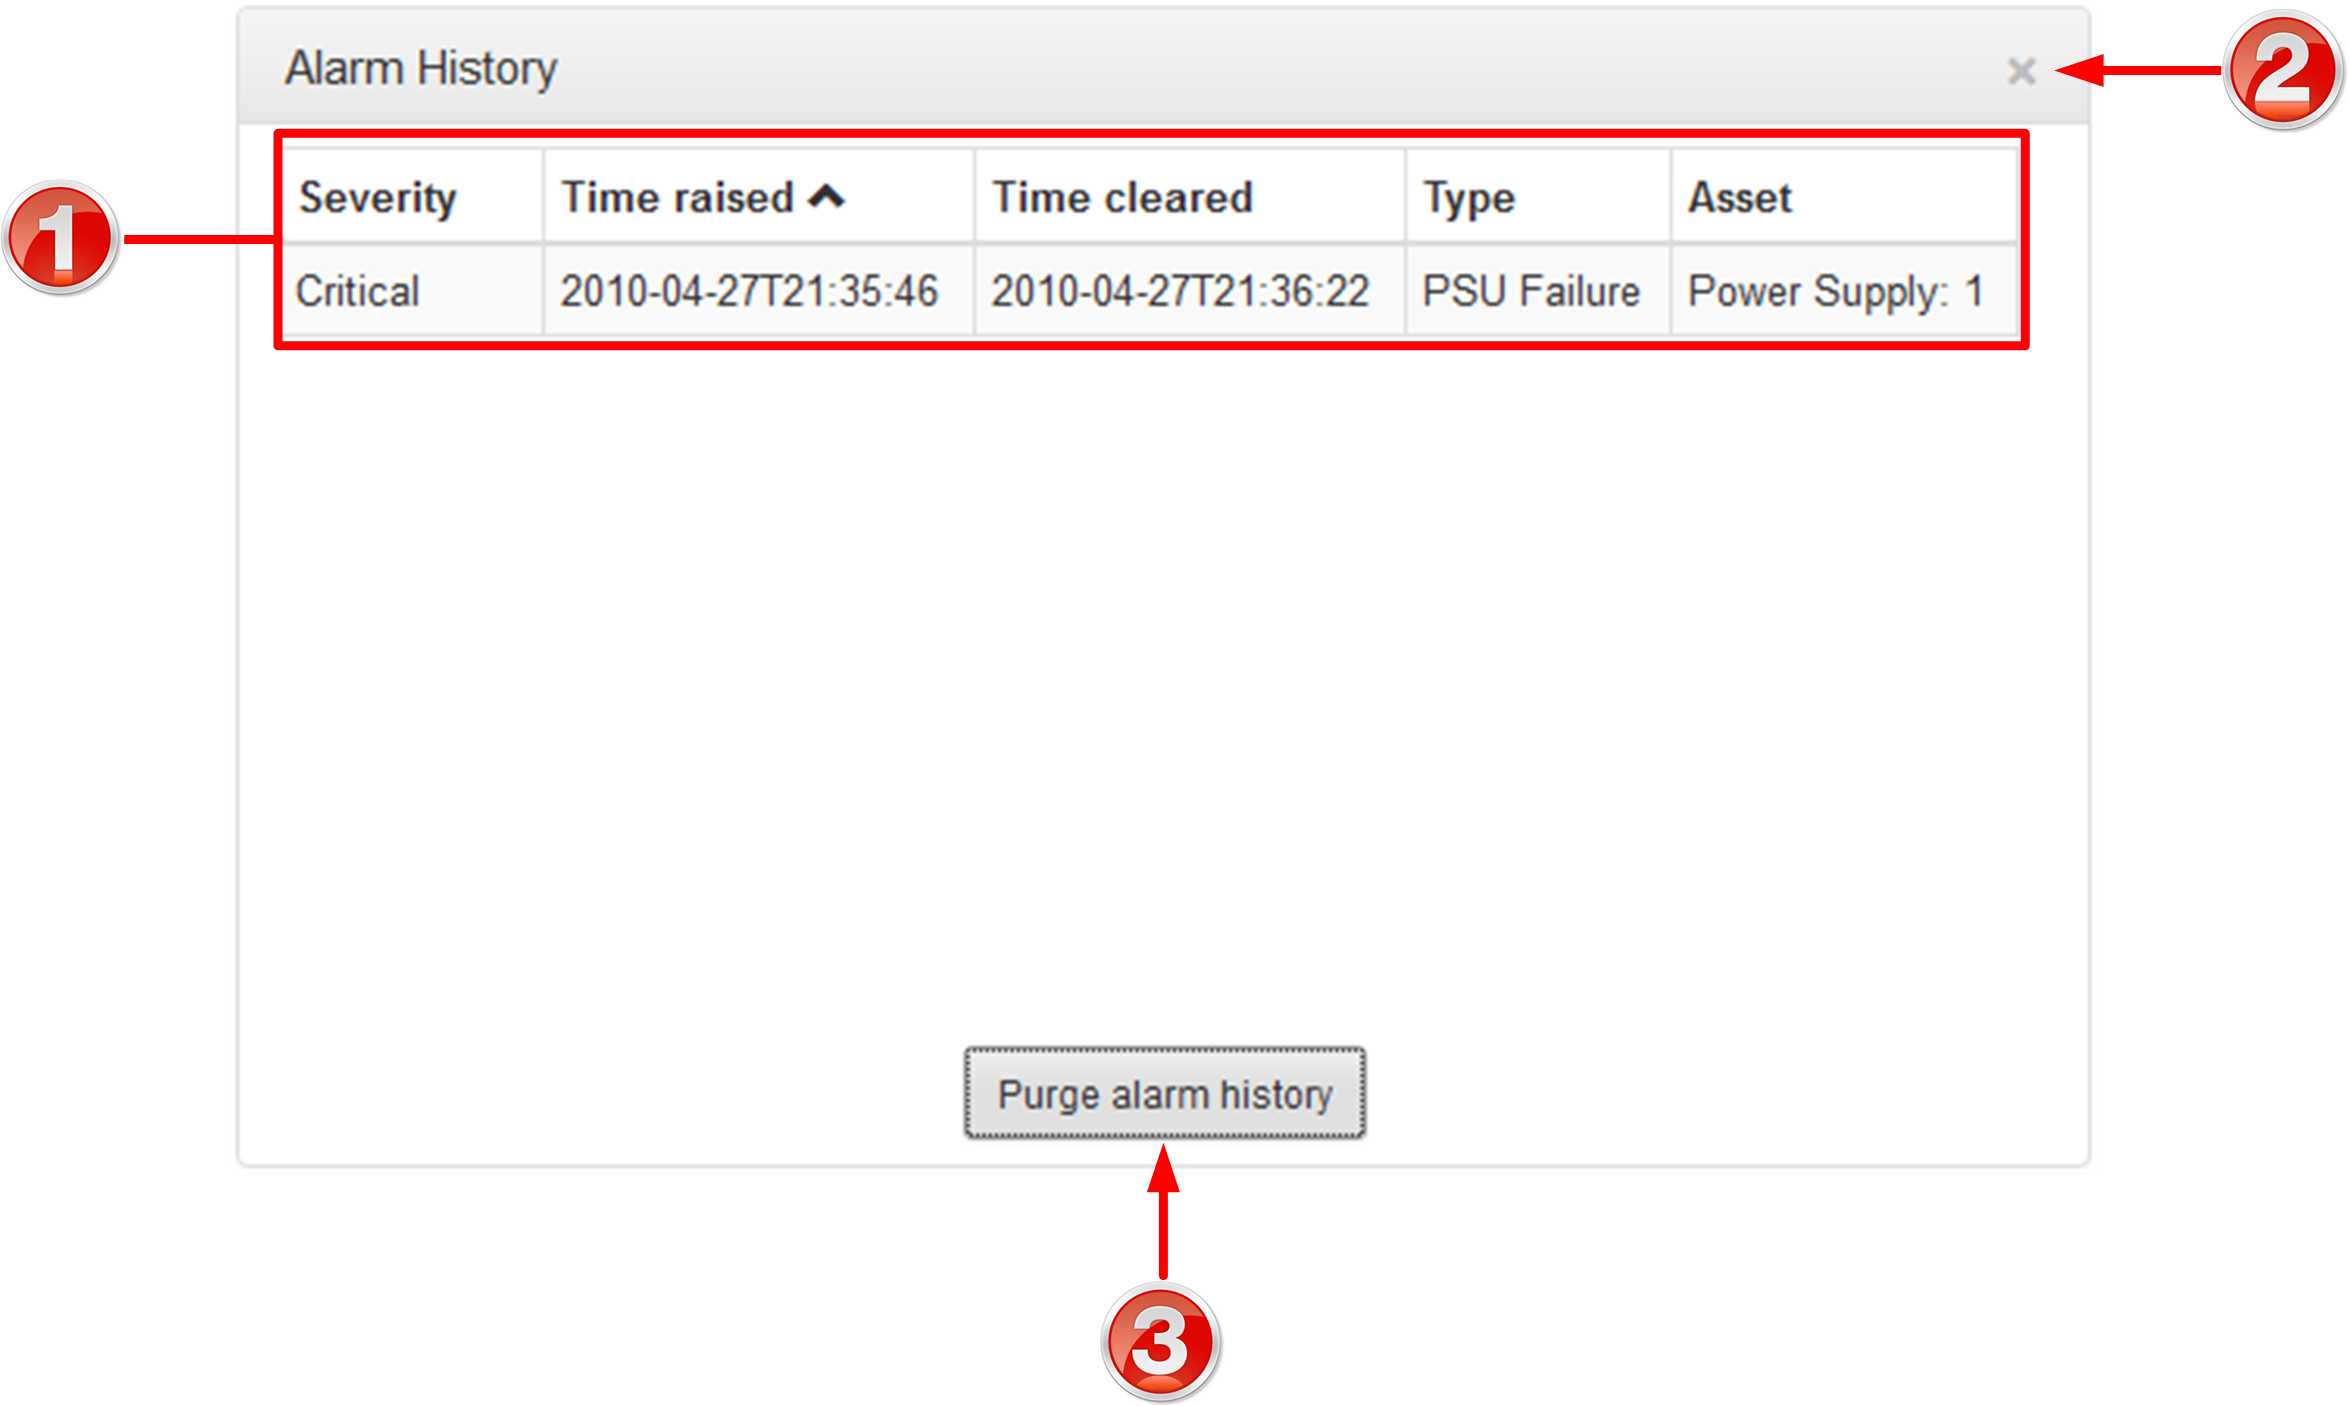
Alarm history description
|
View the history of previous alarms in the codec.
|
2
|
Close button
|
Click to close the Alarms panel.
|
3
|
Purge History button
|
Click to clear the alarm history.
|
|
 Settings Panels
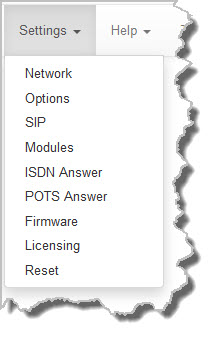
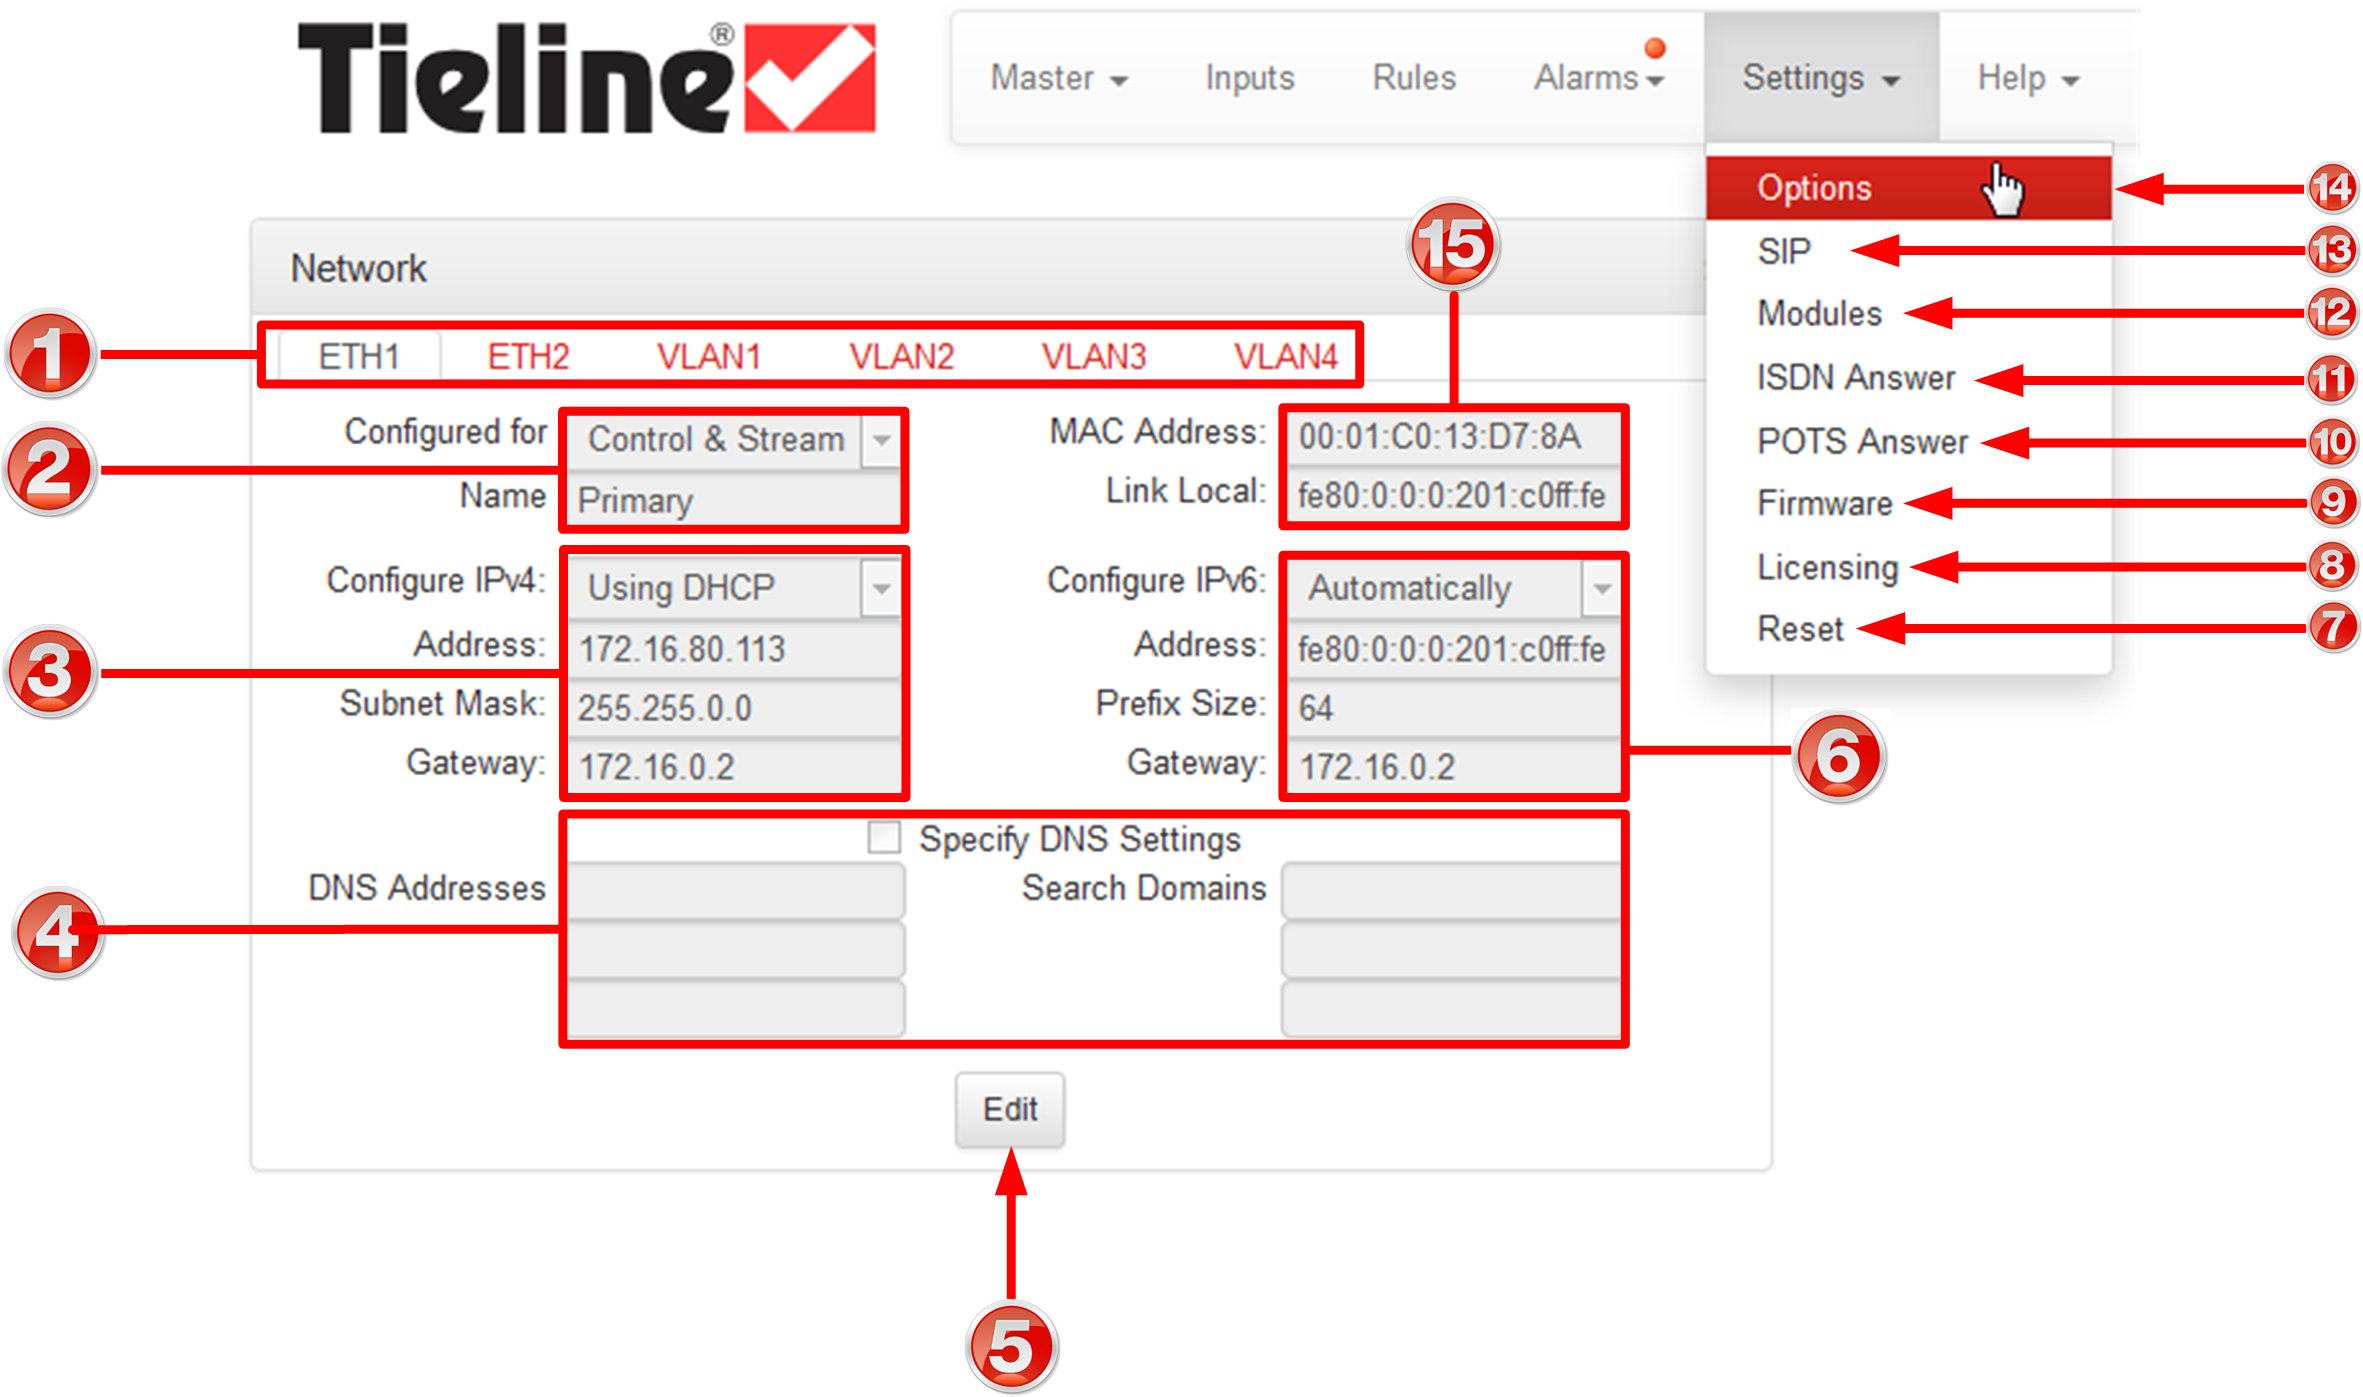
There are 9 Settings panels which can be opened in the Web-GUI. Each panel provides specific codec configuration settings and options. Click to select and open each panel.
As an example, the Network panel is displayed with network interface configuration options. A brief description of the other panel options is also provided.
|
 Settings panels |
|
Feature
|
Description
|
1
|
Network tab
|
Click to select and edit, or view network configuration settings for each Ethernet and VLAN interface.
|
2
|
Network Interface
|
Control and streaming configuration options for each network interface.
|
3
|
IPv4 details
|
IPv4 address details and configuration.
|
4
|
DNS details
|
Select the check-box and specify DNS addresses and domains to search.
|
5
|
Edit / Save button
|
Click to edit Network settings, or save configured settings.
|
6
|
IPv6 details
|
IPv6 address details and configuration.
|
7
|
Reset
|
Click to open the panel; reset codec default settings
|
8
|
Licensing tab
|
Click to open the panel; select a license file and install it in the codec.
|
9
|
Firmware tab
|
Click to open the panel; view software versions and perform an upgrade.
|
10
|
POTS Answer tab
|
Click to open the panel and configure POTS Answering settings.
|
11
|
ISDN Answer tab
|
Click to open the panel and configure ISDN Answering settings.
|
12
|
Modules tab
|
Click to edit hardware module configuration.
|
13
|
SIP tab
|
Click to open the panel and edit or view SIP configuration settings.
|
14
|
Options tab
|
Click to open the panel; configure RS232 and QoS data settings, lock a loaded user Program and adjust Session Port settings and SNMP. Also configure the AES Output Clock sample rate.
|
15
|
MAC Address / Link Local
|
Click to open the panel and view the device MAC address and IPv6 local network address created by the codec.
|
|
 Help Panels
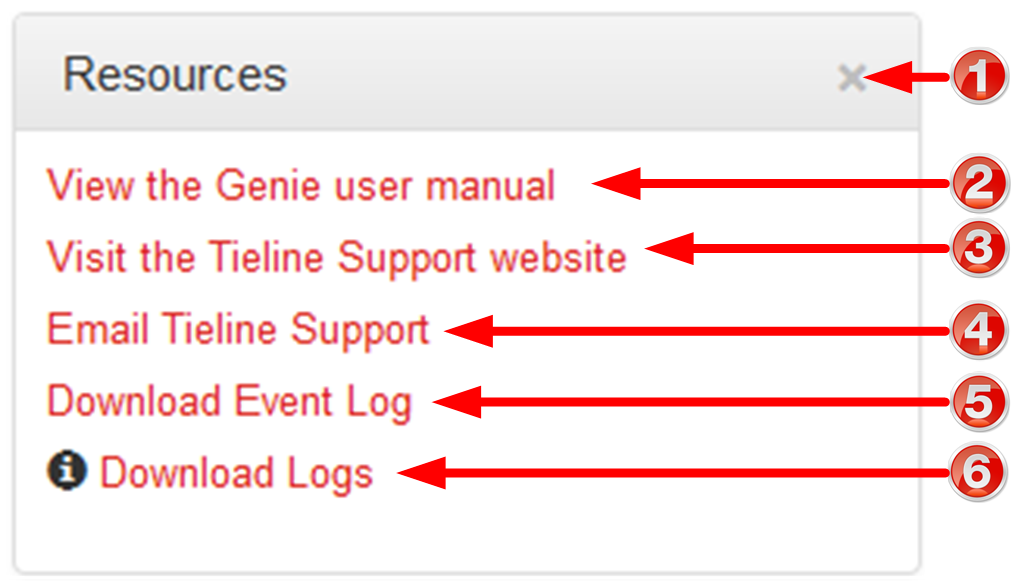
Resources
|
Feature
|
Description
|
1
|
Close button
|
Click to close the panel.
|
2
|
User manual link
|
Click to open the codec user manual in a new browser, or view support information (Note: the codec name displayed will vary by product type)
|
3
|
Support website link
|
Click to visit the support page on the Tieline website.
|
4
|
Email Support
|
Click to email Tieline support.
|
5
|
Event Logs
|
Click to download user-viewable event logs
|
6
|
Support Logs
|
Click to download diagnostic information that can be sent to Tieline support
|
About Panel
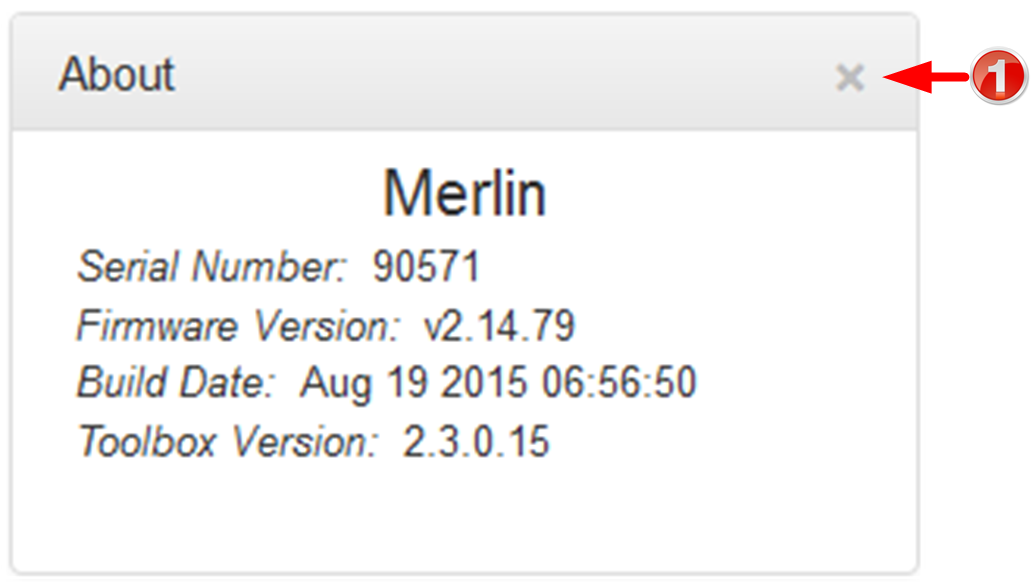
Details of the codec Toolbox and firmware version, as well as the codec serial number. Note: the codec name displayed will vary by product type.
|
 Language Selection
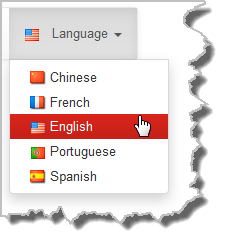
The HTML5 Toolbox Web-GUI offers language support for several languages.
1.Click on the Language drop-down menu arrow in the top right-hand corner of the Web-GUI page. 2.Select the preferred language to display.
|
|


![]() Master Panels: Load Programs & Manage Audio Streams
Master Panels: Load Programs & Manage Audio Streams![]() Inputs Panel for Input Adjustments
Inputs Panel for Input Adjustments![]() Rules Panel for Creating Relay Activation Rules
Rules Panel for Creating Relay Activation Rules![]() Alarm Panels: Configure & Monitor Alarms
Alarm Panels: Configure & Monitor Alarms


