
Verifying IP Address Details in the Codec
1.Press the HOME ![]() button to return to the Home screen, then tap Settings
button to return to the Home screen, then tap Settings  .
.
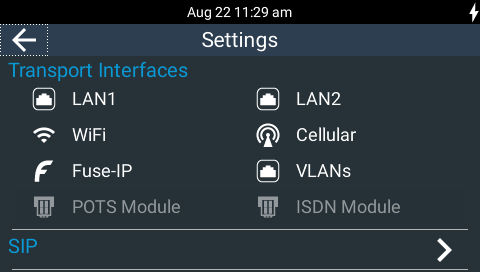
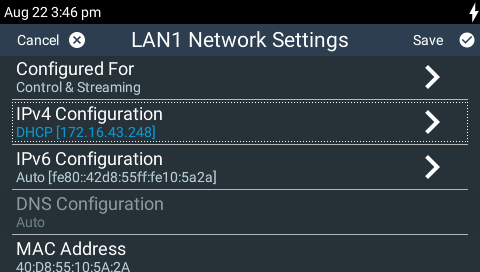
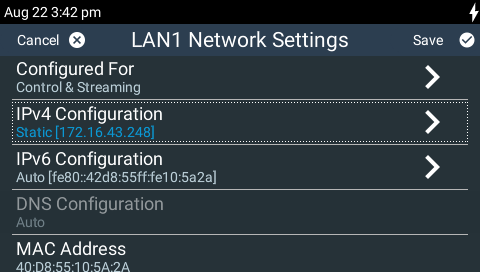
2.Tap to select Transport Interfaces and then tap LAN1  or LAN2 .
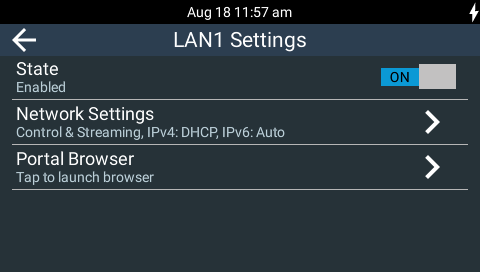
3.Tap to select Network Settings.
|
Important Note: It is possible to turn off LAN1 and/or LAN2 to conserve power consumption when using the internal battery. If LAN 2 is disabled, the codec needs to be rebooted to turn it back on. |

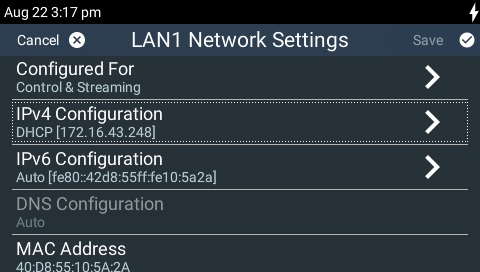
4.IP address details and other unit details are listed.
|
Important Note: See Configuring IP Settings for more details about configuring IP connections using the HTML5 Toolbox Web-GUI. For further assistance with IPv4 or IPv6 network settings contact your IT Administrator. |
Ethernet and VLAN Configuration Options
The codec features two physical Ethernet port interfaces (LAN1 and LAN2) and up to four additional VLAN interfaces.
VLAN interfaces have features similar to physical Ethernet interfaces. However, your network administrator will need to configure VLAN support throughout your network for VLANs to be supported in your codec.
As an example, if only one physical Ethernet interface is available, VLANs can be used to operate SmartStream PLUS or separate codec 'control' and 'streaming' functions if required.
Following are a range of options which can be configured in the LAN menus. After completing configuration tap Save in the top right-hand corner of the screen to apply the new settings.
Configure an IPv4 DHCP Address
By default the codec is configured for DHCP-assigned IP addresses. DHCP addresses are automatically assigned and can change each time you connect to your Internet Service Provider, or by a router on your local area network (LAN).
1.Press the HOME ![]() button to return to the Home screen, then tap Settings .
button to return to the Home screen, then tap Settings .
2.Tap to select Transport Interfaces and then LAN1 , LAN2 or a VLAN interface.
3.Tap Network Settings.
4.Tap IPv4 Configuration.
5.Tap to select DHCP.
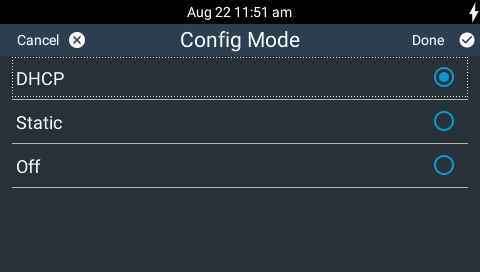
6.Tap Save in the top right-hand corner to reconfigure the codec for DHCP IP address configuration.
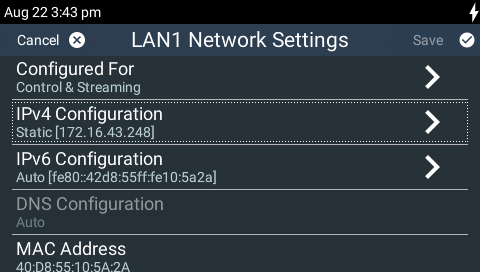
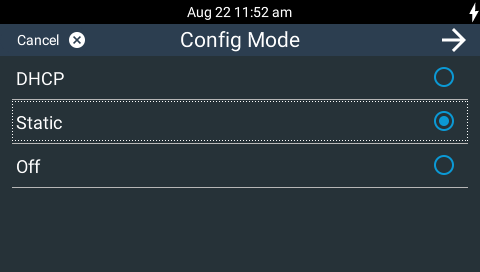
Configure a Static IPv4 Address
Static IP addresses are fixed addresses which are normally recommended for studio installations. Using a static IP address ensures remote codecs can connect reliably using the same IP address over time.
1.Press the HOME ![]() button to return to the Home screen, then tap Settings .
button to return to the Home screen, then tap Settings .
2.Tap to select Transport Interfaces and then LAN1 or LAN2 or a VLAN interface.
3.Tap Network Settings.
4.Tap IPv4 configuration.
5.Tap to select Static.
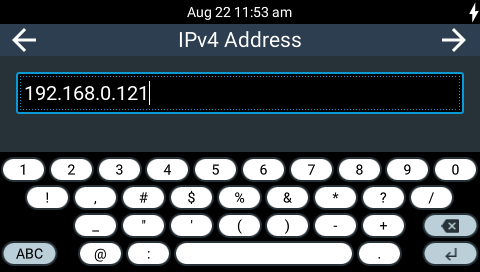
6.Use the on-screen keyboard to enter the static IP address into the codec, and then tap the Right Arrow in the top-right hand corner of the TOUCH SCREEN.
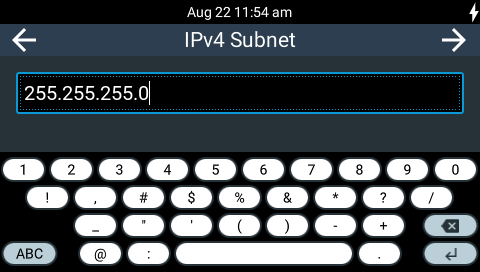
7.Enter the IPv4 Subnet mask into the codec, and then tap the Right Arrow.
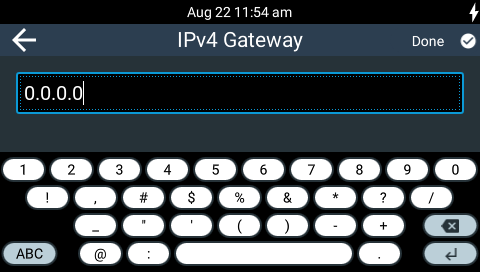
8.Enter the IPv4 Gateway details as required, then tap Done in the top-right hand corner of the TOUCH SCREEN.
7.Tap Save in the top right-hand corner to reconfigure the codec for static IP address configuration.
IPv6 Address Assignment
There are three IPv6 settings available for each LAN port on the codec and any VLANs which are configured.
1.Auto: By default, an address is automatically assigned to the codec when you connect the codec to an IPv6 router. This process is similar to how an IPv4 DHCP address is assigned.
2.Manual: Select to manually enter IPv6 address details.
3.Off: Select to ignore IPv6 address details.
|
Important Note: Select Off if you are not using IPv6 to connect to another device. This ensures your codec will attempt to connect using IPv4 at all times. |
By default the codec is configured to automatically receive IPv6 address information from an IPv6 enabled router. To adjust this setting:
1.Press the HOME ![]() button to return to the Home screen, then tap Settings .
button to return to the Home screen, then tap Settings .
2.Tap to select Transport Interfaces and then LAN1 , LAN2 or a VLAN interface.
3.Tap Network Settings.
4.Tap IPv6 Configuration.
5.Tap Auto, Manual or Off.
Manual IPv6 Address Assignment
Select Manual using the previous procedure and enter information into the IPv6 Address, IPv6 Prefix Size and IPv6 Gateway fields to manually configure address details.
DNS Server
When a static IP address is specified it is possible to specify Domain Name Server (DNS) settings to allow easy look up of codecs within the specified DNS Addresses or Domains section within the Web-GUI. This feature can be turned on or off in the codec menu.
1.Press the HOME ![]() button to return to the Home screen, then tap Settings .
button to return to the Home screen, then tap Settings .
2.Tap to select Transport Interfaces and then LAN1 , LAN2 or a VLAN interface.
3.Tap Network Settings.
4.Tap DNS Configuration.
5.Tap On or Off.
