Connecting to APT Wordcast Equinox ISDN

Contents
Configuring the WorldCast Equinox to Make an ISDN Call
1.Plug your ISDN line into the back of the codec and attach power.
2.Press the "Menu" button on the codec to access the codec menus.
3.Press the "Menu" button to select the "USER" menu.
4.Select "Primary Connection" and press the "Ent/Dial" button.
5.Next select "Codec - ISDN" > "Use Audio Profile" [No] > "Eapt-X16", or "Eapt-X24", "MPEG1-L2" or G.722.
6.Select the appropriate bit rate and whether you are dialing in mono, stereo or Joint Stereo, and then the sample rate.
7.For bonded "MPEG1-L2" connections select "CCS IMUX".
8.Complete the profile setup. The codec is now ready to dial or answer.
Configuring the Tieline Codec to Dial the Equinox over ISDN
1.Press the HOME ![]() button to return to the Home screen and select Connect > ISDN.
button to return to the Home screen and select Connect > ISDN.
2.Navigate to Setup and press the ![]() button.
button.
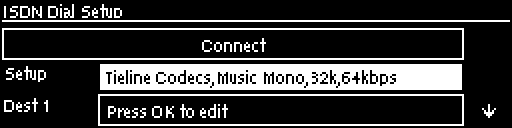
3.Select Session Type [Sessionless] > Select Dial Route [None] > Number of B Channels [Choose the number of B-channels (between 1 and 4) required for your connection] > Algorithm [Choose G.722 , E apt-X Mono or Stereo, MP2 Mono or Stereo or MP2 J-Stereo (Note: select 32kHz or 48kHz sample rate for MP2 and E apt-X depending on available B-channels)].
4.Navigate to a Destination (e.g. Dest 1 or Dest 2) and press the ![]() button to select each one in turn. Enter the number for each B channel you want to dial and press the
button to select each one in turn. Enter the number for each B channel you want to dial and press the ![]() button, then select which B channel will dial using that number and press the
button, then select which B channel will dial using that number and press the ![]() button.
button.
5.Navigate down to Auto Reconnect and press the ![]() button to toggle between Enabled and Disabled. Note: This is normally enabled on the dialing codec only.
button to toggle between Enabled and Disabled. Note: This is normally enabled on the dialing codec only.
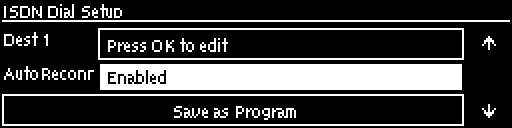
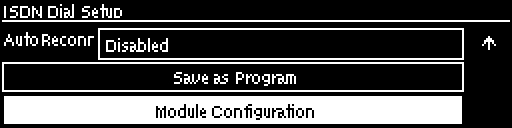
6.Navigate down to Save as Program and press the ![]() button to save these settings as a program.
button to save these settings as a program.
7.Navigate down to Module Configuration and press the ![]() button.
button.
8.Select the ISDN module you want to configure and press the ![]() button.
button.
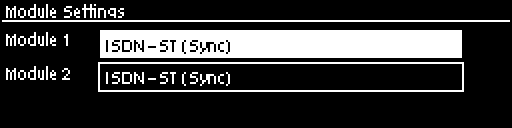
9.Configure the following settings:
•Accept > Voice and Data
•Network > Check with your Telco (EU-ETSI in Australia; Europe & most countries outside North America; [US Nat] is the most common in the US, but check with your Telco).
•Line Type > Check with your Telco and select either Point-to-Multi (point-to-multipoint) or Point-to--Point (point-to-point).
•DN/MSN > Enter the "SPID" and "DN" numbers if required in your region, e.g. a SPID is normally required in the US.
10. Navigate up to Apply Settings and press the ![]() button.
button.
Dialing from the Tieline Codec
Program Dialing
1.If you have saved the ISDN program as previously instructed, press the HOME ![]() button to return to the Home screen and select Connect > Programs.
button to return to the Home screen and select Connect > Programs.
2.Select the saved program you want to load and press the ![]() button.
button.
3.Select Load and press the ![]() button to load the program.
button to load the program.
4.Press the CONNECT ![]() button to dial the ISDN program connections.
button to dial the ISDN program connections.
Ad Hoc Dialing
1.If you haven't save the program but have entered the dialing numbers and other settings, press the HOME ![]() button to return to the Home screen and select Connect > ISDN > Connect.
button to return to the Home screen and select Connect > ISDN > Connect.
2.Press the ![]() button to dial using the settings previously entered.
button to dial using the settings previously entered.
|
Important Note: If you select different algorithm settings on each codec and dial from the Tieline codec, the connection will be unsuccessful and the CONNECTED LED on the front panel of the Tieline codec will continuously flash. Adjust the algorithm settings and attempt to reconnect. |
Dialing from the WorldCast Equinox
|
Important Note: Configure ISDN Answer Config settings in the codec before attempting to dial from the Equinox to the Tieline codec. Select the following settings in the Tieline codec in one of the Configs (see ISDN Answering Configuration for more detail): •May bond. •Sessionless. •Algorithm: G.722, MP2 Mono, MP2 Stereo, MP2 J-Stereo or E apt-X Mono or Stereo. •Sample Rate: 32kHz or 48kHz |
1.Navigate to the B-channel you want to dial over and press the "Ent/Dial" button.
2.Use the keypad to enter the number of the line you are dialing.
3.Press the "Ent/Dial" button again to make the outgoing call from the codec.
4.If dialing two B-channels, navigate to the second B-channel and use the keypad to enter the number, then press the "Ent/Dial" button. Note: the codec screen will display IMUX UNLOCKED until you dial additional connections when bonding multiple channels.
|
Important Note: When dialing a mono or stereo connection over two B-channels audio is not available until the second connection is successful. |