Connecting to CDQ Prima ISDN

Contents
Use the following information to connect a Tieline codec to a Musicam CDQ Prima codec.
Programming the CDQ Prima for a Mono Connection
Select a mono profile in the Prima codec for the connection:
1.Press the “SDIAL” button on the front panel of the codec.
2.When “ID NUM” is displayed press “8” and then press "Enter" using the down arrow.
3.“MPEG2/64K:QS” will be displayed briefly followed by “WORKING”.
4.“OK” will be displayed momentarily and then the LCD screen will return to the default screen and be programmed for:
•A Mono connection.
•64Kbps Bit-Rate.
•48K Sample Rate.
•MPEG Layer 2 algorithm.
•1 ISDN B channel.
•Decoder Independent – No.
5.Press the right arrow on the "Enter" button and navigate to "Interface". Push the down arrow on the "Enter" button to select this menu.
6.Use the "Enter" button and navigate to the type of interface you are using. Note: During Tieline tests we used an "Internal TA".
7.Select the actual terminal adapter connected to your codec. Note: During Tieline tests we used the internal "TA301".
8.Use the "Enter" button and select the switch type for the country you are in. Check with your Telco for the correct setting if you are unsure. Note: During Tieline tests we used the internal "NI1" setting for the USA.
9.Use the "Enter" button and keypad to enter the "SPID 1" and "SPID 2" numbers if required.
10.Use the "Enter" button and keypad to enter the "ID 1" and "ID 2" (Directory/MSN) numbers if required.
11.The codec should now be configured.
Programming the CDQ Prima for a Stereo Connection
1.Press the “SDIAL” button on the front panel of the codec.
2.When “ID NUM” is displayed press “27” and then press "Enter" using the down arrow.
3.“Zephyr/128K:QS” will be displayed briefly followed by “WORKING”.
4.“OK” will be displayed momentarily and then the LCD screen will return to the screen displayed prior to programming. The codec is now programmed for:
• A Joint Stereo connection.
•128Kbps Bit-Rate.
•48K Sample Rate.
•MPEG Layer 2 algorithm.
•2 ISDN B Channels
•Decoder Independent – Yes
5.Press the right arrow on the "Enter" button and navigate to "Interface". Push the down arrow on the "Enter" button to select this menu.
6.Use the "Enter" button and navigate to the type of interface you are using. Note: During Tieline tests we used an "Internal TA".
7.Select the actual terminal adapter connected to your codec. Note: During Tieline tests we used the internal "TA301".
8.Use the "Enter" button and select the switch type for the country you are in. Check with your Telco for the correct setting if you are unsure. Note: During Tieline tests we used the internal "NI1" setting for the USA.
9.Use the "Enter" button and keypad to enter the "SPID 1" and "SPID 2" numbers if required.
10.Use the "Enter" button and keypad to enter the "ID 1" and "ID 2" (Directory/MSN) numbers if required.
11.The codec should now be configured.
Configuring the Tieline Codec to Connect to the CDQ Prima
1.Press the HOME ![]() button to return to the Home screen and select Connect > ISDN.
button to return to the Home screen and select Connect > ISDN.
2.Navigate to Setup and press the ![]() button.
button.
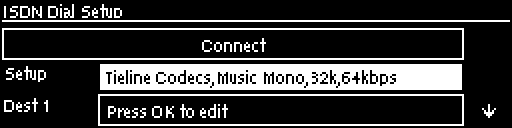
3.Select Session Type [Sessionless] > Select Dial Route [None] > Number of B Channels [Choose 1B (mono) or 2B (stereo)] > Algorithm [Choose MP2 Mono or MP2 J-Stereo (Note: select 48kHz sample rate for MP2 algorithms)].
4. Navigate to a Destination (e.g. Dest 1 or Dest 2) and press the ![]() button to select each one in turn. Enter the number for each B channel you want to dial and press the
button to select each one in turn. Enter the number for each B channel you want to dial and press the ![]() button, then select which B channel will dial using that number and press the
button, then select which B channel will dial using that number and press the ![]() button.
button.
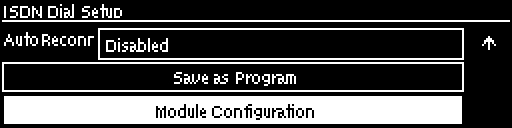
5.Navigate down to Auto Reconnect and press the ![]() button to toggle between Enabled and Disabled. Note: This is normally enabled on the dialing codec only.
button to toggle between Enabled and Disabled. Note: This is normally enabled on the dialing codec only.
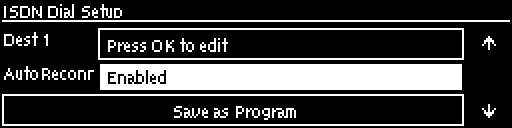
6.Navigate down to Save as Program and press the ![]() button to save these settings as a program.
button to save these settings as a program.
7.Navigate down to Module Configuration and press the ![]() button.
button.
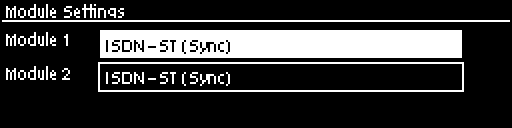
8.Select the ISDN module you want to configure and press the ![]() button.
button.
|
Important Note: ISDN Sync should be displayed when an ISDN line is connected to the codec. This appears regardless of whether you have configured the ‘ISDN Line Type’ correctly. |
9.Configure the following settings:
•Accept > Voice and Data
•Network > Check with your Telco (EU-ETSI in Australia; Europe & most countries outside North America; [US Nat] is the most common in the US, but check with your Telco).
•Line Type > Check with your Telco and select either Point-to-Multi (point-to-multipoint) or Point-to--Point (point-to-point).
•DN/MSN > Enter the "SPID" and "DN" numbers if required in your region, e.g. a SPID is normally required in the US.
10. Navigate up to Apply Settings and press the ![]() button.
button.
Dialing from the Tieline Codec
Program Dialing
1.If you have saved the ISDN program as previously instructed, press the HOME ![]() button to return to the Home screen and select Connect > Programs.
button to return to the Home screen and select Connect > Programs.
2.Select the saved program you want to load and press the ![]() button.
button.
3.Select Load and press the ![]() button to load the program.
button to load the program.
4.Press the CONNECT ![]() button to dial the ISDN program connections.
button to dial the ISDN program connections.
Ad Hoc Dialing
1.If you haven't save the program but have entered the dialing numbers and other settings, press the HOME ![]() button to return to the Home screen and select Connect > ISDN > Connect.
button to return to the Home screen and select Connect > ISDN > Connect.
2.Press the ![]() button to dial using the settings previously entered.
button to dial using the settings previously entered.
After dialing successfully “FRAMED” should illuminate on the CDQ Prima screen. Tieline codecs also support 32kHz sampling.
|
Important Note: Configure ISDN Answer Config settings in the codec before attempting to dial from the Equinox to the Tieline codec. Select the following settings in the Tieline codec in one of the Configs (see ISDN Answering Configuration for more detail): •May bond. •Sessionless. •Algorithm: MP2 Mono, MP2 J-Stereo. •Sample Rate: 48kHz |
Making a Mono Call from the CDQ Prima Codec
1.Press the "Dial" button on the front panel of the codec.
2.Navigate right using the "Enter" button and select "1".
3.Enter the number to dial using the numeric keypad.
4.Press the "Enter" button (bottom arrow) and the screen will briefly display "Working", then "Connect" and then the green "Framed" light should illuminate on the front panel.
Making a Stereo Call from the CDQ Prima Codec
1.Press the "Dial" button on the front panel of the codec.
2.Use the "Enter" button and select "Both".
3.Enter the first number to dial using the numeric keypad.
4.Press the "Enter" button (bottom arrow) and the screen will briefly display "Dialling line 1" and then "Connect".
5.Enter the second number to dial using the numeric keypad and press the "Enter" button (bottom arrow).
6.The screen will briefly display "Dialling line 2", then "Connect" and then the green "Framed" light should illuminate on the front panel.
|
Important Note: When connecting in stereo, the Prima expects both B channel dials to occur within 5 seconds. This can be performed by the Tieline codec.
It has also been noted that the CDQ Prima codec will not connect if no audio is present when dialing. It may connect Prima > Tieline, but not Tieline > Prima. If audio is present, the codec should connect and stay connected even if audio is removed subsequently. The J-Stereo light on the Prima may also flash when in this mode.
Ideally, have audio connected when dialing and the codec will frame immediately after the first dial and then dial the second B channel quickly afterwards. |