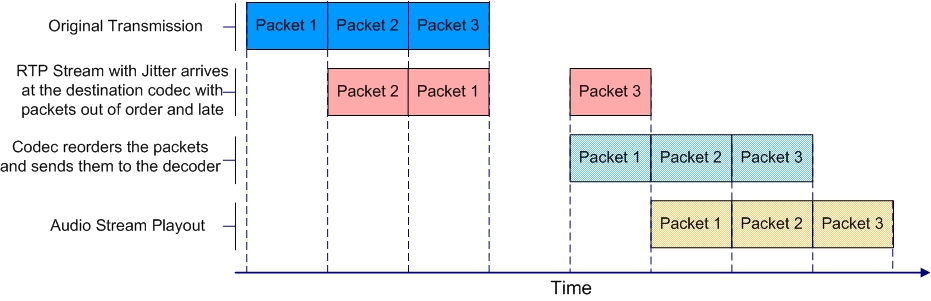
Jitter, (also known as latency or delay), is the amount of time it takes for a packet of data to get from one point to another. A jitter buffer is a temporary storage buffer used to capture incoming data packets. It is used in packet-based networks to ensure the continuity of audio streams by smoothing out packet arrival times during periods of network congestion. Data packets travel independently and arrival times can vary greatly depending on network congestion and the type of network used, i.e. LAN versus wireless networks. The concept of jitter buffering is displayed visually in the following image.
Jitter-buffer management is encompassed within Tieline's SmartStream IP technology which can:
•Remove duplicate packets.
•Re-order packets if they arrive out-of-order.
•Repair the stream in the event of packet loss (error concealment).
•Manage delay dynamically based on current network congestion.
•Manage forward error correction (FEC).
With Tieline codecs you can configure either a fixed or automatic jitter buffer and the settings you use depend on the IP network over which you are connecting. Over LANs, WANs and wireless networks the automatic jitter buffer generally works well. It adapts automatically to prevailing IP network conditions to provide continuity of audio streaming and minimize delay.
A fixed jitter buffer is preferable over satellite connections to ensure continuity of signals.
|
CAUTION: If a Tieline codec connects to a device that is using non-compliant RTP streams then the last fixed setting programmed into the codec will be enabled (default is 500ms). Non-compliant devices include some other brands of codec, web streams and other devices. |

Tieline ‘Auto Jitter Buffer’ Settings
The following automatic jitter buffer settings range from the most aggressive "Least Delay" setting, which endeavors to minimize delay as much as possible while adapting to prevailing network conditions, to the "Highest Quality" setting, which is the most conservative delay setting to minimize packet loss when packet latency is not as critical. Best compromise is the most popular setting used by most broadcasters as it achieves an excellent balance that minimizes latency for bidirectional communications, as well as minimizing packet loss over most wired and wireless IP networks.

Jitter Buffer Settings and Relationship of Latency and Packet Loss
Least Delay: This setting attempts to reduce the jitter buffer to the lowest possible point, while still trying to capture the majority of data packets and keep audio quality at a high level. This setting is the most aggressive in adapting to prevailing conditions, so the jitter buffer may vary more quickly than with the other settings. It is not recommended in situations where jitter variation is significant, or occurs in bursts. (E.g. cellular/multi-user wireless networks). It is best for stable and reliable links such as dedicated or lightly-loaded WAN/LANs.
Less Delay: This setting lies between "Best Compromise" and "Least Delay". It may assist in reducing latency over a connection without incurring packet loss.
Best Compromise: This default setting is the midpoint between the jitter buffer settings applicable for "Highest Quality" and "Least Delay." It is designed to provide the safest level of good audio quality without introducing too much latency. In most situations it will deliver very high quality and low delay to support live bidirectional communications over cellular and wireless networks.
Good Quality: This setting lies between "Best Compromise" and "Highest Quality." It may assist in achieving higher quality connections without incurring extreme delays in transmission or significant packet loss.
Highest Quality: This setting is the most conservative in terms of adapting to prevailing network conditions to reduce delay. The jitter-buffer will remain higher for a longer period after a jitter spike is detected – just in case there are more spikes to follow. This setting is best to use where audio quality is the most important factor and delay is not as critical. Unless delay is irrelevant, this setting is not recommended over peaky jitter networks (e.g. cellular networks) and is best used on more stable networks where fluctuating jitter bursts are not common.
Jitter Depth
The jitter Depth setting allows you to select predetermined minimum and maximum jitter settings within the auto jitter buffer's minimum and maximum jitter limitations. The default setting of 60 to 1000ms is a good starting point for most networks. It may be necessary to increase the maximum auto jitter latency setting for networks experiencing higher packet latency, or the minimum depth depending on the reliability of the network.
Which Algorithms Support Automatic Jitter Buffering?
The following table provides an overview of which algorithms are capable of using the automatic jitter buffer feature over SIP and non-SIP connections.
Algorithm |
Tieline Session Data Connections |
SIP Connections |
Linear (Uncompressed) |
|
|
Tieline Music |
|
|
Tieline MusicPLUS |
|
|
G.711 |
|
|
G.722 |
|
|
MPEG Layer 2 |
|
|
MPEG Layer 3 |
|
|
LC-AAC |
|
|
HE-AAC v.1 |
|
|
HE-AAC v.2 |
|
|
AAC-LD |
|
|
AAC-ELD |
|
|
Opus |
|
|
aptX Enhanced |
|
|


How to get the Best Jitter Buffer Results
When configuring automatic jitter buffer settings, establish the IP connection for a while before ‘going live’, to allow the codec to evaluate prevailing network conditions. The initial jitter buffer setting when a codec connects is 500ms and it is kept at this level for the first minute of connection (as long as observed delay values are lower than this point).
After the initial connection period the jitter buffer is adjusted to suit prevailing network conditions and is usually reduced. Establish a connection for at least 5 minutes prior to broadcasting, so that the codec has been provided with enough jitter history to ensure a reliable connection.
There are five jitter buffer states. Jitter buffer and connection status statistics can be viewed via HOME  > Cxns and use the down
  and up
  navigation buttons to scroll through connection statistics. The first four stages are observed in “auto” jitter buffer mode.
1.Stabilization period (a1): A few seconds during which a stable connection is established.
2.Stage 2 (a2): A compatibility check occurs.
3.Stage 3 (a3): If the compatibility check is successful, this is the analysis hold-off period. During a minute, the jitter buffer is held at a safe, fixed value of 500ms while enough history is recorded to start jitter buffer adaptation.
4.Stage 4 “live” (A): This is where the codec determines it is safe enough to start broadcasting using the auto-jitter buffer level. We recommend running the codec for a few more minutes to obtain a more comprehensive history of the connection’s characteristics.
5.Fixed (F): This state is displayed if the jitter buffer is fixed.
Configure the Jitter Buffer on the Answering Codec
Create an answering program to independently configure the jitter buffer settings on an answering codec. This will ensure specific fixed or auto jitter settings can be configured to suit the IP network to which the codec is connected. To do this:
1.Create a new answering program on the answering codec.
2.Configure preferred jitter buffer settings in this answering program.
3.Lock the answering program in the codec.
Please note that with the implementation of EBU N/ACIP 3368 SIP configuration, the dialing codec can configure the jitter setting on the answering codec. This will override the jitter buffer settings in a locked and loaded answering program in a Tieline codec.
If you change the jitter buffer setting in a codec it will only adjust to the new level when link quality is high (e.g. above 70%). This is done to ensure audio quality is not compromised. When manually configuring the jitter-buffer delay in a codec it is necessary to think carefully about the type of connection you will be using. Following is a table displaying rule of thumb settings for programming jitter-buffer delays into your codec.
Connection |
Jitter-Buffer Recommendation |
Private LAN |
60 milliseconds |
Local |
100 - 200 milliseconds |
National |
100 - 300 milliseconds |
International |
100 – 400 milliseconds |
Wireless Network |
250 - 750 milliseconds |
Satellite IP |
500 - 999 milliseconds |
|
Important Note: The preceding table assumes Tieline Music is the algorithm in use. Do not use PCM (linear uncompressed) audio over highly contended DSL/ADSL connections without enough bandwidth to support the high connection bit rates required. |

Relationship between the Jitter Buffer and Forward Error Correction (FEC)
If forward error correction is configured then additional data packets are sent over a connection to replace any lost data packets. There is no need to modify jitter buffer settings if you are sending FEC data, only if you are receiving FEC data.
The jitter buffer depth on the receive codec needs to be increased if FEC is employed. We recommend you add 100ms to the fixed jitter buffer on a codec receiving FEC at a setting of 20% and 20ms at a setting of 100%. Tieline’s auto jitter buffer detects the amount of FEC that is being used and automatically compensates to increase the codec jitter buffer when this feature is enabled.
|
Important Notes: There is no jitter buffer setting on a multicast server codec because it only sends and never receives audio packets. |