
When dialing over IP you can select the preferred interface to use when establishing a connection. By default Any is selected, which means the first available interface will be used to dial a connection. The default Via interfaces in order of use when available are:
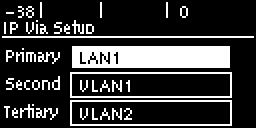
1.LAN1 Ethernet port (default Primary Via interface)
2.VLAN1 Ethernet port (default Secondary Via interface)
3.VLAN2 (default Tertiary Via interface)
|
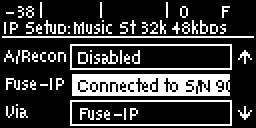
Important Note: •If an interface is not available it is not listed in the Via interface selection screen. E.g. Fuse-IP. •If you select Fuse-IP as the Via interface, a link to the Fuse-IP configuration menu appears above the Via menu.
•VLAN interfaces have features similar to physical Ethernet interfaces. However, your network administrator will need to configure VLAN support throughout your network for them to be supported in your codec. |

Reconfigure Default Primary, Secondary and Tertiary Interfaces
It is possible to reconfigure the default Primary (LAN), Secondary (VLAN1) and Tertiary (VLAN2) interfaces in the codec. As an example, you may want to select Primary as the dialing interface in a program and then copy this program onto multiple codecs. However, the actual primary interface used at each location can vary for each codec. For one codec it may be an Ethernet port and for another it may be a VLAN interface. This allows you to configure site-specific settings to suit available network interfaces at different remote locations.
1.Press the SETTINGS  button.
2.Use the navigation buttons to select System and press the  button.

3.Navigate to IP Via Set and press the button.

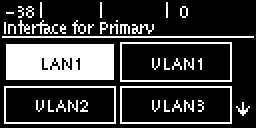
4.Navigate to the Primary, Second or Tertiary IP Via interface setting and press the button.
5.Select an alternative default interface and press the button.
6.Press the Return button  to navigate out of the menu, then navigate to Yes in the Warning dialog and press the button to save all changes.

|
Important Note: Fuse-IP cannot be configured as a default Primary, Secondary or Tertiary Via. |
