The following sections provide an overview of the different configuration panels available within the codec's HTML5 Toolbox Web-GUI. Navigate with the mouse pointer to the Menu bar at the top of the Web-GUI screen and click to select and open each panel in turn.

HTML GUI Menu Bar for Opening Panels
When you first open the HTML5 Toolbox Web-GUI the Program Loader panel, Connections panel and PPMs panel are loaded by default. If you retain cookies in your browser, any panels opened previously in the Web-GUI are automatically populated when you log in next. The default panel view is displayed on login if cookies have been cleared.
The green Online indication in the top left-hand corner of the Toolbox Web-GUI indicates it is online and can be used for codec control. A red Offline indication is displayed when the codec is unavailable. The Upgrade symbol is displayed when a new firmware version is available for the codec. Open the Firmware panel in the Settings menu to upgrade the codec with new firmware.
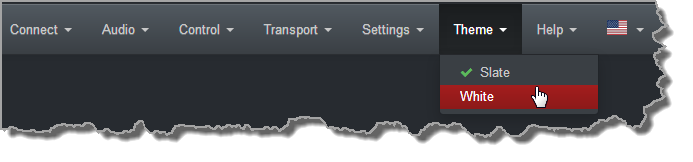
Adjusting the Theme
To adjust the Theme or 'skin' of the HTML5 Toolbox Web-GUI, navigate to the Menu bar at the top of the screen and click Theme, then click to select your preferred option. Note: this manual uses the White theme for most images.
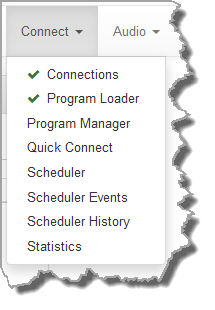
Opening a Panel & Adjusting Size or Screen Position
Click an item in the Menu bar to display available panel options, then click to select and open a panel. New panels automatically open in the top left of the screen. A green Tick adjacent to a panel name in the menu signifies it is already open in the web-GUI.
Position the mouse pointer over a panel's Title bar and click and drag to move a panel and reposition it in a preferred screen position.

Some panels can be resized. Click the bottom right-hand corner of a panel supporting this feature and drag and resize as required.

Connect Panels: Load & Connect Programs & Manage Audio Streams
Connections Panel

|
Feature |
Description |
1 |
Program Connect / Disconnect button |
Click to connect/disconnect all audio streams in a program. |
2 |
Audio Stream Connect / Disconnect button |
Click to connect/disconnect all connections in an audio stream. |
3 |
Connection Connect / Disconnect button |
Click to connect/disconnect an individual connection. Click to adjust the connection bit-rate when a connection is active. |
4 |
Show/Hide Arrow |
Click to show/hide audio stream and connection details. |
5 |
Close button |
Click to close the panel. |
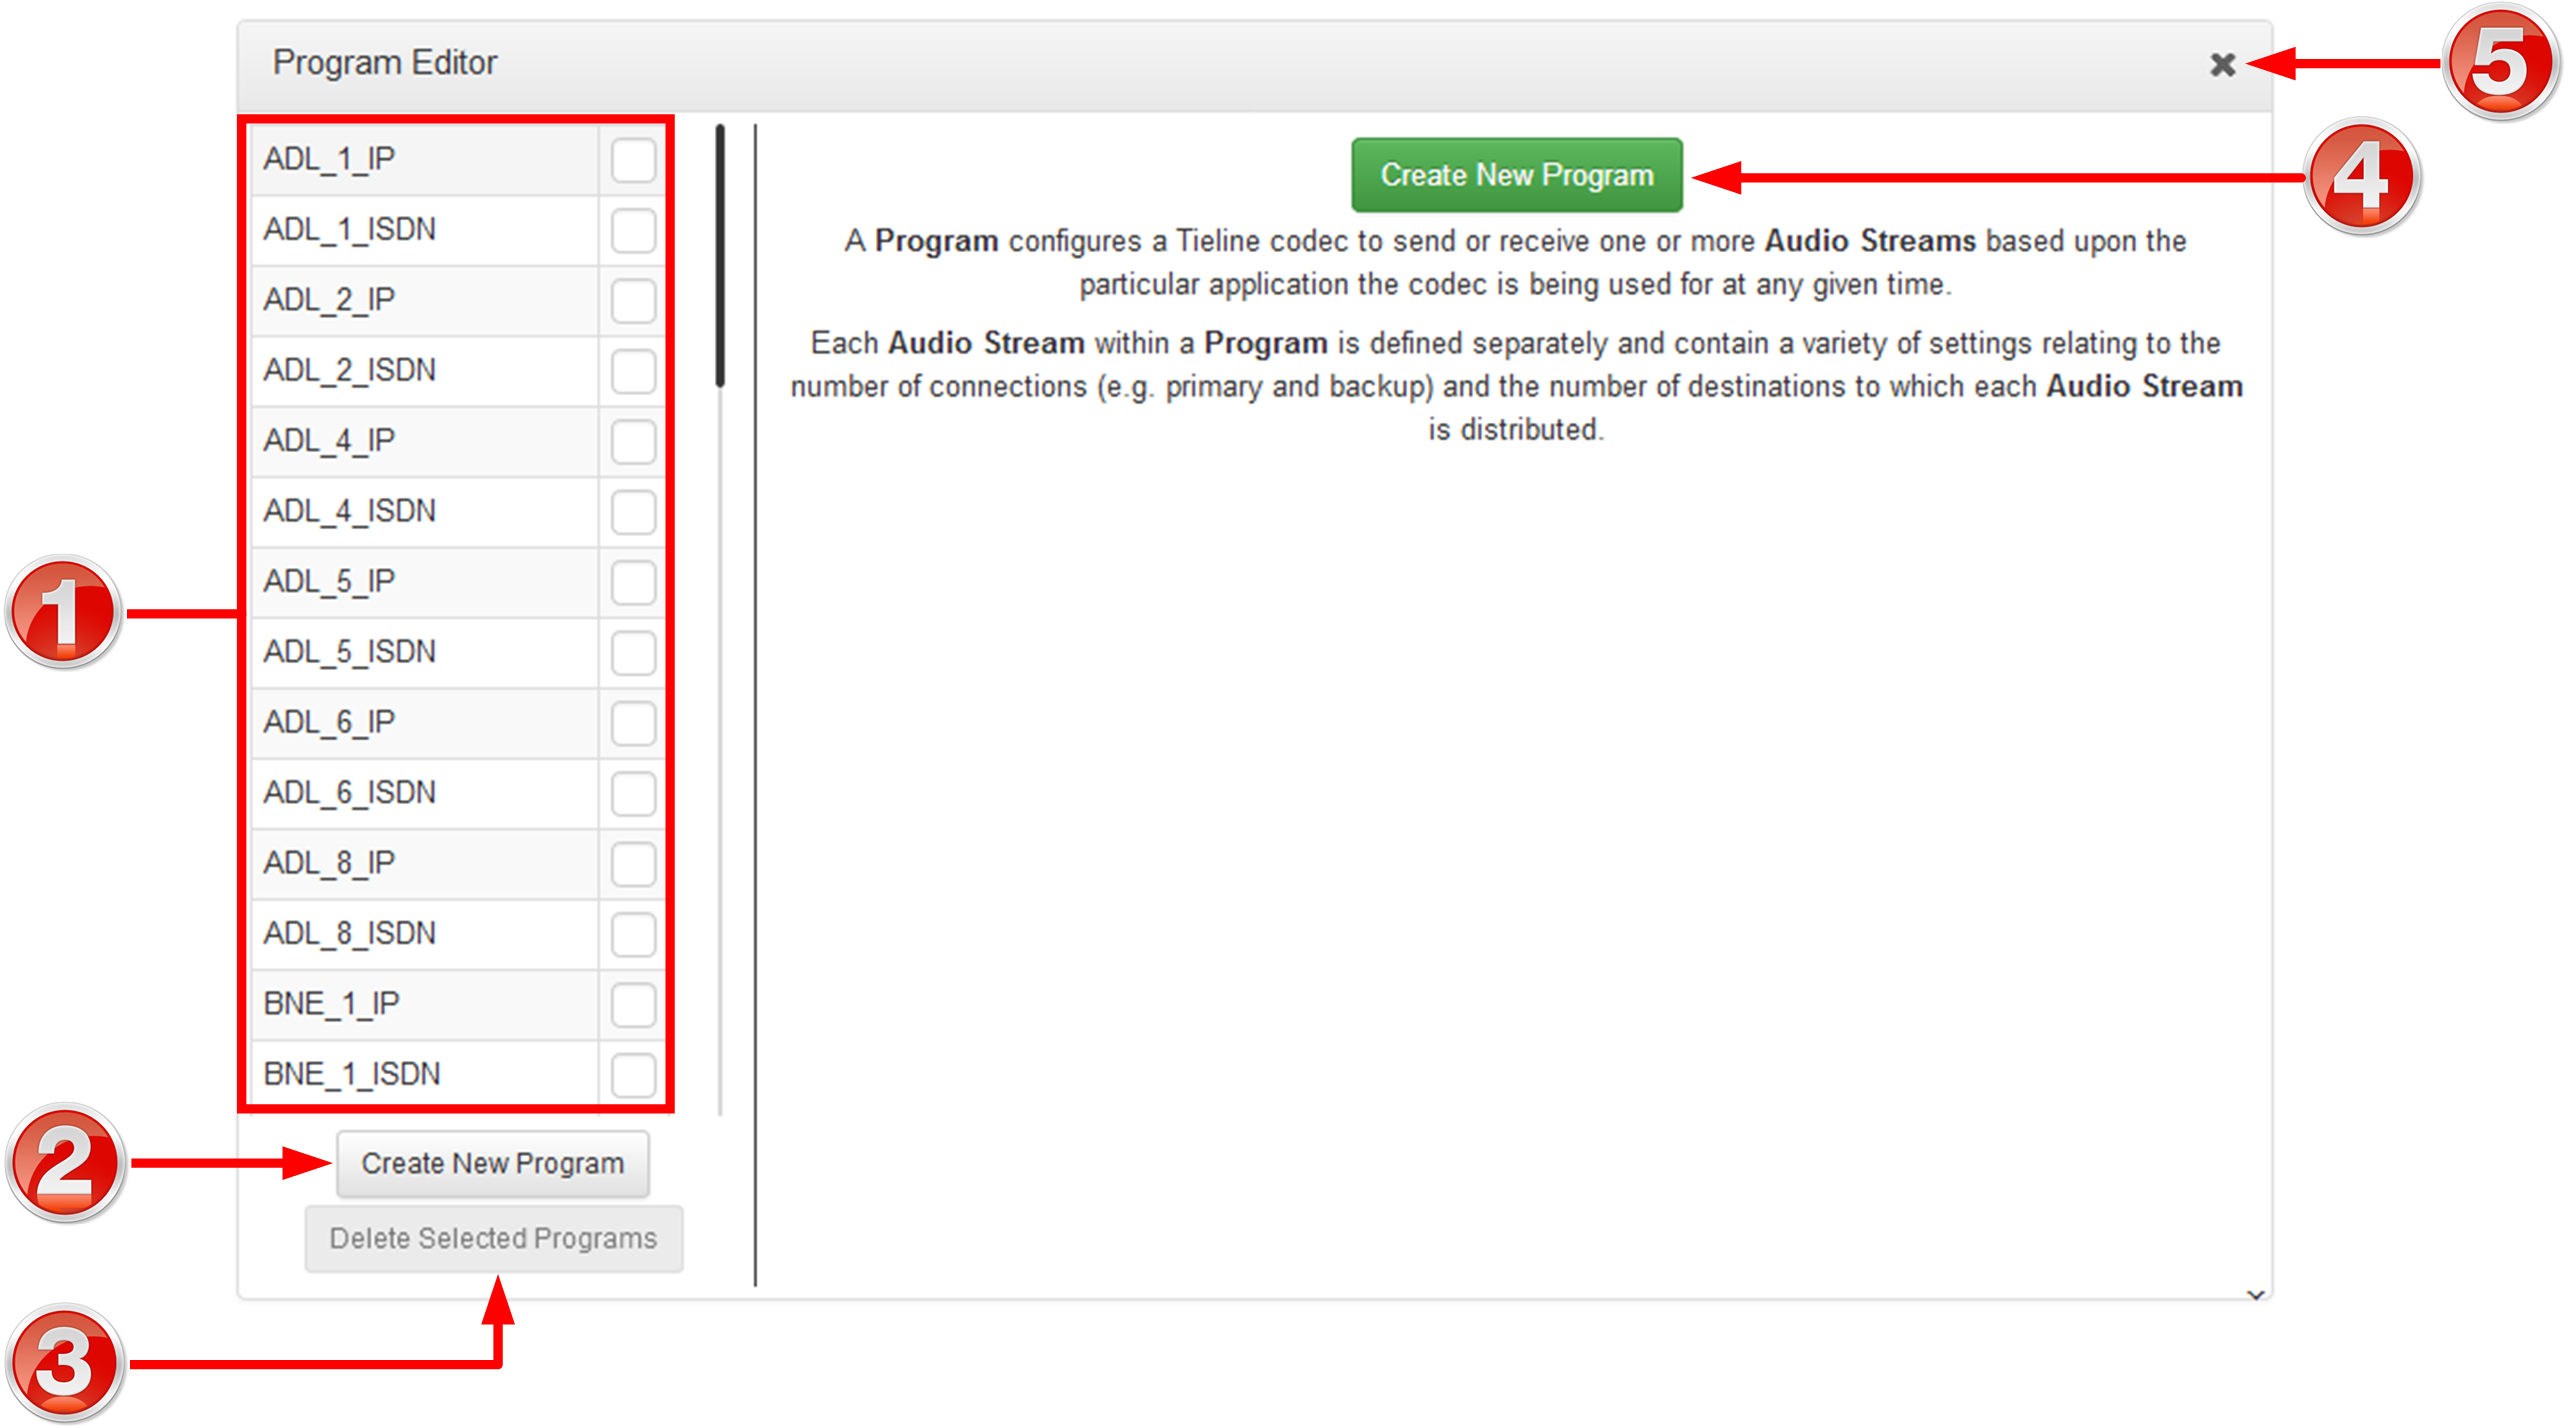
Program Manager Panel
|
Feature |
Description |
1 |
Program list |
The list of saved programs in the codec. |
2 |
Create New Program button |
Click to create a new program using the program wizard. |
3 |
Delete Selected Program button |
Click to delete all selected programs |
4 |
Create New Program button |
Click to create a new program using the program wizard. |
5 |
Close button |
Click to close the panel. |
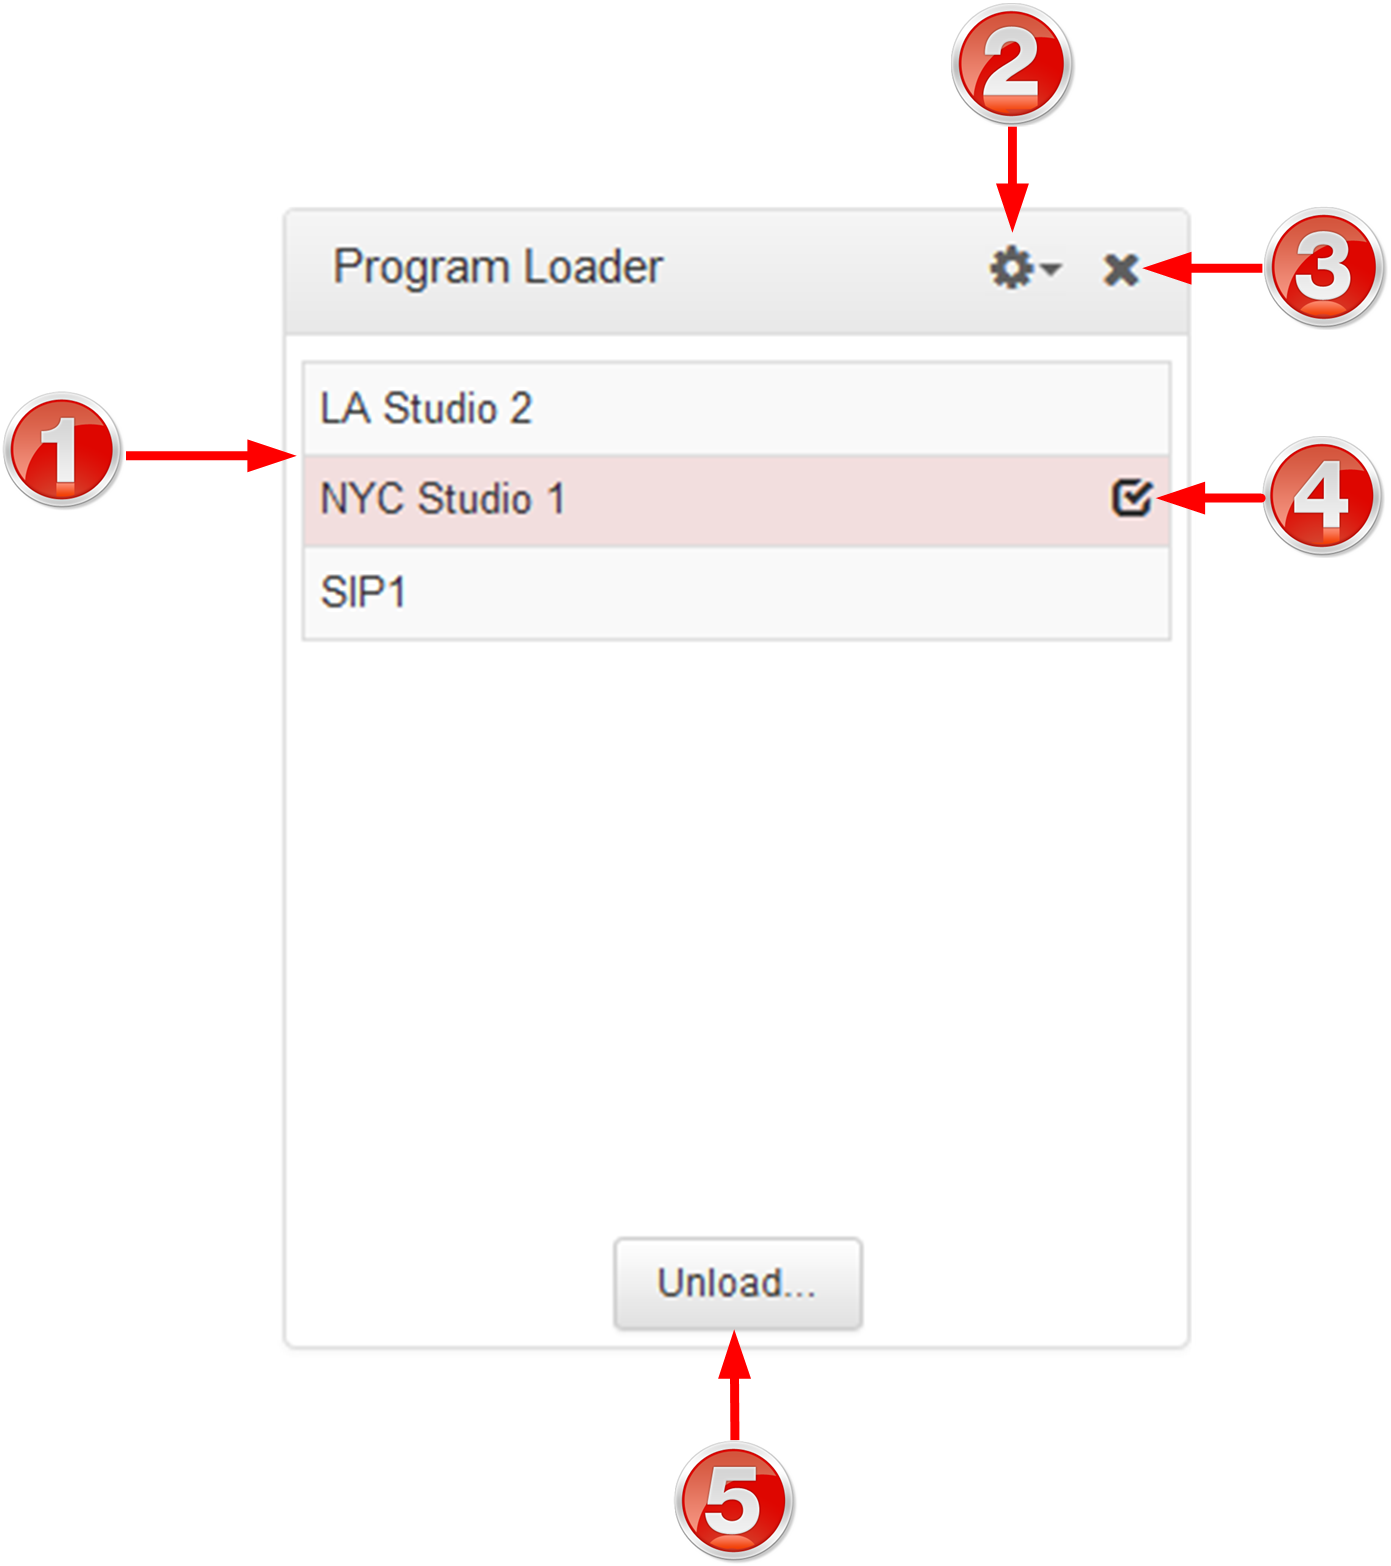
Program Loader Panel
|
Feature |
Description |
1 |
Programs list |
Lists all configured programs which have been added into the codec. Click to select a program before loading. |
2 |
Listing options |
Alphabetical listing options |
3 |
Close button |
Click to close the panel. |
4 |
Check-box symbol |
The Check-box symbol identifies the currently loaded program in the codec. |
5 |
Load and Unload button |
Click Load to load the currently selected program in the Programs list; the button changes automatically to Unload after loading, to allow unloading of a program when required. |
Scheduler Panel

|
Feature |
Description |
1 |
Date selection |
Select the days you wish to view in the scheduler. |
2 |
Add event button |
Click to create a new scheduled event. |
3 |
View type |
Click to select the timeframe or timeline view of scheduled events. |
4 |
Information symbol |
Hover over the Information symbol to view information about the Scheduler panel. |
5 |
Options menu |
Click the Options symbol to view timezone options and generate a PDF view, or enable/disable the scheduler. |
6 |
Close button |
Click to close the panel. |
Scheduler Events Panel

|
Feature |
Description |
1 |
Grouping |
Drag and drop a column header to group scheduled events by that column, e.g. Codec Time. |
2 |
List of scheduled events |
View scheduled events in a list view |
3 |
Close button |
Click to close the panel. |
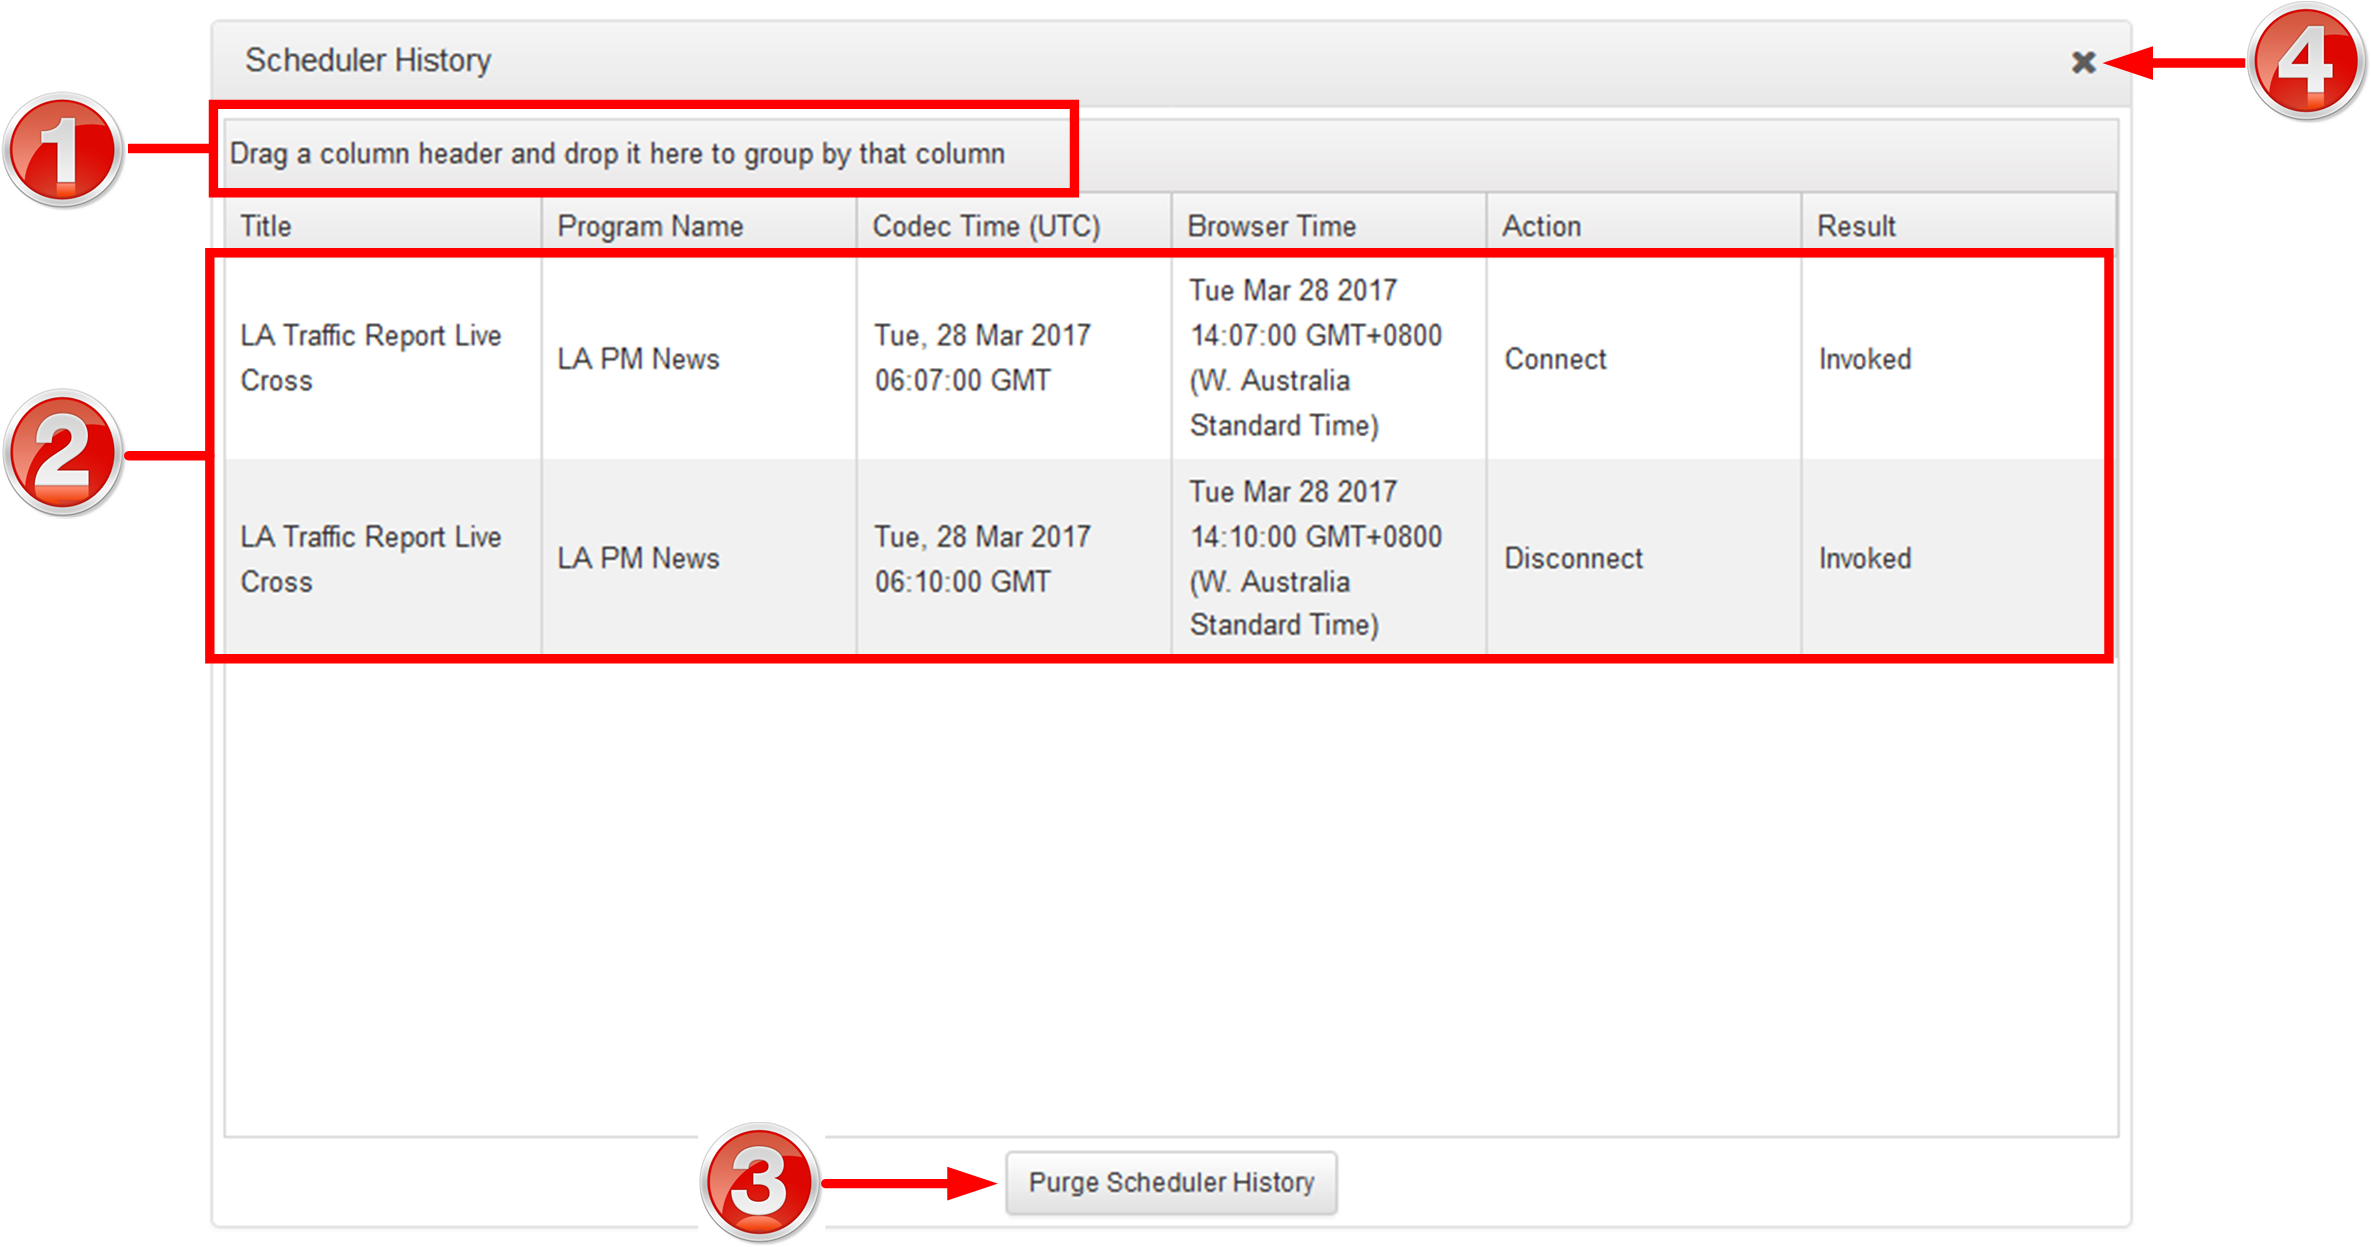
Scheduler History
|
Feature |
Description |
1 |
Grouping |
Drag and drop a column header to group event history by that column, e.g. Codec Time. |
2 |
Event History List |
View the codec's history of scheduled events. |
3 |
Purge Scheduler History button |
Click to clear all event history displayed. |
4 |
Close button |
Click to close the panel. |
Statistics Panel

|
Feature |
Description |
1 |
Show/Hide Arrow |
Click to show/hide audio stream statistics. |
2 |
Show/Hide Arrow |
Click to show/hide individual connection statistics. |
3 |
Close button |
Click to close the panel. |
Audio Menu Panels
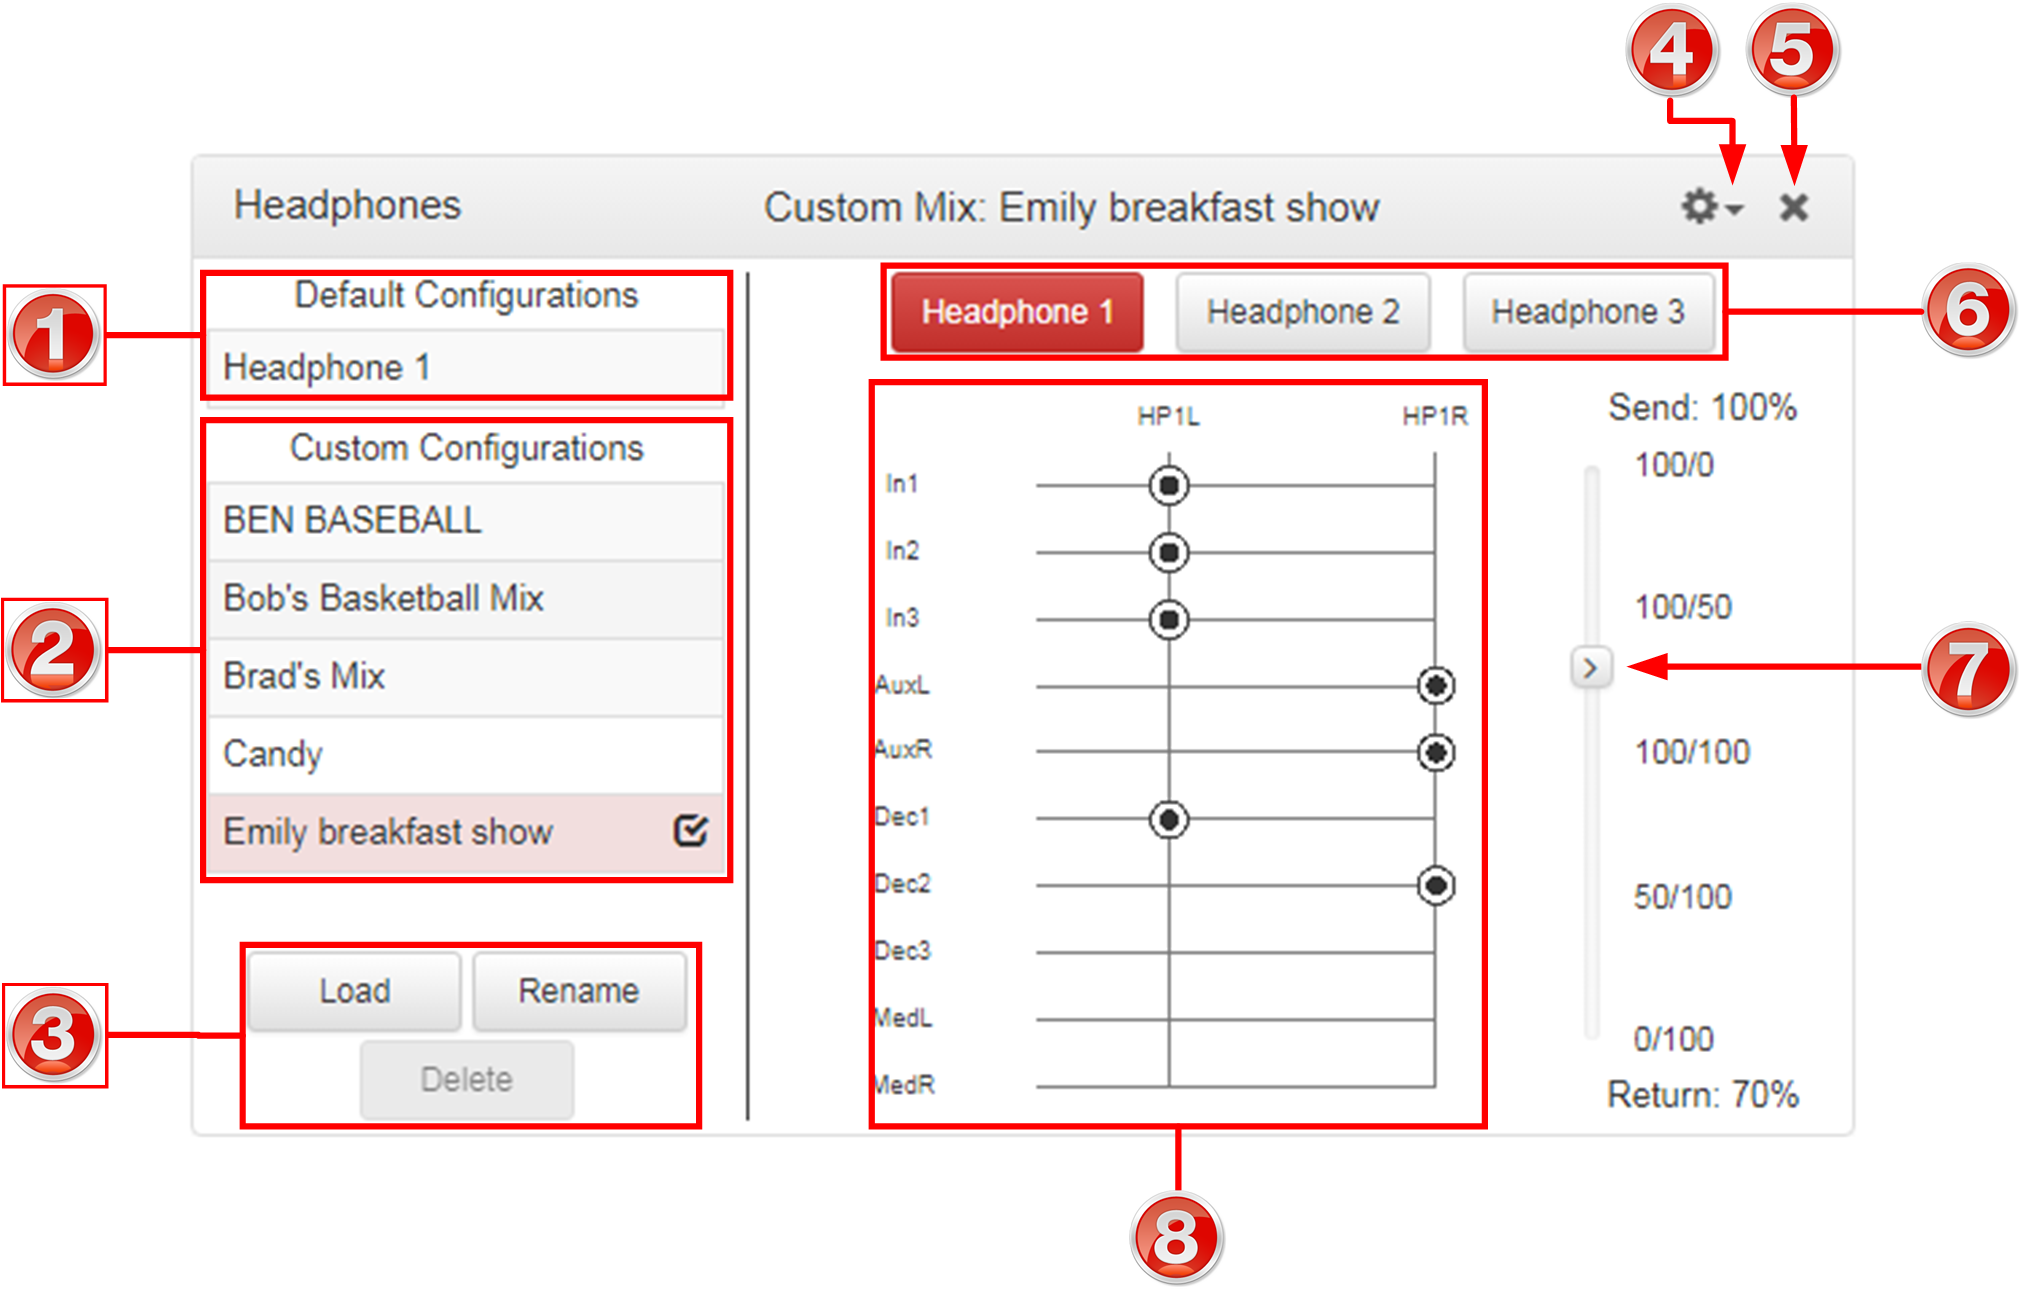
Headphones Panel
|
Feature |
Description |
1 |
Default Configurations |
Displays the default headphone mix being viewed and/or edited. |
2 |
Custom Configurations |
Lists custom headphone mixes available. |
3 |
Load, Rename, Delete buttons |
Buttons used to load, rename and delete custom configurations |
4 |
Options menu |
Menu options available to undo any changes, reset the mix to the loaded matrix in the Matrix Editor, or save a new mix. |
5 |
Close button |
Click to close the panel. |
6 |
Headphone select buttons |
Click to select and view a headphone mix and edit routing. |
7 |
Send/Return balance slider |
Click and drag to adjust the balance between outgoing and incoming audio. |
8 |
Headphone crosspoint matrix |
Click to select and deselect audio crosspoints to customize routing. |
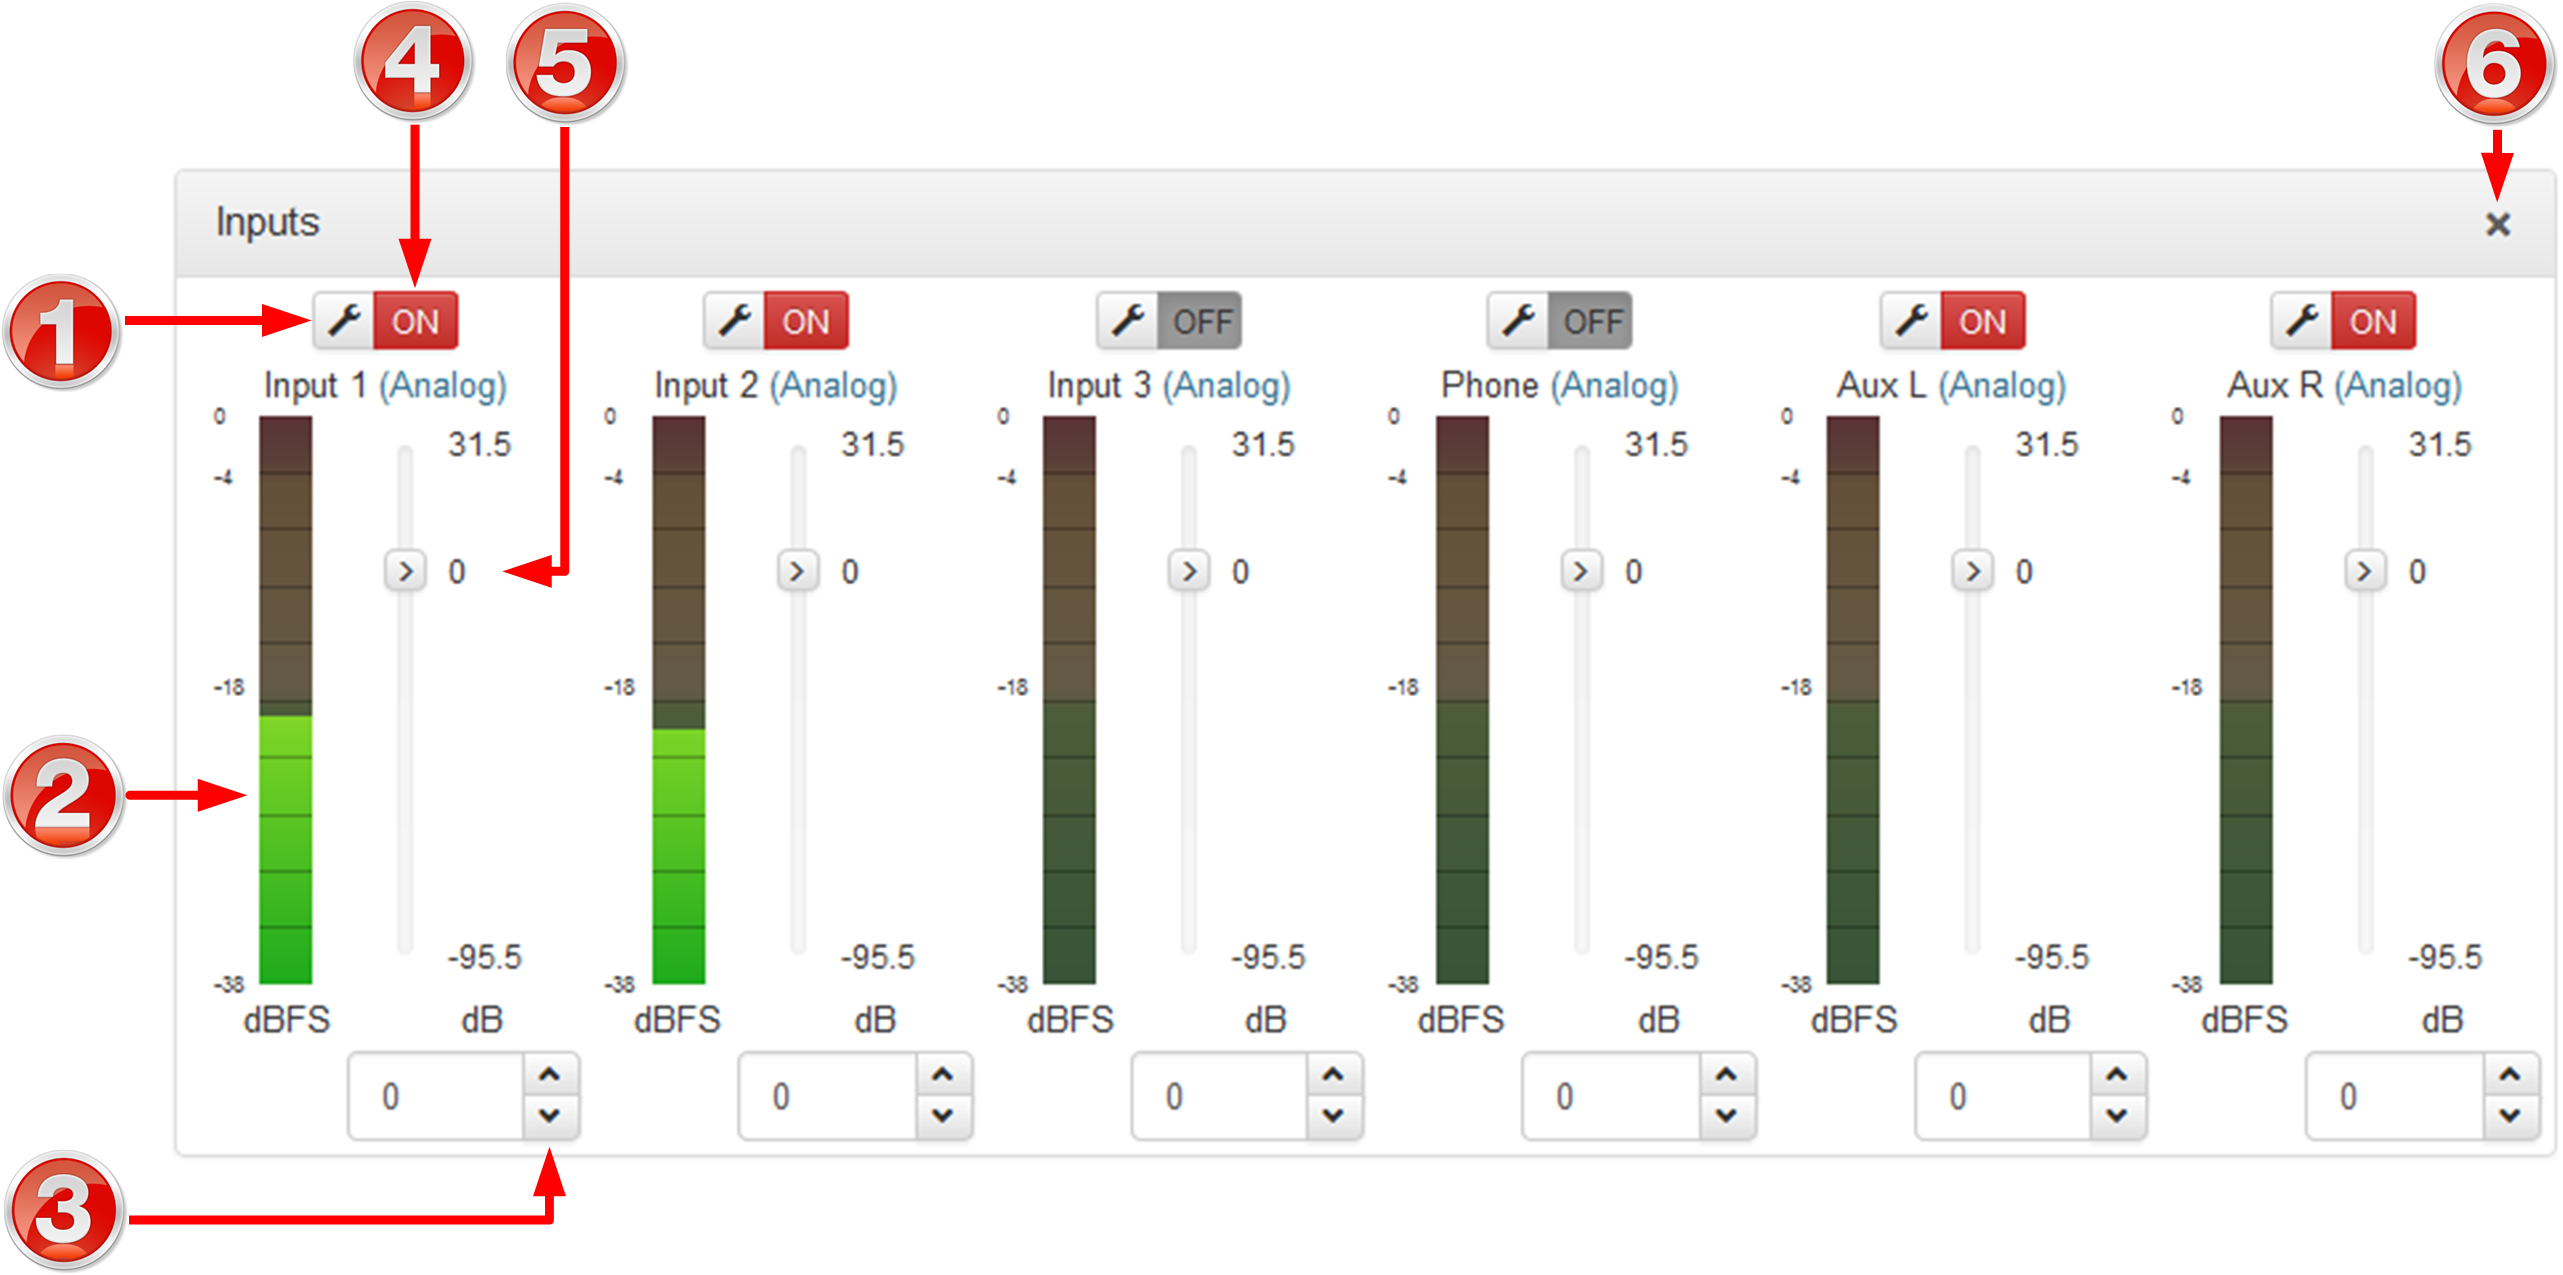
Inputs Panel
|
Important Note: Tieline codecs have different input configurations, therefore the image shown may not reflect the number of inputs displayed in your codec Web-GUI. |

|
Feature |
Description |
1 |
Settings button |
Click to adjust input Name, Type, Polarity Inverted and IGC settings. |
2 |
Input PPM meter |
Input PPM meter. |
3 |
Input gain adjustment |
Click to adjust input gain in 0.5dB increments |
4 |
On/Off button |
Click to toggle an input on or off. |
5 |
Input Sliders/Faders |
Input gain control sliders/faders. Input gain adjustments in +/- 0.5dB increments |
6 |
Close button |
Click to close the panel. |
Matrix Editor Panel

|
Feature |
Description |
1 |
Default Configurations |
Displays the default matrix mix. |
2 |
Custom Configurations |
Lists custom matrices available. |
3 |
Load, Rename, Delete buttons |
Buttons used to load, rename and delete custom matrices |
4 |
Options menu |
Menu options available to undo any changes, reset the mix to the current matrix loaded in the Matrix Editor, or save a new matrix. |
5 |
Close button |
Click to close the panel. |
6 |
Cue / Talkback select buttons |
Click to select and view a Cue or Talkback mix and edit routing. |
7 |
Matrix Editor crosspoint matrix |
Click to select and deselect audio crosspoints to customize routing. |
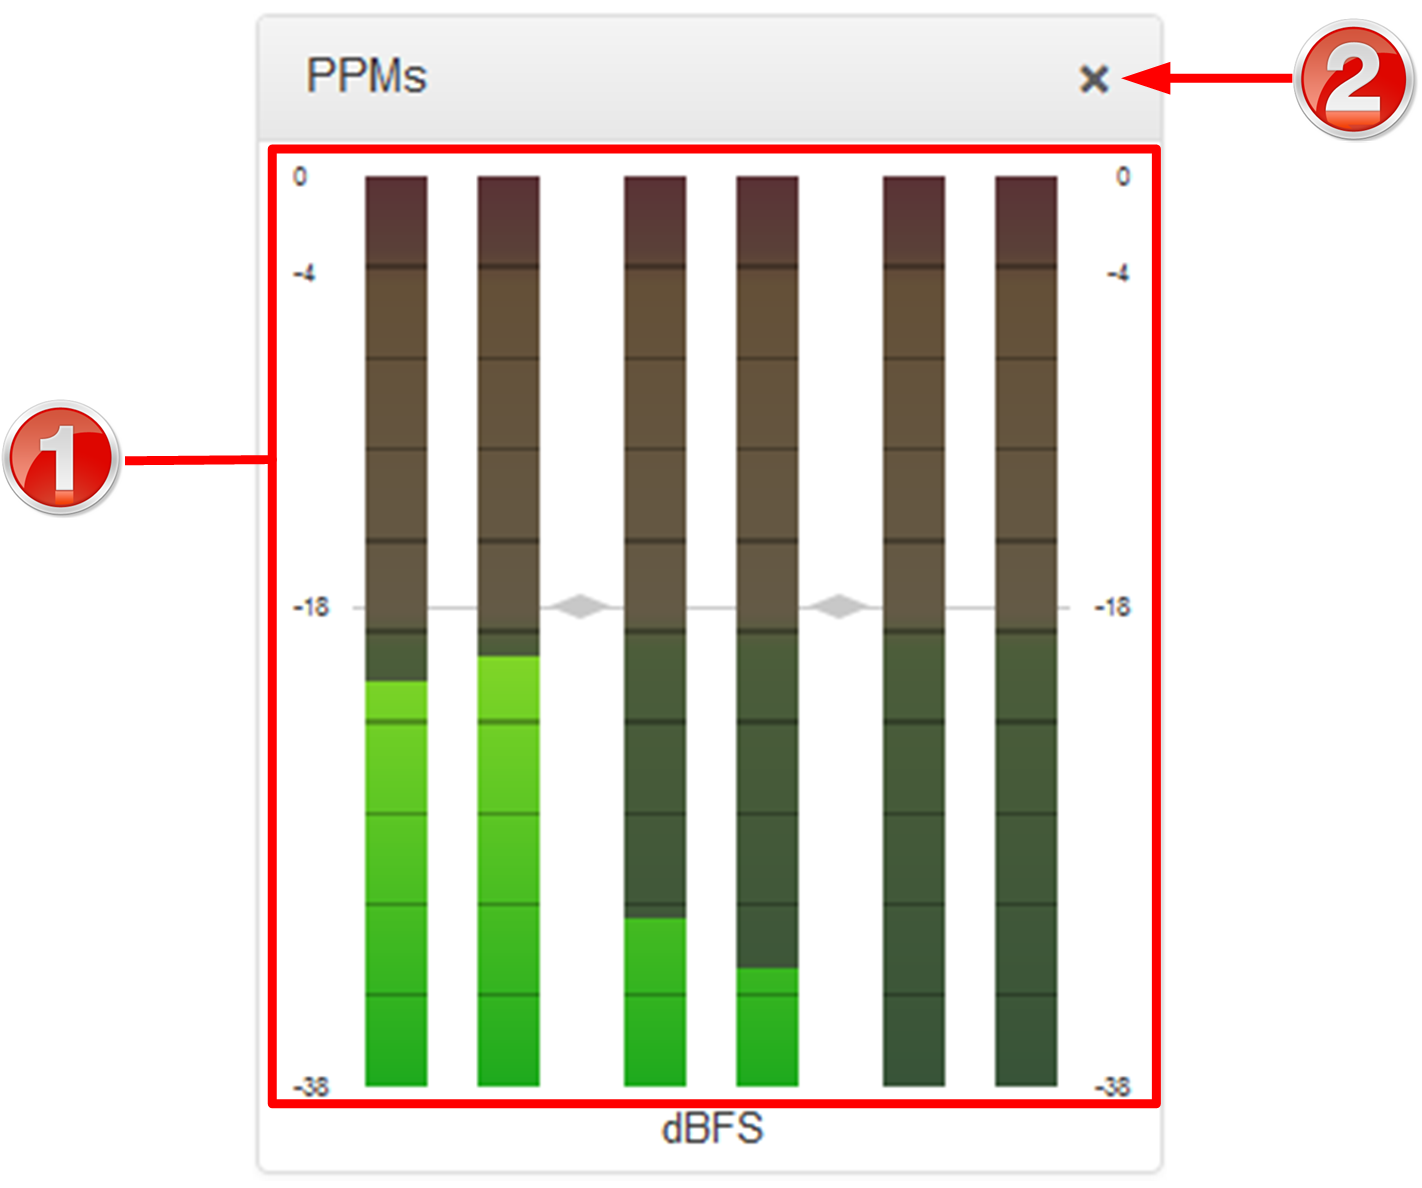
PPMs Panel
Note: Click and drag the bottom right-hand corner to expand the panel.
|
Feature |
Description |
1 |
PPM Mode |
Select a preferred PPM meter mode. Options include Program Default, Input, Decoder, HP Monitor and Input / Output |
2 |
PPM Meters |
6 PPM meters using dBFS metering |
3 |
Close button |
Click to close the panel. |
Control Menu
Rules Panel

|
Rule |
Description |
1 |
Connect and disconnect a program when an input is toggled |
Click to configure connection and disconnection by toggling an input. |
2 |
Connect when an input is switched ON; Disconnect when another input is switched ON |
Click to configure connection and disconnection after different relay inputs are switched ON. |
3 |
Synchronize a local relay input with a remote relay output |
Click to configure a local relay input to synchronize with the state of a remote relay output. |
4 |
Synchronize a local relay input with a local relay output |
Click to configure a local relay input to synchronize with the state of a local relay output. |
5 |
Toggle a relay based on a connection's status |
Click to configure a relay to toggle based on connection status. |
6 |
Back / Add New Rule button |
Click to add a new rule, or exit the rule creation function. |
7 |
Close button |
Click to close the panel. |
Transport Panels
There are several Transport panels which can be opened in the Web-GUI. Each panel provides specific transport-related configuration settings and options. Click to select and open each panel. |
|
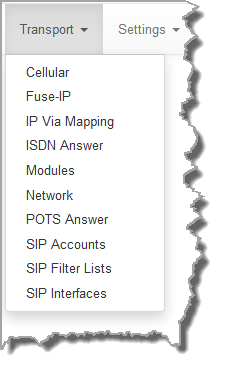
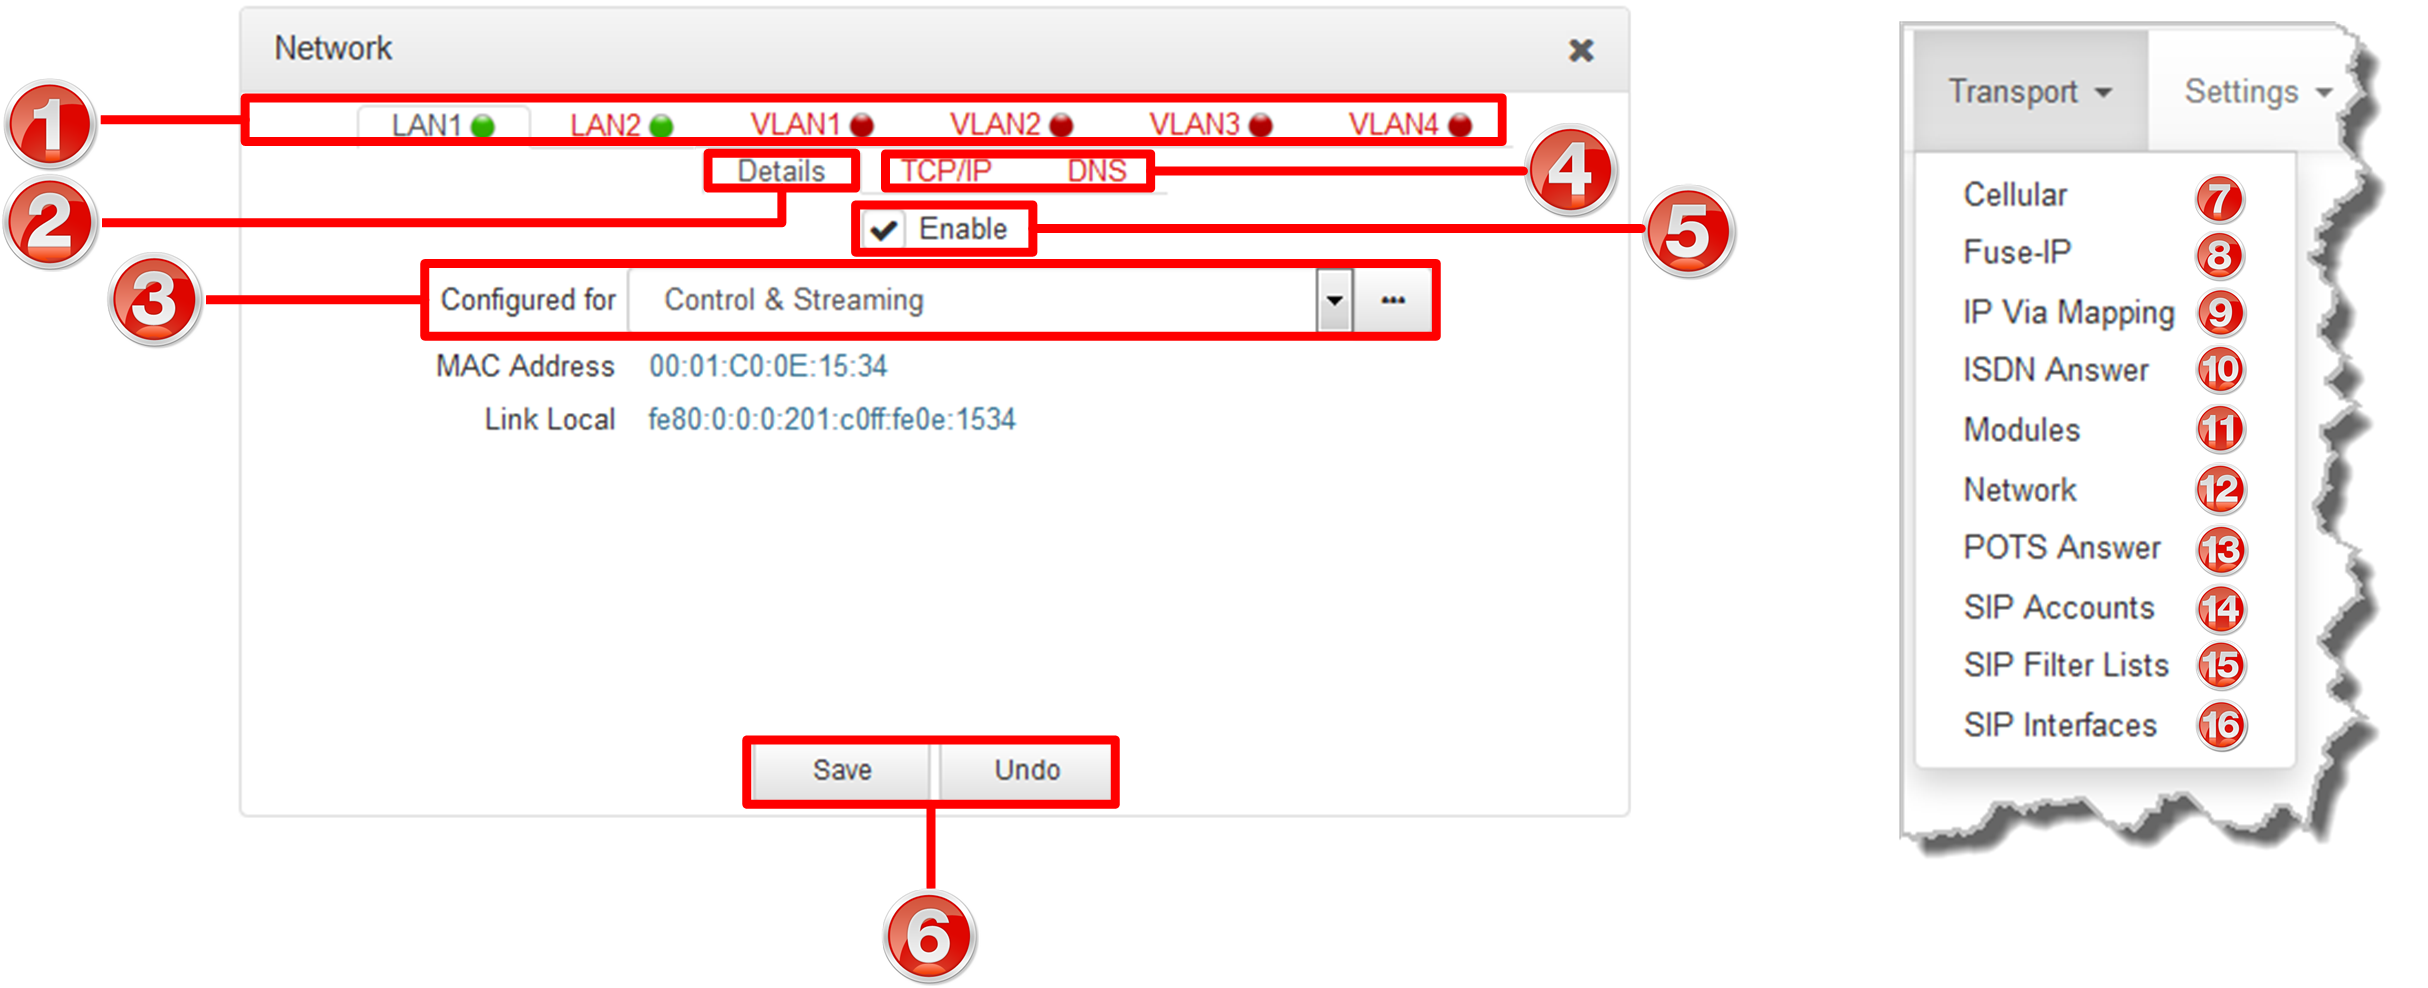
As an example, the Network panel is displayed with network interface configuration options. A brief description of the other panels is also provided.
|
Feature |
Description |
1 |
Network interfaces |
Click to select and edit, or view network configuration settings for each Ethernet and VLAN interface. |
2 |
Details tab |
Display configuration options for a selected network interface, plus other device details. |
3 |
Control/Streaming |
Select Control and/or Streaming options for the selected interface. |
4 |
TCP/IP and DNS tabs |
Select the TCP/IP tab to configure IPv4/IPv6 address details. Select the DNS tab to specify DNS addresses and domains to search. |
5 |
Enable check-box |
Select the check-box to enable an interface. |
6 |
Save/Undo button |
Click Save to store settings, or click Undo to revert to previously configured settings. |
7 |
Cellular |
Click to open the Cellular panel and configure USB air cards or an internal cellular module with a SIM card |
8 |
Fuse-IP |
Click to open the Fuse-IP panel and configure Fuse-IP bonding |
9 |
IP Via Mapping |
Configure default Primary, Secondary and Tertiary interfaces. |
10 |
ISDN Answer |
Click to open the panel and configure ISDN Answering settings. |
11 |
Modules |
Click to edit hardware module configuration. |
12 |
Network |
Click to open the Network panel and configure network settings. |
13 |
POTS Answer |
Click to open the panel and configure POTS Answering settings. |
14 |
SIP Accounts |
Click to open the panel and edit SIP account settings. Up to 6 SIP accounts are supported. |
15 |
SIP Filter Lists |
Add trusted network codecs to the URI Whitelist. Add SIP URIs to the URI Blacklist and add user agents to the User Agent Blacklist to deny them access to the codec. |
16 |
SIP Interfaces |
Click to open the panel and configure port, proxy and Via settings for the SIP1 and SIP2 interfaces. The codec supports dialing over these SIP interfaces simultaneously. |
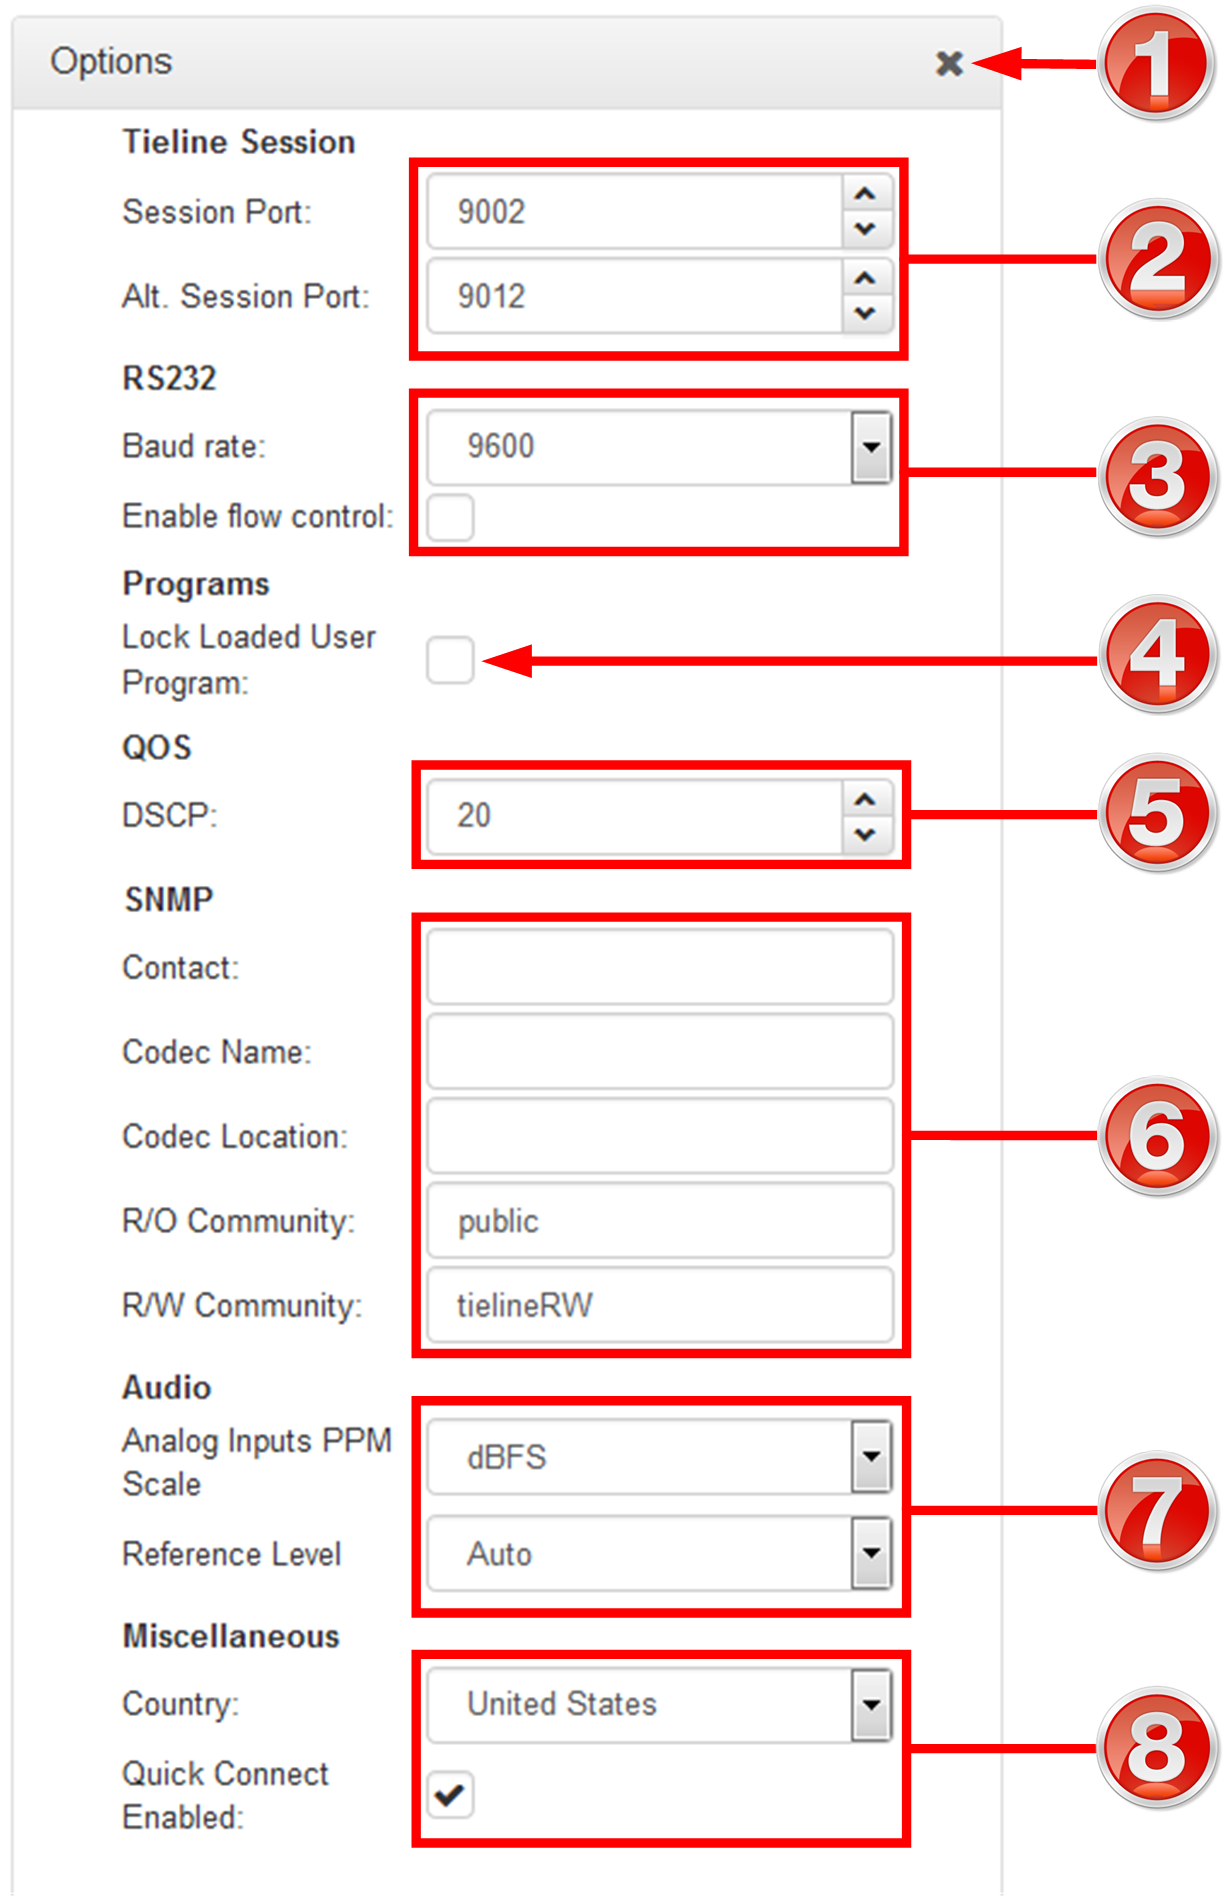
Settings Panels
There are several Settings panels which can be opened in the Web-GUI. Each panel provides different codec configuration settings and options. Click to select and open each panel.
As an example, the Options panel is displayed with a brief description of the other panels available. |
 Settings panels |
|
Feature |
Description |
1 |
Date and Time |
Click to open the panel view and sync the codec to NTP time. |
2 |
Firmware tab |
Click to open the panel; view software versions, download firmware and perform an upgrade. |
3 |
Licensing tab |
Click to open the panel; select a license file and install it in the codec. |
4 |
Options tab |
Click to open the panel; configure RS232 and QoS data settings, lock a loaded user Program and adjust Session Port settings, SNMP, the analog input PPM scale, reference level, AES Output Clock sample rate and enable/disable the Quick Connect HTML Web-GUI option. |
5 |
Reset / Backup |
Click to open the panel; reset codec default settings and perform backup/restore of codec programs and settings. |
|
Feature |
Description |
1 |
Close button |
Click to close the panel. |
2 |
Tieline Session |
Edit the Tieline session and alternative session port used by the codec. |
3 |
RS232 |
Click Baud rate to adjust the baud rate used by the RS-232 serial port on the codec. Select the check-box to Enable Flow Control. |
4 |
Programs |
Select the Lock Loaded User Program check-box to lock the currently loaded program in the codec. |
5 |
QoS |
Configure IP audio data packets for expedited or assured forwarding (Quality of Service or QoS) when traversing different networks. |
6 |
SNMP Settings |
Configure SNMP settings in the codec. |
7 |
Audio |
Configure various audio settings on the codec. |
8 |
Miscellaneous |
Country and Quick Connect Enabled settings. |
Help Panels
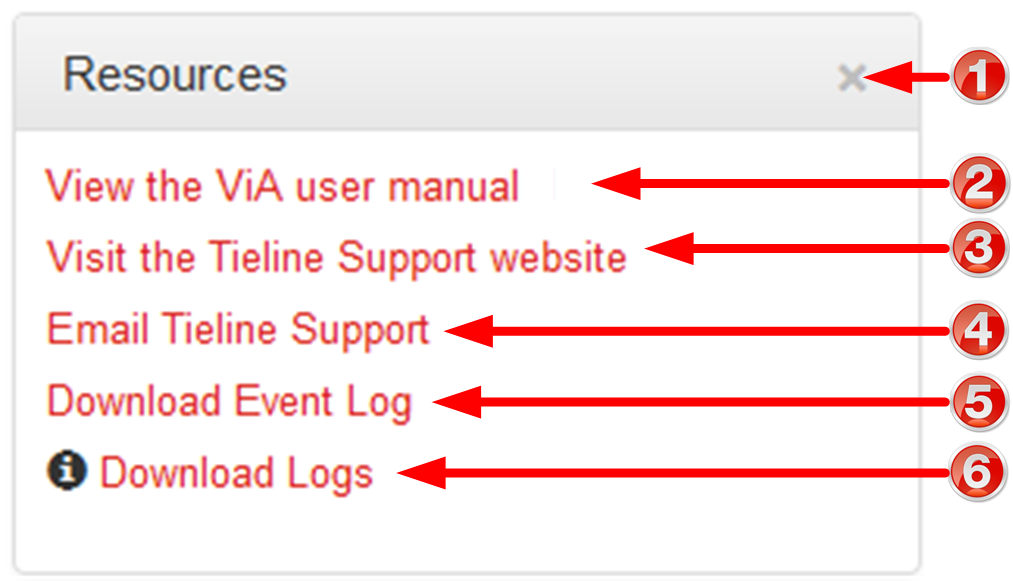
Resources Panel
|
Feature |
Description |
1 |
Close button |
Click to close the panel. |
2 |
User manual link |
Click to open the codec user manual in a new browser, or view support information (Note: the codec name displayed will vary by product type) |
3 |
Support website link |
Click to visit the support page on the Tieline website. |
4 |
Email Support |
Click to email Tieline support. |
5 |
Event Logs |
Click to download user-viewable event logs |
6 |
Support Logs |
Click to download diagnostic information that can be sent to Tieline support |
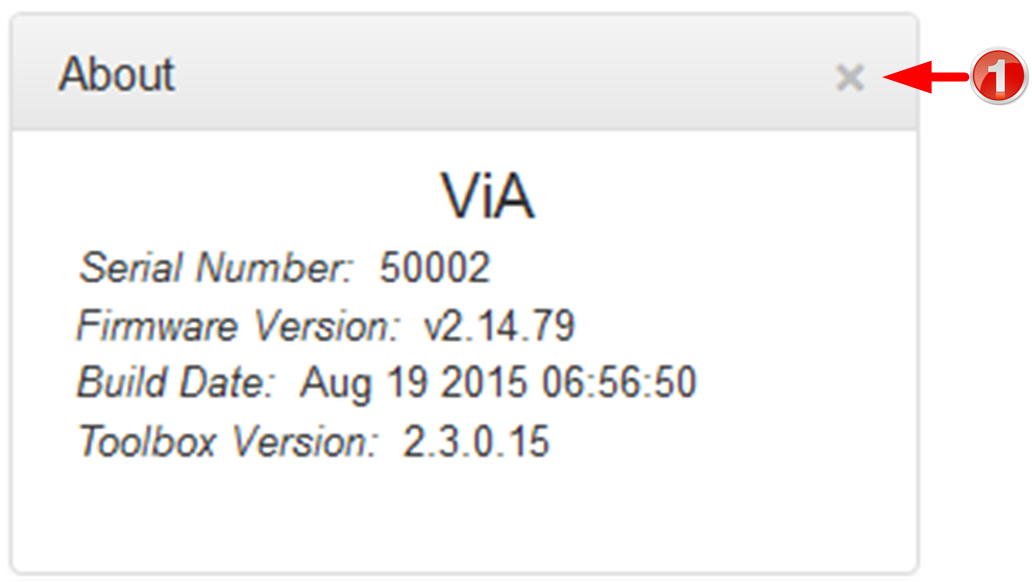
About Panel
Details of the codec Toolbox and firmware version, as well as the codec serial number. Note: the codec name displayed will vary by product type.
|
Feature |
Description |
1 |
Close button |
Click to close the panel. |
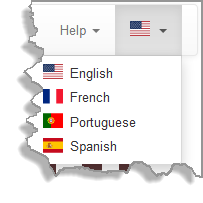
Language Selection
The HTML5 Toolbox Web-GUI offers language support for several languages.
1.Click on the Language drop-down menu arrow in the top right-hand corner of the Web-GUI page.
2.Select the preferred language to display.