The HTML5 Quick Connect Web-GUI is designed for simple peer-to-peer connections and non-technical users. It has a reduced feature-set and allows users to:
1.Load existing programs in a codec via the Program Loader panel and then dial via the Quick Connect panel.
2.Use the Quick Connect panel to create and dial a simple peer-to-peer connection using IP/SIP, ISDN or POTS.
See Opening the HTML5 Web-GUI and Login for details about launching the standalone HTML5 Quick Connect Web-GUI. The Quick Connect panel can also be launched from the Connect menu in the HTML5 Toolbox Web-GUI.
By default, the HTML5 Quick Connect panel is enabled in each codec. To disable this feature:
1.Navigate to Settings in the main HTML5 Toolbox web-GUI and click to open the Options panel.
2.Navigate to Quick Connect Enabled and deselect the check-box.
|
Important Note: Simple peer-to-peer connections are not saved as programs with unique names. Details of the last ad hoc dial are retained in the Quick Connect panel, even after a program is loaded and unloaded using the Program Loader panel. |

Launching the HTML5 Quick Connect Web-GUI
1.Type the codec IP address in your web-browser.
2.Click to launch the HTML5 Toolbox Quick Connect Web-GUI.
3.Enter the authentication Password for the codec and click OK.
4.The panels in the Quick Connect Web-GUI will automatically be displayed.

|
Important Note: To change the password using the codec TOUCH SCREEN navigate to Settings > System > Web GUI > Password. Use the TOUCH SCREEN keypad to enter a new password and tap Done in the top right-hand corner to save the new setting. |
Loading and Unloading an Existing Program
If programs are saved in the codec they are displayed in the Program Loader panel.
1.Click to select a program in the Program Loader panel and click the Load button to load it in the codec.
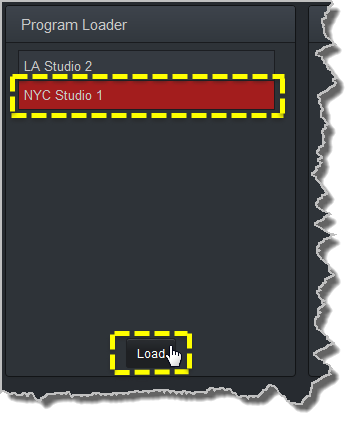
2.The Check-box symbol appears next to the program name to confirm it has been loaded and the Load button changes to an Unload button.
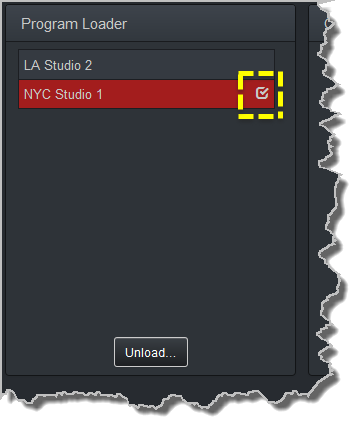
To unload a program click the Unload button.
Dial a Loaded Program
1.Click the Connect button in the Quick Connect panel to dial a loaded program. Note: After connecting, the Connect button changes to a Disconnect button.

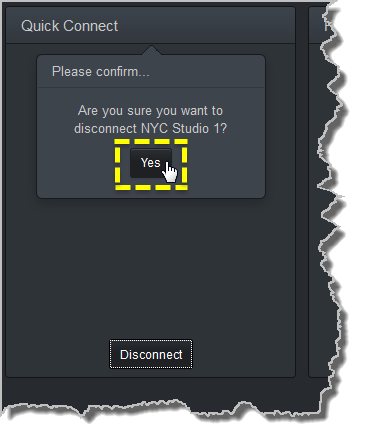
Disconnect a Loaded Program
1.Click the Disconnect button in the Quick Connect panel.
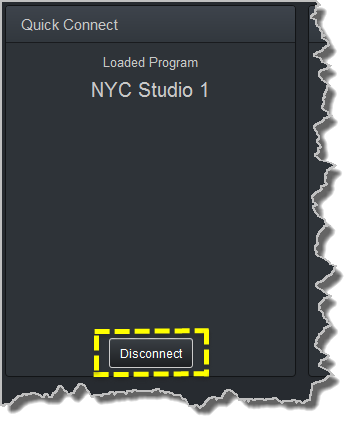
2.Click Yes in the confirmation dialog to disconnect the connection.
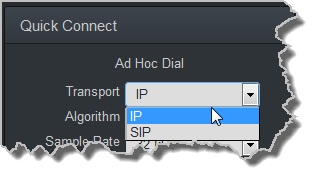
Dial Peer-to-Peer over IP with Quick Connect
|
Important Notes: •Click the Unload button in the Program Loader panel if a program is currently loaded. •To dial over IP using SIP, click the drop-down arrow for Transport and select SIP. |
1.Click the drop-down Transport menu arrow in the Quick Connect panel and select IP.
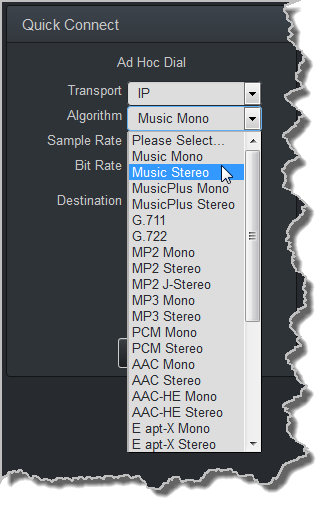
2.Click the drop-down Algorithm menu and select an algorithm.
3.Click the select the appropriate Sample Rate and Bit Rate for the connection. Note: If only one sample rate is available this will be automatically selected.
4.Click in the Destination text box and enter the IP address of the destination codec.
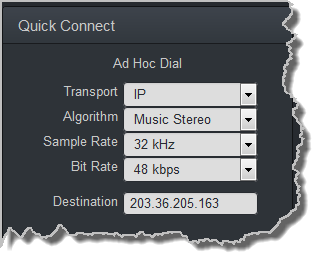
5.Click the Connect button to dial.
Dial Peer-to-Peer over ISDN with Quick Connect
|
Important Notes: Click the Unload button in the Program Loader panel if a program is currently loaded. |
1.Click the drop-down Transport menu arrow in the Quick Connect panel and select ISDN.
2.Click the drop-down Algorithm menu and select an algorithm.
3.Click the drop-down B Channels menu and select the number of channels required for this connection.

4.Click to select the appropriate Sample Rate for the connection.
5.Click in each Destination text box in turn to enter the ISDN number for each B Channel.
6.Click the Connect button to dial.
Dial Peer-to-Peer Over POTS with Quick Connect
|
Important Note: Click the Unload button in the Program Loader panel if a program is currently loaded. |
1.Click the drop-down Transport menu arrow in the Quick Connect panel and select POTS.
2.Click the drop-down Algorithm menu and select an algorithm. The connection bit rate is configured automatically. Note: G5 POTS modems initially attempt to establish a link at the lowest Max Bit rate setting configured in the two modules being connected. If the POTS line doesn't support this bit rate, the modems will attempt to connect at the highest possible bit rate to suit the prevailing line quality at each end of the link.
3.Enter the phone number in the Destination text box.
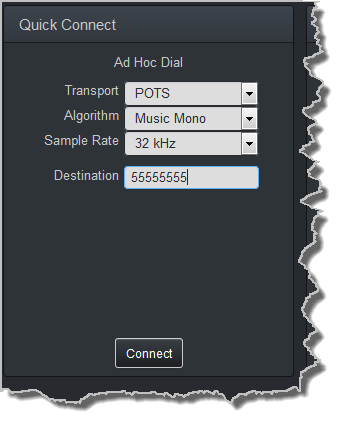
4.Click the Connect button to dial.
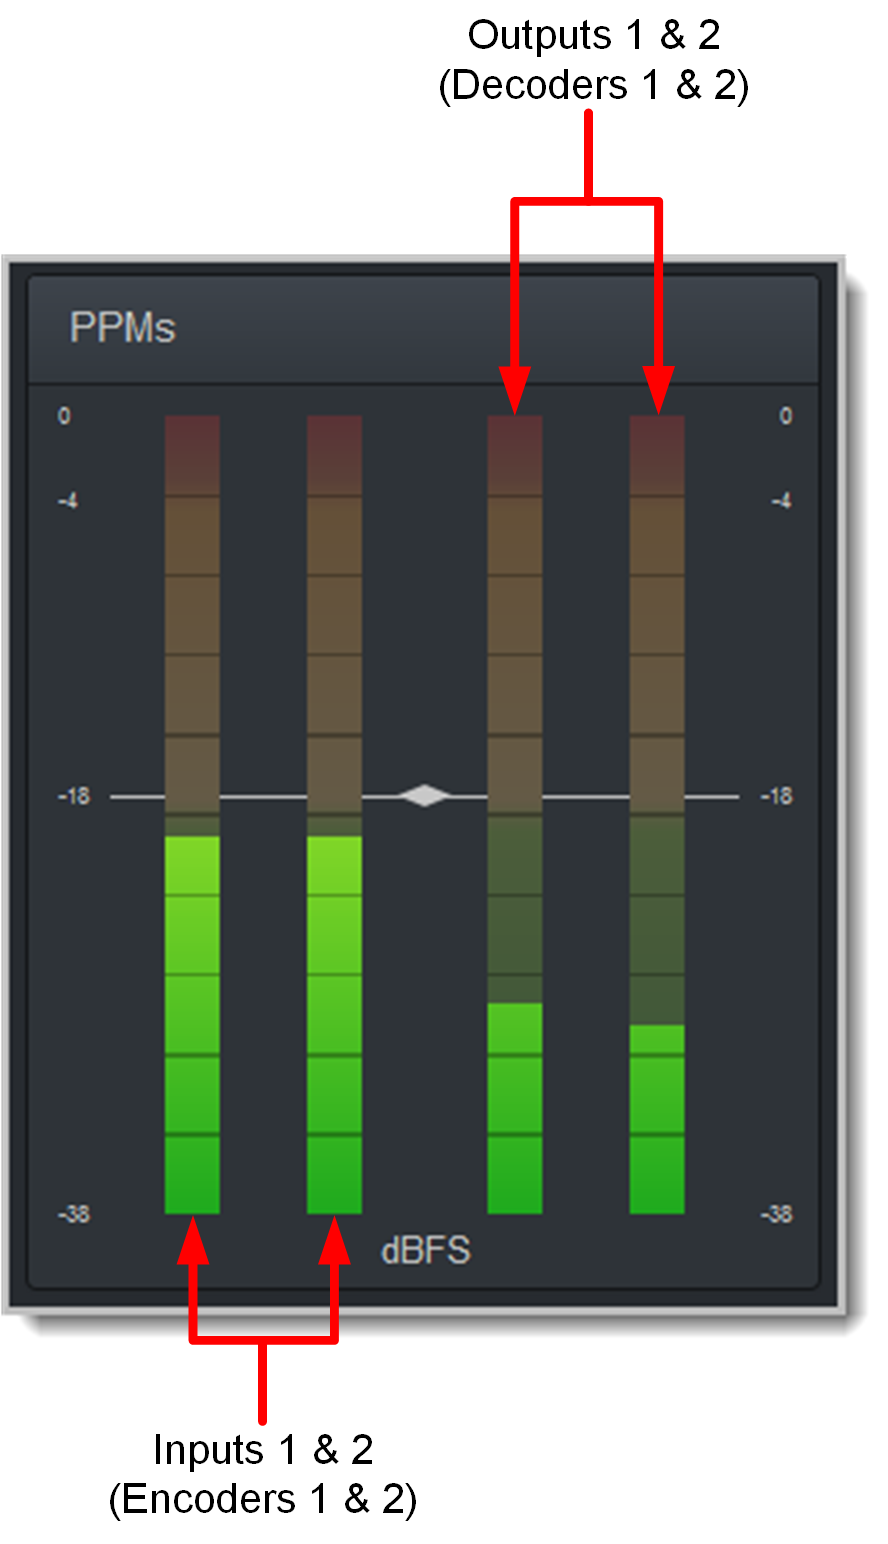
Monitoring PPMs
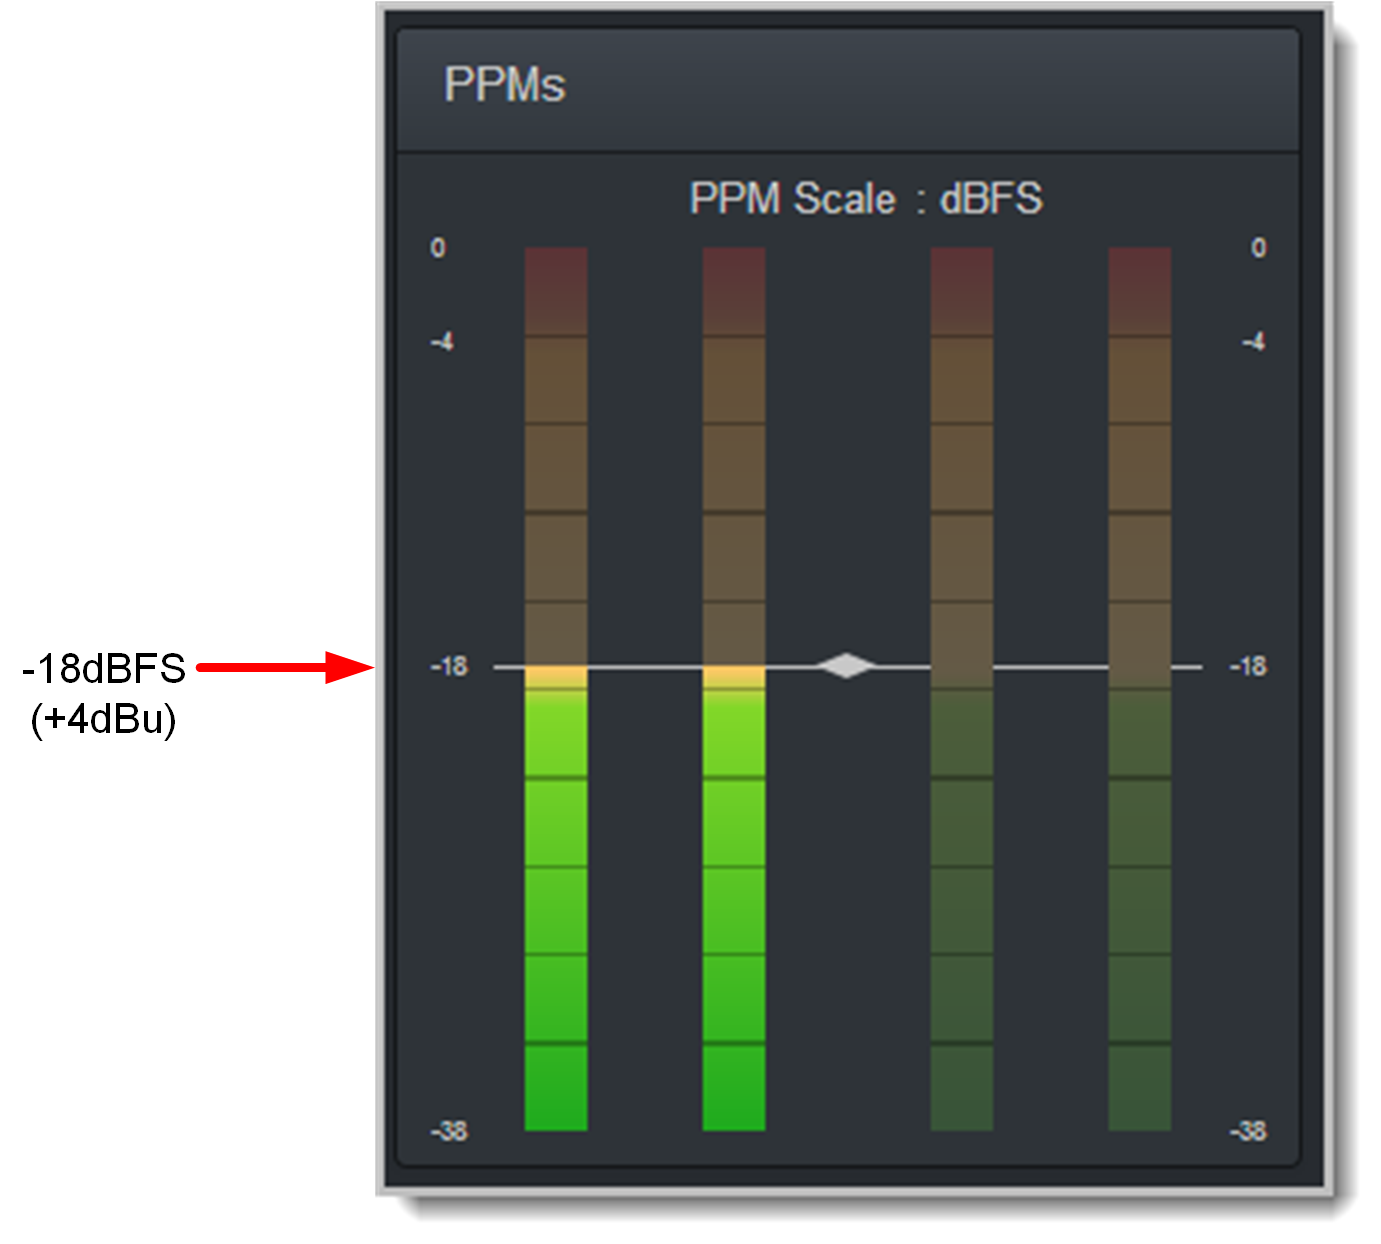
Set audio levels so that audio peaks average at the nominal 0vu point indicated below on the PPM meters. By default, the PPM METERS on the front of the codec, on the TOUCH SCREEN, or in the HTML5 Toolbox Web-GUI, use dBFS to express nominal operating, headroom and noise floor levels.
The codec can also automatically adapt to different Tieline reference scales. A Tieline codec with proprietary Tieline session data enabled will automatically adjust the reference level to suit G5 and G3 codecs, or Report-IT. When connecting to a non-Tieline codec, or a Tieline codec without session data enabled, the codec will use the Tieline G5 reference scale setting.
The default Tieline G5 audio reference scale displayed on the PPMs is -38dBFS to 0dBFS (e.g. Merlin, Genie, Bridge-IT and ViA codec families). Using this reference scale audio peaks can safely reach 0dBFS without clipping, providing 18dB of headroom from the nominal 0vu point.
The audio reference level settings in the codec are:
|
Reference Setting |
Description |
dBFS |
dBu Equivalent |
1 |
Tieline G5 |
PPM meter low point |
-38dBFS |
-16dBu |
Nominal 0vu reference level |
-18dBFS |
+4dBu |
||
Level at which audio will clip/distort |
0dBFS |
+22dBu |
||
2 |
Tieline G3 |
PPM meter low point |
-29dBFS |
-11dBu |
Nominal 0vu reference level |
-14dBFS |
+4dBu |
||
Level at which audio will clip/distort |
0dBFS |
+18dBu |
Mono and Stereo PPM Metering
When connected with a mono program the codec will display a mix of inputs 1 and 2 on PPM1. PPM 3 displays the level of return audio.
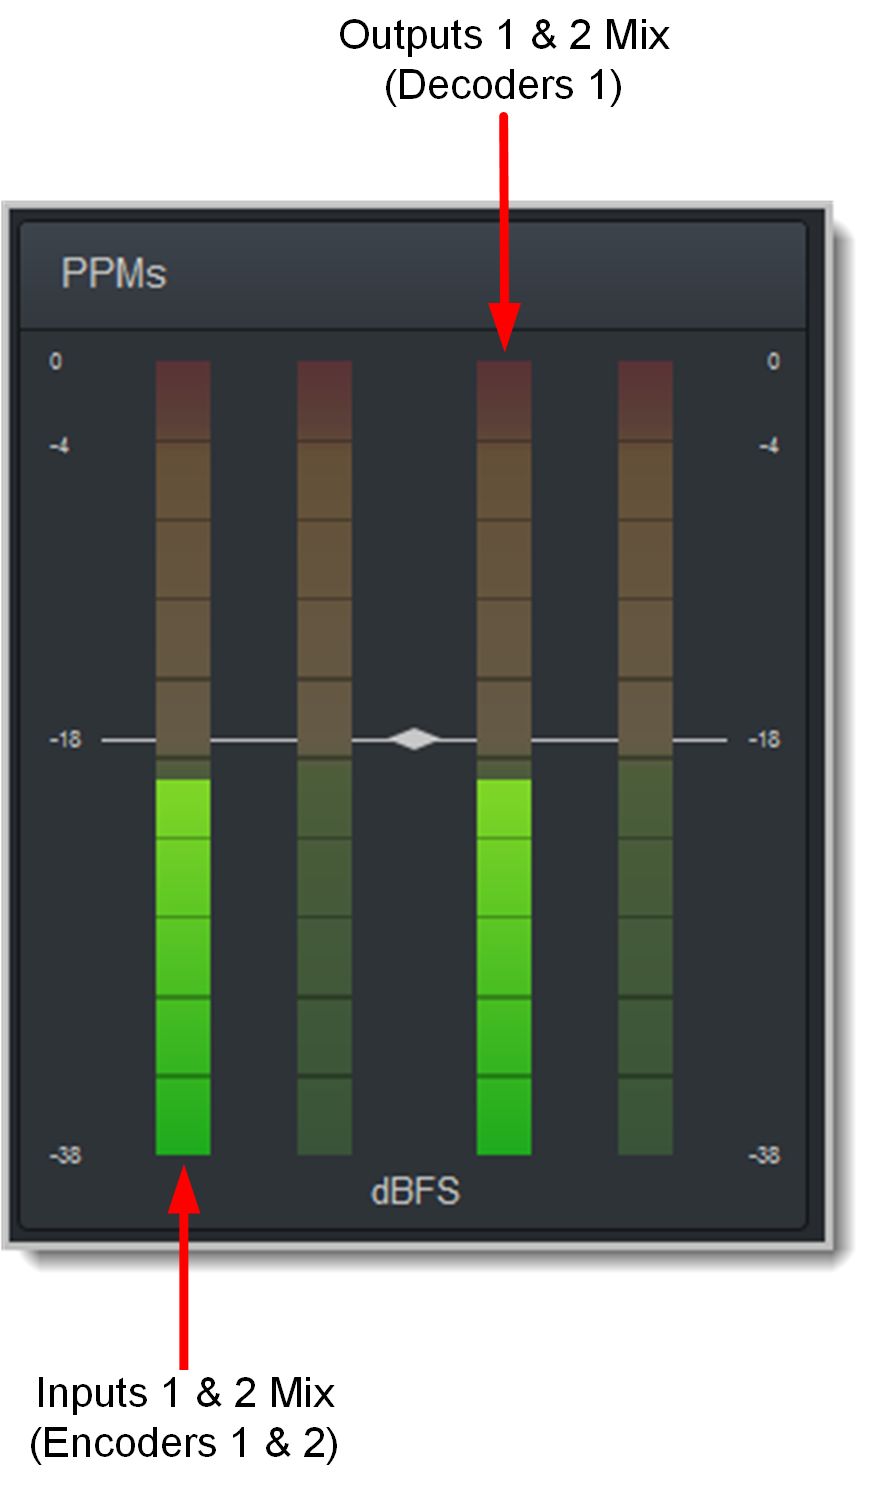
When connecting with a stereo program, the codec displays audio on PPM1 and 2 for inputs 1 and 2 and PPM 3 and 4 for the return audio.