Steps to Connect over ISDN

Contents
The following procedure explains how to create a custom peer-to-peer program and dial another Tieline codec over ISDN using the front panel keypad and navigation buttons.
|
Important Notes: •See Testing ISDN Connections for valuable information about setting up and maintaining reliable ISDN connections. •See ISDN Module Configuration for details on module settings. •See ISDN Answering Configuration for details on ISDN answering settings. •See Configuring ISDN for details on configuring connections via the Java Toolbox Web-GUI, or click here for details on using the HTML5 Toolbox Web-GUI to configure. |
1.Press ![]() and press and release the right
and press and release the right ![]() arrow button to open the Input Audio Level adjustment screen.
arrow button to open the Input Audio Level adjustment screen.
•Press the number on the keypad corresponding to the channel you want to toggle on or off. E.g. press ![]() on the numeric keypad to toggle channel 1 on and off.
on the numeric keypad to toggle channel 1 on and off.
•Use the up ![]() and down
and down ![]() navigation buttons to select the gang function and press the
navigation buttons to select the gang function and press the ![]() button to toggle ganging on/off.
button to toggle ganging on/off.
•Use the up ![]() and down
and down ![]() navigation buttons to select a single channel, or ganged channels. Note: A channel is highlighted when selected.
navigation buttons to select a single channel, or ganged channels. Note: A channel is highlighted when selected.
•Use the left ![]() and right
and right ![]() navigation buttons to adjust the input levels up or down.
navigation buttons to adjust the input levels up or down.
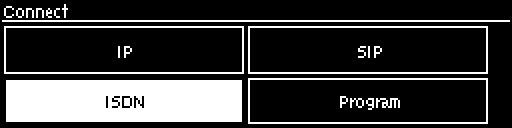
2.Press the HOME ![]() button to return to the Home screen, select Connect > ISDN and press the
button to return to the Home screen, select Connect > ISDN and press the ![]() button.
button.
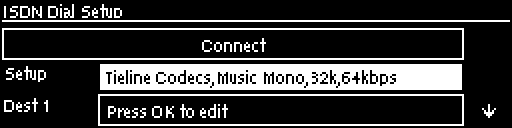
3.Navigate to Setup and press the ![]() button.
button.
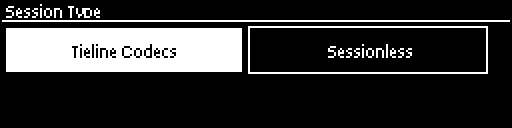
4.Select whether to dial with Tieline Session Data or select Sessionless if dialing a non-Tieline codec, then press the ![]() button.
button.
|
Important Note: By default, when Tieline codecs dial they send call configuration settings to the remote codec using Tieline Session Data. This configures the codec receiving the call with matching algorithm, sample rate and bit rate settings. This does not occur when dialing to non-Tieline devices, therefore Sessionless must be selected to provide compatibility. |
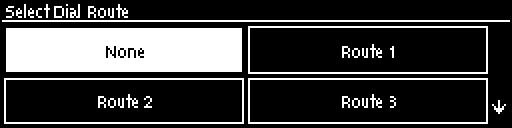
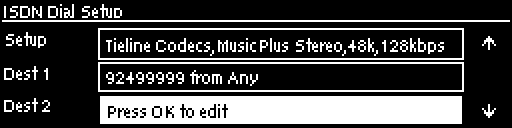
5.Select the Dial Route to use for this audio stream if one is required, then press the ![]() button. Note: See Configuring ISDN Answering for more information on Dial Route and Answer Route tags. These are useful when routing multiple audio streams over transports like ISDN.
button. Note: See Configuring ISDN Answering for more information on Dial Route and Answer Route tags. These are useful when routing multiple audio streams over transports like ISDN.
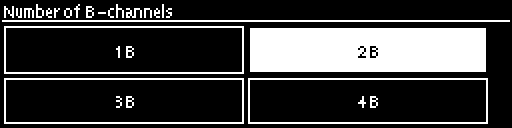
6.Select the number of B channels being used for the audio stream connection, then press the ![]() button.
button.
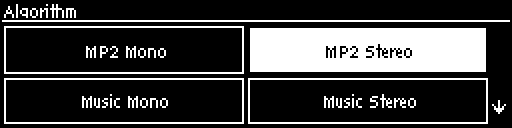
7.Select an algorithm, then press the ![]() button.
button.
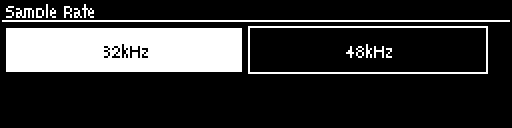
8.Select the sample rate if required, then press the ![]() button.
button.
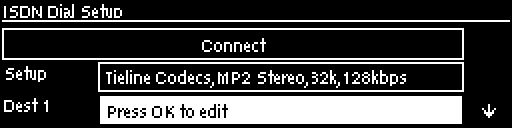
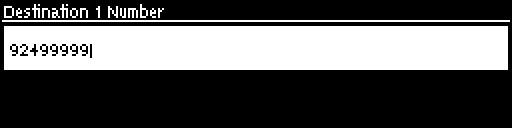
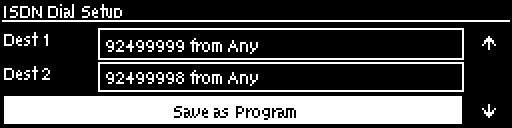
9.Select Destination 1 and press the ![]() button, then use the numeric KEYPAD to enter the ISDN number you want to dial and use the RETURN
button, then use the numeric KEYPAD to enter the ISDN number you want to dial and use the RETURN ![]() button to delete any numbers already entered. Then press the
button to delete any numbers already entered. Then press the ![]() button.
button.
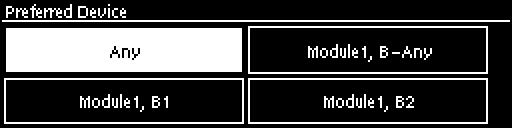
10. Select the preferred B channel to use when dialing and press the ![]() button.
button.
11. If you are dialing over multiple B channels to create a bonded connection select the next destination, e.g. Destination 2, and use the numeric KEYPAD to enter the next ISDN number you want to dial. Do this for all B channel destinations.
12. Navigate down to Auto Reconnect and press the ![]() button to toggle between Enabled and Disabled. Note: This is normally enabled on the dialing codec only.
button to toggle between Enabled and Disabled. Note: This is normally enabled on the dialing codec only.
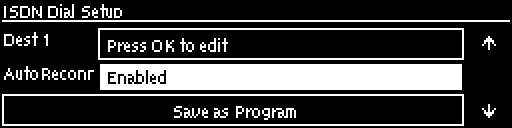
13. At this point we recommend you save a program to simplify dialing and to store this configuration for future use. Use the up ![]() navigation button to select Save as Program and press the
navigation button to select Save as Program and press the ![]() button.
button.
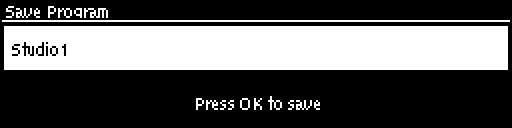
14. Use the numeric KEYPAD to name the program, then press ![]() to save the program.
to save the program.
15. It is possible to dial the B channels associated with this audio stream from this menu. Use the up ![]() navigation button to select Connect and press
navigation button to select Connect and press ![]() to connect.
to connect.
16. When dialing, the CONNECTED LED on the front of the unit will flash green. When connected, the CONNECTED LED on the front of the unit will illuminate solid green.
|
Important Note: To load a saved program and dial press the HOME |