Creating a Multicast Client Program

Contents
Two different types of multicast programs need to be created when multicasting:
•A multicast server program is used by the broadcasting codec to send multicast IP packets to multicast routers on a network.
•A multicast client program is used by codecs to receive multicast IP audio packets.
|
Important Notes: •You cannot edit a program when it is currently loaded in the codec. •Ensure all connection related settings like the port, algorithm, bit rate (etc) match on both multicast server and client programs or they will not be able to join multicast streaming sessions. •The default UDP audio port is 9000 for a multicast client program configured via the codec front panel. •You can lock a loaded custom program in a codec to ensure the currently loaded program cannot be unloaded by a codec dialing in with a different program type. •Always dial the multicast server codec connection first before connecting multicast client codecs. •Multicast client codecs will display return link quality (LQ) only. The Return reading represents the audio being downloaded from the network locally. •Forward Error Correction (FEC) is not available for multicast connections. •It is not possible to send auxiliary data using multicast connections. •It is not possible to connect to a G3 codec and receive multicast IP audio streams. •To copy multicast client programs onto multiple codecs see Save and Restore Configuration Files. •To learn more about programs see the section titled About Program Dialing. •See Toolbox web-GUI documentation for more detailed information about Configuring Multicast Client Programs |
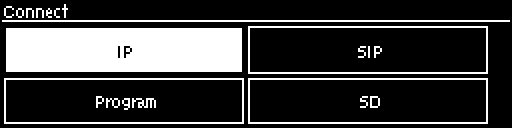
1.Press the HOME ![]() button to return to the Home screen, select Connect > IP > Sessionless and press the
button to return to the Home screen, select Connect > IP > Sessionless and press the ![]() button.
button.
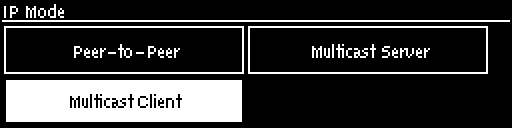
2.Select Multicast Client to configure a client codec program.
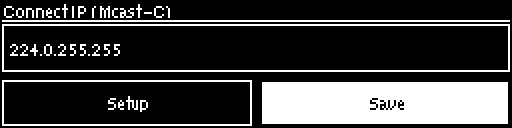
3.Use the RETURN ![]() button to delete any numbers already entered, then use the numeric KEYPAD to enter the multicast IP address you want to dial, using the
button to delete any numbers already entered, then use the numeric KEYPAD to enter the multicast IP address you want to dial, using the ![]() or
or ![]() buttons to enter the periods in the IP address. The same multicast address and audio port must be used for both the server and client programs. Next, press the down
buttons to enter the periods in the IP address. The same multicast address and audio port must be used for both the server and client programs. Next, press the down ![]() navigation button to select Setup and press
navigation button to select Setup and press ![]() .
.

4.Press the down ![]() navigation button to select Algorithm and press
navigation button to select Algorithm and press ![]() .
.
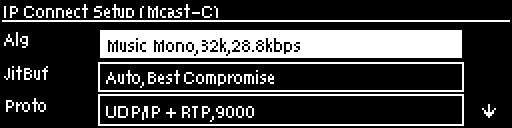
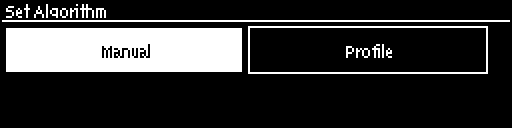
5.Use the navigation buttons to select an algorithm profile or manually choose algorithm settings, then press ![]() .
.
6.Click to configure the Jitter Buffer from either Auto Jitter Adapt or Fixed Buffer Level , then and enter the Jitter Depth, which must be between 12ms and 5000ms depending on the algorithm you select, then press ![]() .
.
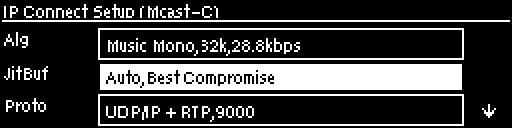
|
Important Notes: Automatic or fixed jitter buffer settings can be adjusted on individual client codecs as required. There is no jitter buffer setting on the server codec because it never receives audio packets. |
7.Select Protocol to select the audio protocol and adjust the Return Audio Port. Select UDP/IP +RTP for RFC compliant IP streaming. Press ![]() to save settings.
to save settings.
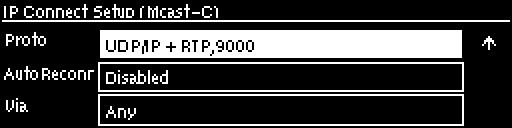
8.If required, enable Auto Reconnect and use Via to specify which IP streaming interface is used to dial this connection, e.g. Primary (port ETH1) or Secondary (port ETH2). Note: By default Any will select ETH1 if it is available and ETH2 if it is unavailable.

9.Press the RETURN ![]() button when configuration is complete to navigate backwards to the Connect IP screen that the multicast IP address was entered into.
button when configuration is complete to navigate backwards to the Connect IP screen that the multicast IP address was entered into.
|
Important Note: At this point you can navigate to Save on the Connect IP screen and press
|
Connecting a Multicast Client Program
1.After you have created multicast server and client programs on your codecs you can dial multicast connections. First select the multicast server program you want to use on the server codec and dial to connect.
2.Select and load the multicast client program on each of the multicast client codecs and dial the multicast IP address to begin receiving multicast audio packets.
a.Press the HOME ![]() button to return to the Home screen.
button to return to the Home screen.
b.Use the navigation buttons to select Programs and press the ![]() button.
button.
c.Use the up ![]() and down
and down ![]() navigation buttons to select the multicast client program you want to connect with, then press the
navigation buttons to select the multicast client program you want to connect with, then press the ![]() button to load the program.
button to load the program.
d.Press the CONNECT ![]() button to make a connection.
button to make a connection.
You can navigate to Cxns on the Home screen to view a codec's connection Status, then press ![]() to view connection statistics for IP packets being received over the connection.
to view connection statistics for IP packets being received over the connection.