
Getting Started
Up to 6 SIP accounts can be configured in the codec and registering codecs for SIP connectivity is simple. First, select the SIP server to which you will register your codec. On a LAN this may be your own server, or it could be one of the many internet servers available. When you register an account with a SIP server you will be provided with:
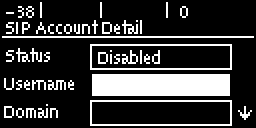
•The SIP registrar and Proxy Server details.
•An authorized user or username (often the same as a SIP number).
•A password.
•Domain details.
•Realm details (in most cases leave blank).
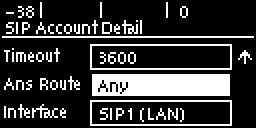
•Registration Timeout (this shouldn't need to be adjusted from the default setting).
|
Important Notes: •In most situations it is best to configure a SIP account when the codec is configured with a public IP address. •Each SIP account can only be mapped to a single SIP interface, i.e. SIP1 (LAN1) or SIP 2 (VLAN1). •Up to 6 SIP accounts can be added to the codec. •It is also possible to add and register a SIP account to your codec using the HTML5 Toolbox Web-GUI. |

Adding a SIP Account
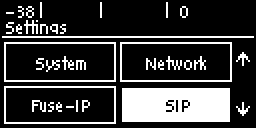
1.Press the the SETTINGS  button, then navigate to SIP and press the
  button.
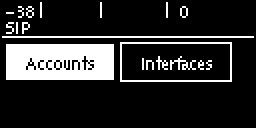
2.Navigate to Accounts and press the button.
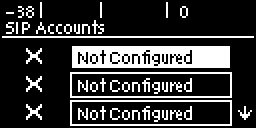
3.Select an account which is Not Configured and press .
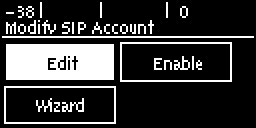
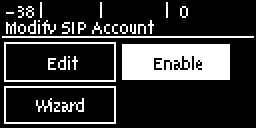
4.Select Edit to enter SIP server account details, then press .
5.Navigate to each field in turn and press the button to enter SIP account credentials.
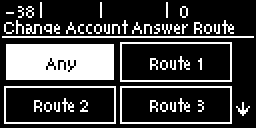
6.Select Ans Route and use the Change Account Answer Route screen to route incoming calls to this SIP account to a specific audio stream. The route setting in this menu must correspond with the answering route configured in an audio stream within the loaded program. If the default value Any is used then a call will be routed to an audio stream on a first-come-first-served basis in a multi-stream program.
7.After completing account configuration, select Enable in the Modify SIP Account menu and press the button to enable the SIP account and register it with the SIP server.
8.To confirm the account has been registered successfully, verify the account has a "tick" next to it in the SIP Accounts menu.
|
Important Note: Once enabled, the SIP account can be used when creating a new SIP connection. Configure this menu setting via Connect > IP > SIP > Setup > Account. |
Confirming Account Registration
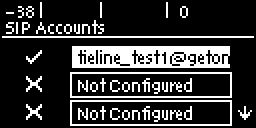
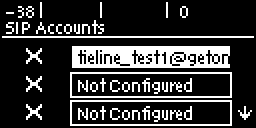
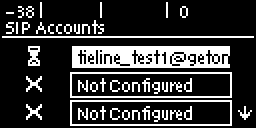
There are three symbols displayed on the screen next to an account which indicate SIP account registration status.
Symbol |
Description |
|
Cross symbol indicates the account is not yet registered. |
|
Hourglass symbol indicates account registration is currently being attempted. |
|
Tick symbol indicates the account is registered to a SIP server. |
Troubleshooting SIP Registration
If a SIP account is not being registered please check the following:
1.Confirm all account registration information has been entered correctly.
2.Confirm the SIP Interface (SIP1 or SIP2) configured in the account is enabled.
3.Verify that the Via selected in the SIP1 or SIP2 interface settings corresponds with the network interface being used by the codec to register the account. E.g. LAN1 or VLAN.
