
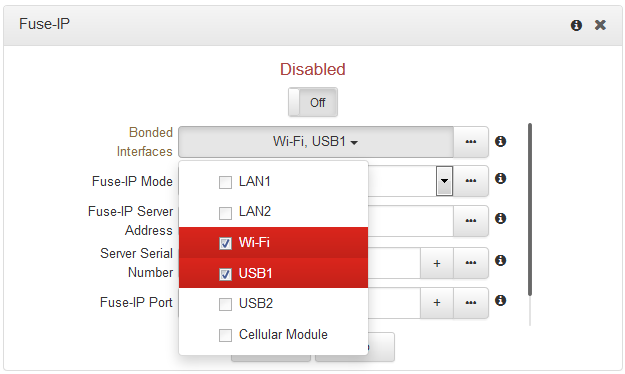
Tieline’s proprietary Fuse-IP data aggregation technology uses a point-to-point tunnel between two codecs to bond multiple IP interfaces (peers). Fuse-IP automatically distributes data over any two bonded interfaces. IP interfaces from which you can choose to bond include:
•2 USB modems.
•Built-in Wi-Fi.
•An internal cellular module.
•Dual Ethernet LAN ports.
See Connecting with Fuse-IP for more details on configuration using the codec TOUCH SCREEN.
Configuring a Fuse-IP Remote Client
1.Open the HTML5 Toolbox Web-GUI and click Settings and then Fuse-IP.
2.Click the Bonded Interfaces drop-down menu to select the interfaces to be bonded.
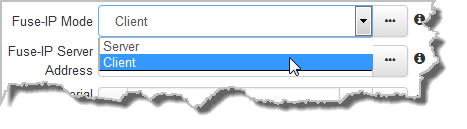
3.Click the Fuse-IP Mode drop-down menu to select Client as the Fuse-IP mode if you are dialing the studio codec. Note: the studio codec should be configured in server mode.
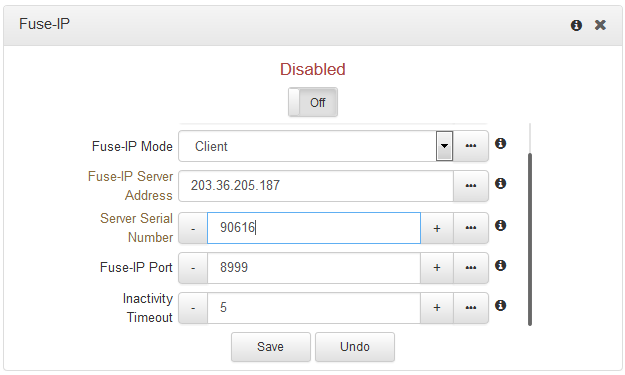
4.Enter the Fuse-IP Server Address, which is the public static IP address of the server codec at the studio. Then enter the server codec's serial number in the Server Serial Number text box. Leave the default Fuse-IP Port as 8999 in most situations unless this port is already in use, e.g. you have multiple codecs behind a firewall using Fuse-IP, therefore you need to allocate a different port for each Fuse-IP tunnel. Note: the port number on the client and server codecs must be the same. Configure the Inactivity Timeout if you want to turn the Fuse-IP tunnel off after a predetermined time period to save data, then click Save. Note: Inactivity Timeout can be configured from 0 to 1440 minutes. Enter 0 to disable the timeout.
5.Click the On/Off button for Fuse-IP to create a Fuse-IP tunnel between the server and client codecs. Note: Connected should be displayed after a few seconds.
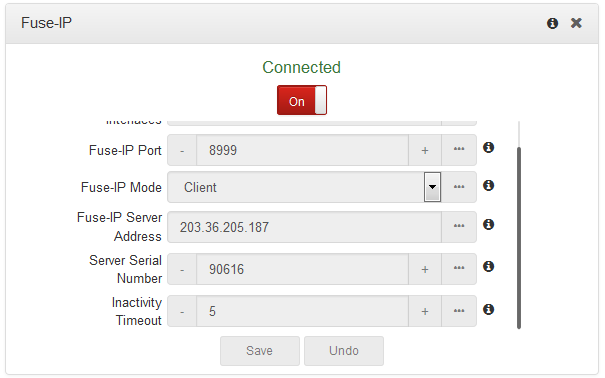
6.The status indicator is orange when Fuse-IP is enabled but no tunnel is created. It turns green when a tunnel is active.

Enabled: no tunnel created

Enabled & tunnel created
7.Double-check all settings on both the server and client codecs if the message Started, dialing server... persists after turning Fuse-IP On.

|
Important Notes: •Fuse-IP cannot be configured as a default Primary, Secondary or Tertiary Via. •Data is sent by the codec over the newly created 'tunnel' as soon as Fuse-IP is enabled, even if a connection has not been configured and dialed. Depending on the number of interfaces being used, the codecs may transmit and receive up to 24MB of data per hour at each end of the link. •The codec remembers the Fuse-IP enabled/disabled state on power up. •For additional stability it is recommended that a fixed jitter buffer is configured when streaming using Fuse-IP. The actual jitter buffer depth should account for the difference in delay between the interfaces and the maximum jitter experienced. To determine the jitter over each link you can connect and stream audio over each interface separately and look at the jitter reading displayed on the Connection Statistics screen. •Use a dotted quad IPv4 address when configuring the Fuse-IP Server Address. |

