Configure and Register SIP Accounts

Contents
This section provides instructions for registering your codec to a SIP server. If you want to make a peer-to-peer SIP call without using a SIP server, see Configure SIP Peer-to-Peer Programs. For more details about SIP see About SIP.
Getting Started
Registering the codec to a SIP server is simple and up to 6 SIP accounts can be configured. First, choose the SIP server (or servers) to which you will register your codec. This may be your own server, or it could be one of the many internet servers available. We recommend that you use your own SIP server if possible and configure it to support G.722, MP2, Opus and AAC algorithms. This is because most internet SIP servers are for VoIP phones and may only be configured for low grade voice quality connections using G.711.
When you register an account with a SIP server you will be provided with:
•Authorized user or user username (often the same as a SIP address)
•SIP address
•Domain details
•Realm details
•Registrar
•Registar port
•Outbound Proxy
•Proxy port
|
Important Notes: •In most situations it is best to create a SIP account when the codec is configured with a public IP address. •Each SIP account can only be mapped to a single SIP interface, i.e. SIP1 or SIP 2. •Up to 6 SIP accounts can be added to the codec. •If your codec is registered with same SIP registrar as the destination codec then you only need to enter the SIP user name to dial successfully. •It is also possible to add a SIP account to your codec using the codec TOUCH SCREEN menus. See Configuring SIP Accounts for more details. |
Register the Codec to a SIP Server with the Java Web-GUI
Use the Java Toolbox Web-GUI to configure SIP account registration details into your codec. Once these details have been entered into the codec, each time it is connected to a public IP address it will contact the SIP server automatically to acknowledge its presence over a wide area network.
1.Connect your codec to a LAN connection with a public IP address, then log in to the Java Toolbox Web-GUI and click the Settings ![]() symbol at the top of the screen to display the Settings panel.
symbol at the top of the screen to display the Settings panel.
2.Click the SIP button in the top-left corner of the System panel to display SIP Accounts.
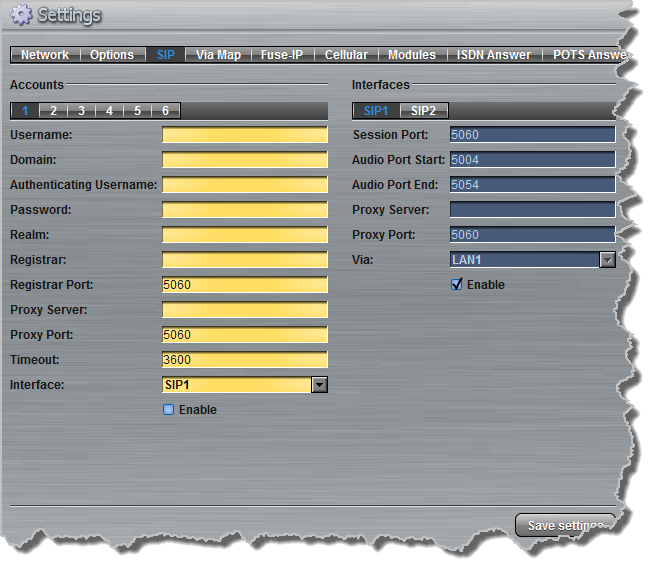
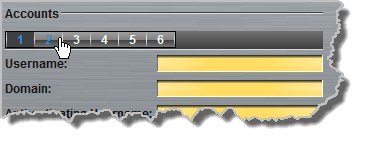
3.Tap one of the six SIP account numbers to select an account to configure.
4.Enter the SIP account details into the relevant text boxes, including the Registration Timeout (which shouldn't need to be adjusted from the default setting). Also ensure a SIP Interface is selected (e.g. SIP1 or SIP2.) The SIP interface contains settings related to ports and the selected Via interface, e.g. LAN1 or LAN2. See SIP Interface Configuration for more details.
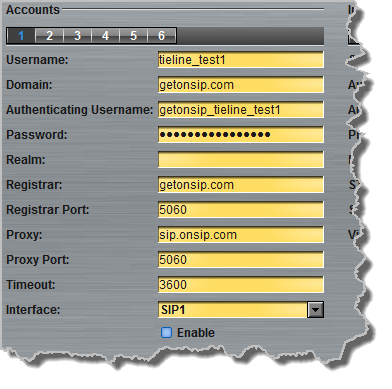
5.Click to select Enable and click the Save Settings button to register the codec to the server. Settings Saved is displayed in the bottom-left corner of the Settings panel if an account has been registered successfully.
6.On the codec you can press the HOME ![]() button and then tap Settings > SIP > Accounts to verify that the account has been registered to the SIP server. The registration symbol
button and then tap Settings > SIP > Accounts to verify that the account has been registered to the SIP server. The registration symbol ![]() appears next to an account when it has been registered successfully.
appears next to an account when it has been registered successfully.
|
Important Notes: Some ISPs may block SIP traffic over UDP port 5060. |