Product |
Feature |
Notification |
Gateway 4 |
Licensing |
The Gateway 4 codec supports 4 audio channels only and this cannot be upgraded or expanded. |
Gateway 8/16 |
Licensing |
The Gateway codec supports between 8 and 16 audio channels. If a codec supports fewer than 16 channels, it can be upgraded to support more channels by purchasing a channel license upgrade from Tieline and installing it in the codec. |
The Gateway codec supports between 8 and 16 channels and to view channel License Status in a codec open the HTML5 Toolbox web-GUI in a web-browser and select Settings and open the Licensing panel.

For more details about channel licensing see Channel Licenses.
Perform an Automatic Software License Install with the HTML5 Toolbox Web-GUI
To perform an automatic software license update after purchasing a new license file it is necessary to connect the codec to a PC and ensure it is connected to the internet. Check for a notification by email from Tieline that your new license file is ready to download from TieServer.
1.Open the HTML5 Toolbox web-GUI in a browser on your PC by typing either the IP address of the codec (LAN connection), or the USB address of the codec (USB connection) into the address bar.
2.Ensure you have unloaded any currently loaded program in the codec via the Program Loader panel.
3.Click Settings in the Menu Bar, then click Licenses to display the License Manager.
4.Click Get license file from TieServer.
5.A Success dialog in the web-GUI Licensing panel confirms when installation is complete.
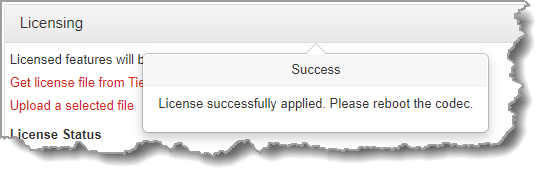
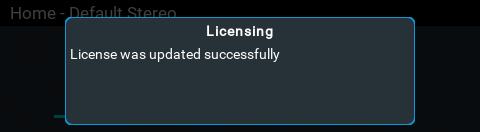
6.The codec screen should also display a confirmation message.
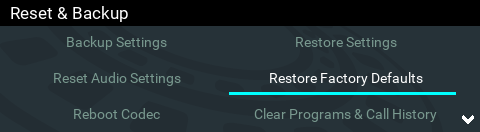
7.Reboot the codec via Settings > Reset & Backup > Reboot Codec and press the  button. Note: do not reboot by removing the power cable from the codec.
Download a License File and Install Manually
If the automatic license update fails, or the codec is not connected to the internet, it is possible to install a previously downloaded license file, or a license file copied to a PC. Save the license to a PC connected to the codec and use the following procedure to install it:
1.Open the HTML5 Toolbox web-GUI in a browser on your PC.
2.Click Settings in the Menu Bar, then click Licensing to display the Licensing panel.
3.Click Upload a selected file.
4.Navigate to the ".lcf" license file on your PC, then click the Open button to commence license installation.
5.A Success dialog in the web-GUI Licensing panel confirms installation is complete.
6.Reboot the codec via Settings > Reset & Backup > Reboot Codec and press the button. Note: do not reboot by removing the power cable from the codec.
7.Clear the web-browser cache and then it may also be necessary to reset factory defaults to display the new channel assignment. To reset factory defaults select Settings > Reset & Backup > Restore Factory Defaults. Note: Please take note of network related settings before restoring factory defaults. Do not restore factory defaults in situations where the codec can only be accessed remotely. I.e. it is not possible to access the codec front panel to adjust network settings and restore connectivity.
8.Verify that the license settings have been installed in the Licenses panel.
