Product |
Feature |
Notification |
Gateway 4 |
PPM Meters |
8 PPMs on front panel display 4 channel inputs/outputs or encoders/decoders |
Gateway 4 |
Inputs |
4 Channels in/out |
Gateway 4 |
Inputs |
Inputs 1-4 can be configured as analog or digital inputs (AES3 or AoIP) in pairs |
Gateway 4 |
Web-GUI Inputs panel |
4 inputs and PPMs displayed |
Gateway 8/16 |
PPM Meters |
16 PPMs on front panel can display inputs/outputs/encoders/decoders |
Gateway 8/16 |
Inputs |
8-16 Channels In/Out (depending on codec configuration purchased) |
Gateway 8/16 |
Inputs |
Inputs 1-8 can be configured as analog or digital inputs (AES3 or AoIP) in pairs |
Gateway 8/16 |
Web-GUI Inputs panel |
8 - 16 inputs and PPMs displayed (depending on codec configuration purchased) |
Open the HTML5 Toolbox Web-GUI and click Audio in the Menu Bar, then click Inputs to display the Inputs panel.
 input panel")
Gateway (8/16) input panel

Gateway 4 inputs panel
Adjusting Audio Input Levels
To adjust input audio levels, click on the input slider and drag it to the desired input gain level. Alternatively, type a value below a PPM meter to increase or decrease the input level value. Note: 0.5dB increments are accepted for increasing and decreasing audio levels. Input levels on the Inputs panel should be set to ensure audio peaks average at the first yellow indications on the PPM meters, which represents nominal 0 VU at -20dBFS. Audio levels should also be verified using the meters in the PPMs panel.
|
Important Notes: There is a maximum of 6dB of additional gain available when adjusting a digital input. |

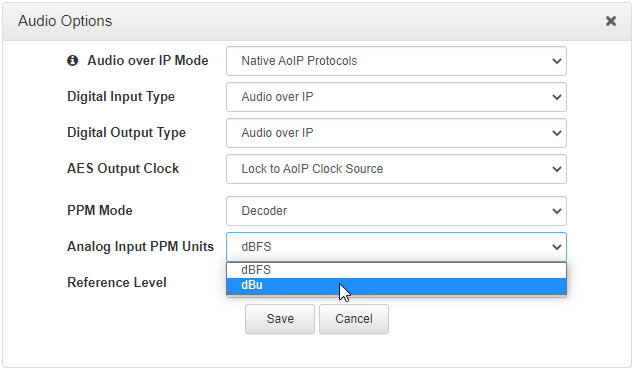
Changing the Input PPM Meter Units from dBFS to dBU
It is also possible to switch the analog input PPM meter unit of measurement from dBFS (default) to dBU:
1.Open the HTML5 Toolbox Web-GUI and click Audio in the Menu Bar, then click Audio Options to display the Audio Options panel, next click Edit.
2.Click the Analog Inputs PPM Units drop-down menu and select dBU, then click Save.
Configuring Input Settings
Selecting Analog and Digital Audio Sources
Codec inputs can be configured for AES3, digital (e.g. AES67, ST 2110-30, Livewire+, RAVENNA), or analog line level audio sources. Use the Audio Options panel in the HTML5 Toolbox web-GUI to configure digital inputs globally for either AES3 or AoIP input sources. See Input Configuration, Levels and PPMs for more details. After setting the Digital Input Type in the Options panel, configure the codec for either analog or digital input types using the Inputs panel as follows.
1.Click the Input Settings  symbol.
2.Select Type and then Analog or Digital (AES3 or Native AoIP Protocols).
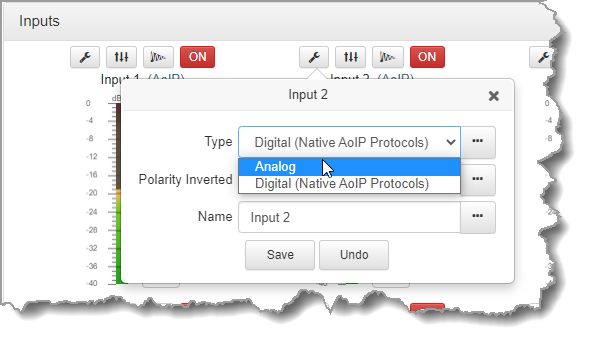
3.Click Save to confirm the new setting.
Adjusting IGC
Input IGC (Intelligent Gain Control) is enabled by default and is automatically activated at +19 dBu (G6 audio scale), +17 dBu (G5 audio scale) and +13dBu (G3 audio scale) to prevent audio clipping.
1.Click the Input Settings symbol.
2.Select IGC (Intelligent Gain Control) and then Auto, Fixed or Off as required.

3.Click Save to confirm the new setting.
Invert Polarity
Select the Polarity Inverted check-box to reverse the polarity of an analog or digital input.
1.Click the Input Settings symbol on the input you want to adjust.
2.Click to select the Polarity inverted check-box.
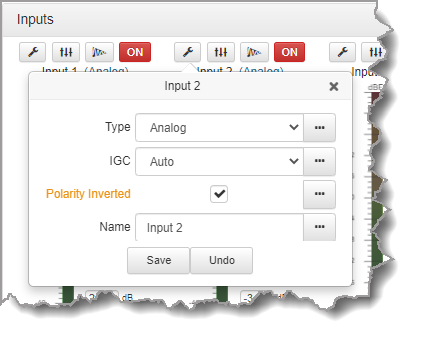
3.Click Save to store the new setting.
Renaming Inputs
1.Select the Input Settings symbol on the input being renamed.
2.Click in the Name text box to enter a new name, or edit an existing name.
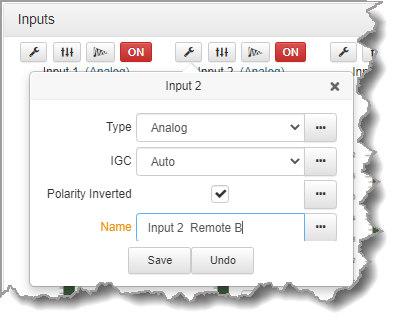
3.Click Save to confirm the name change.
Adjust EQ Settings
EQ and compression can be adjusted for each input if required. To enable and adjust the built-in 10 band EQ:
1.Click the EQ button  for an input in the Inputs panel. The EQ button is blue
  when input EQ is enabled.
2.Click the drop-down menu arrow and select Graphic to enable EQ for the input if it is in Bypass.
3.Adjust the EQ frequency sliders as required.
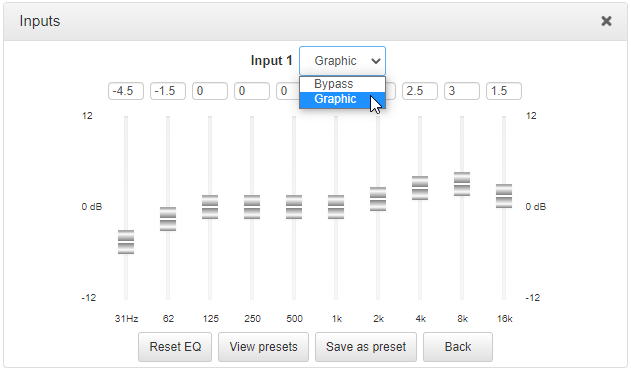
4.Click Save as preset to save an EQ preset, e.g. for a particular announcer. Click View presets to recall a previously stored EQ preset.
5.Click Back to view all inputs.
Adjust Compression Settings
To to enable and adjust input compression settings.
1.Click the Compressor button  for an input in the Inputs panel. The Compressor button is blue
  when input compression is enabled.
2.Click the drop-down menu arrow and select Enabled to enable compression for the input if it is disabled.
3.Adjust the compression settings as required.

4.Click Save as preset to save a compressor preset, e.g. for a particular announcer. Click View presets to recall a previously stored compressor preset.
5.Click Back to view all inputs.
|
Important Note: Audio signal processing occurs in the following order: IGC/Limiter (Intelligent Gain Control limiting on the input) > Input Compression > Input EQ > Mixer > Output AGC (Automatic Gain Control limiter). |

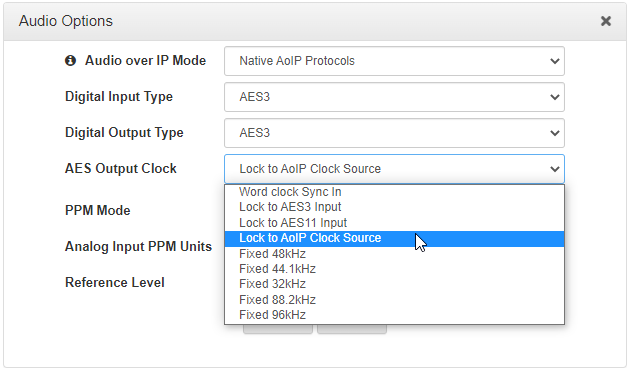
AES3 Output Sample Rate Configuration
The AES3 output sample rate can be configured using the HTML5 Toolbox Web-GUI. See Configuring AES3 Audio for more information about AES3 input and output sample rate clocking.
1.Open the HTML5 Toolbox Web-GUI and click Audio in the Menu Bar, then click Audio Options to display the Audio Options panel.
2.Click the AES Output Clock drop-down menu to select your preferred setting, then click Save.
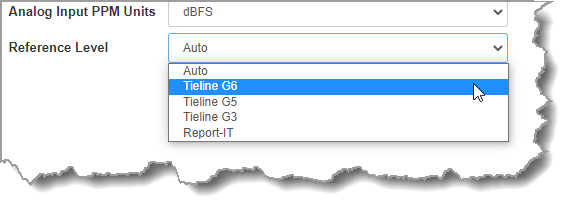
Audio Reference Levels
By default, the PPM METERS on the front of the codec, or in the HTML5 Toolbox Web-GUI, use dBFS to express nominal operating, headroom and noise floor levels. The codec can also automatically adapt to different Tieline reference scales. A Tieline codec with proprietary Tieline session data enabled will automatically adjust the reference level to suit G5 and G3 codecs, or Report-IT. When connecting to a non-Tieline codec, or a Tieline codec without session data enabled, the codec will use the Tieline G6 reference scale setting.
The default Tieline G6 audio reference scale displayed on the PPMs when connecting to a Tieline G6 codec is -40dBFS to 0dBFS. Using this reference scale audio peaks can safely reach 0dBFS without clipping, providing 20dB of headroom from the nominal 0vu point.
|
Important Note: If a codec supports multiple stream programs and the Auto (default) reference level is selected, the first codec to connect will configure the reference level used for all subsequent connections. I.e. If a G5 codec connects first, then the G5 Audio Reference Level will be configured for all connections. |
To adjust this setting:
1.Open the HTML5 Toolbox Web-GUI and click Audio in the Menu Bar, then click Audio Options to display the Audio Options panel.
2.Click the Reference Level drop-down menu and select the correct option, then click Save.