
The Programs panel incorporates a wizard to configure a new program and all audio stream settings. Before you configure a new codec program consider if:
•You want your codec to be capable of dialing and answering, dialing only or answering only.
•A backup connection is required.
This section contains instructions for:
1.Configuring Peer-to-Peer Programs: Dialing
2.Configuring a Backup Connection or Auto Reconnect
3.Configuring Answering Connections
For more information about programs and audio streams within programs see the section titled Load, Connect and Manage Programs. Note: The following connection setup instructions will show how to configure a dial and answer program, with a backup connection. If you want the codec to either dial or answer only, select the option and the wizard will automatically display relevant screens to allow you to configure the codec correctly.
Configuring Peer-to-Peer Programs: Dialing
|
Important Notes: Before you start program configuration please note: •It is not possible to edit a program when loaded in the codec. •Lock a loaded custom program in a codec to ensure the currently loaded program cannot be unloaded by a codec dialing in with a different type of program. •Some drop-down menus and settings may be greyed out intentionally depending on features available and the transport selected (e.g. IP or ISDN). •It is possible to save a program at several points throughout the program wizard and use default settings to save configuration time. •Failover and SmartStream PLUS redundant streaming are not available with SIP or sessionless IP connections. •POTS is not supported for stereo audio stream connections. •To learn more about programs see Load, Connect and Manage Programs. |

1.Open the HTML5 Toolbox Web-GUI and click Connect in the Menu Bar, then select Program Manager to launch the Program Manager panel.
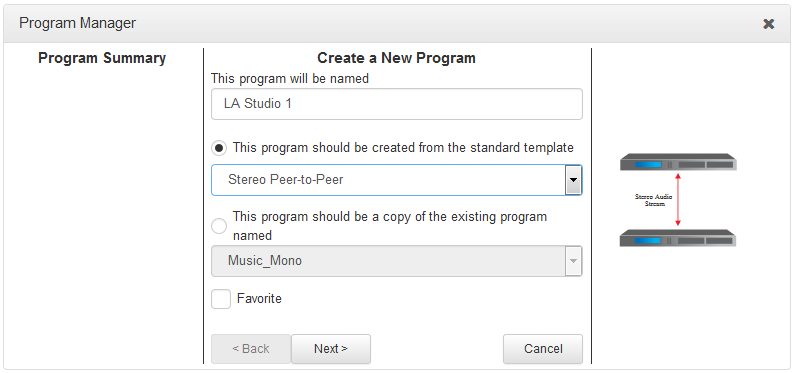
2.Click the Create New Program button to open the wizard and:
•Click in the text box to name the new program.
•Select Mono/Stereo Peer-to-Peer, or if you want to use an existing program as a template, select this option.
•Click to select the Favorite check-box if you want to add the new program to the list of favorites in the codec, then click Next.
|
Important Note: When you decide to use an existing program as a template, the new program inherits all the settings of the template program and you can adjust these settings as required by continuing through the program wizard. |
3.Enter a name for the Audio Stream, add a caller ID and configure the codec to dial, answer or dial and answer. Then click Next. Note: The caller ID is used to identify calls.
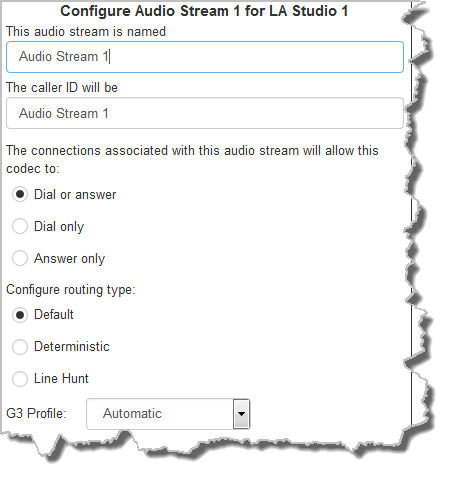
Routing Type Options: |
|
Default
|
No Dial Route or Answer Route is configured. An incoming call will be routed to an audio stream on a first-come, first-served basis in a multi-stream program. Note: By default IP streams are routed using audio ports. |
Deterministic
|
Select a Dial Route or Answer Route to configure deterministic routing of multiple audio streams using transports like ISDN or POTS. Use of Dial and Answer Routes is not necessary over IP. See Configuring ISDN Answering or Configuring POTS Answering for more information. |
Line Hunt |
Create line hunt groups for multiple incoming callers on a first come, first served basis. This is ideal for separating groups of inputs and outputs between different studios or stations. See Line Hunt Call Answering for more information. |


|
Important Note: The G3 profile setting supports maintaining specific G3 codec settings when answering a call from a G5 codec.
1.Auto: The codec will dial the G3 codec and connect in mono or stereo. Note: This is overridden in a ViA codec when a G3 Main + IFB use-case is configured. 2.Dual Program: This allows the codec to dial a G3 codec with a Dual Program profile loaded and support two simultaneous mono connections. 3.Runtime: The G3 codec will retain runtime settings when answering a call from a G5 codec. 4.Custom: The G3 codec will load a specified profile, e.g. profile 6, which is the first custom profile number. |
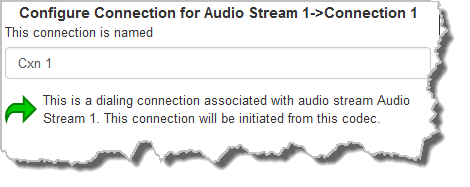
4.This audio stream connection in the wizard will allow the codec to dial. Enter the name of the connection in the text box, then click Next.
5.Follow the instructions on the right-hand side of the panel to configure the transport settings for the connection, then click Next.
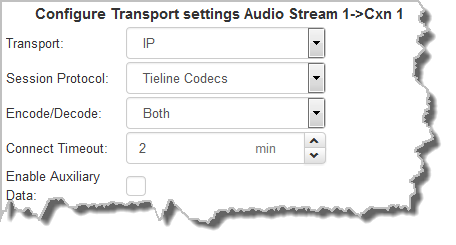
|
Important Note: •If you select Sessionless as the Session Protocol select UDP/IP +RTP for RFC-compliant IP streaming. •See RS232 Data Configuration for detailed information on RS232 data and see Enabling Relays and RS232 Data for more information on relay operations. |
6.Configure destination codec dialing and encoding settings:
|
For IP connections configure the IP address, ports, and then specify which streaming interface is used to dial this connection, e.g. Primary (port LAN1) or Secondary (port LAN2). Note: By default Any will select LAN1 if it is available and LAN2 if it is unavailable.
Click Save Program to save the program with the default algorithm, jitter and FEC settings which are physically entered in the codec. Alternatively, click Next to specify individual algorithm, jitter buffer and FEC settings and configure a failover connection or SmartStream PLUS for this audio stream (recommended).
Click the drop-down arrows on the right-hand side of each text box to adjust the Encoding, Sample rate and Bit rate options.
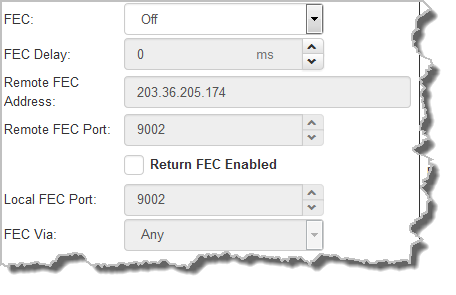
For IP connections click to configure: •Auto Jitter Adapt and the preferred auto jitter setting using the drop-down arrow for Buffer priority. It is also possible to configure the Minimum depth and Maximum depth of jitter over the connection. See Configuring the Jitter Buffer for more details. •Alternatively, select a Fixed Buffer Level and enter the Jitter Depth, which must be between 12ms and 5000ms depending on the algorithm you select. •Local and Remote FEC settings if required.
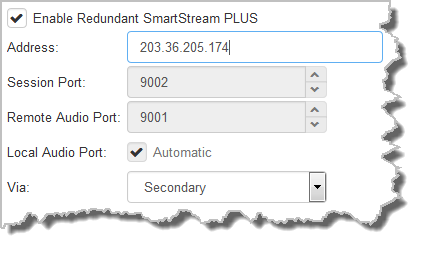
Click the check-box to select Enable Redundant SmartStream PLUS and configure dual redundant IP streaming. Alternatively, click Next to configure Auto Reconnect or a failover connection, whereby the alternative connection is dialed if the primary connection fails.
By default, primary IP streaming is via LAN1. To achieve the maximum level of redundancy select Secondary to configure redundant streaming from the secondary IP port LAN2. The redundant stream uses Remote Audio Port 9001 by default and the Local Audio Port allocated is Automatic. Note: Automatic indicates that the codec will arbitrarily allocate the local port value and send this information to the codec to which you are dialing.
|


|
Important Note: Dual SmartStream PLUS redundant streaming over two IP interfaces mitigates lost packets on either link and will provide IP network backup if an IP link is lost. To learn more about SmartStream PLUS redundant IP streaming see http://www.tieline.com/Transports/SmartStream-IP |
|
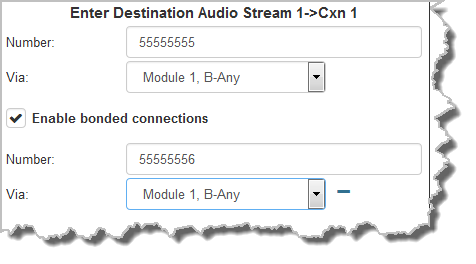
For ISDN connections enter a number and select which B channel to use. Select the Enable bonded connections check-box to configure and bond multiple B channels.
Next, click Save Program to save the program with default algorithm settings, or click Next to specify a different algorithm and configure a backup connection if required. (recommended).
Dialing settings for this ISDN audio stream are now complete.
|

|
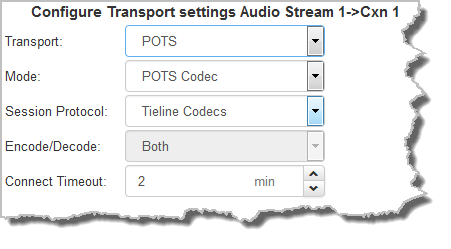
Select POTS Codec in the Mode drop-down menu to encode/decode using POTS, or select Analog Phone to configure a standard analog phone call, then click Next.
Next, enter the phone number of the codec or device you want to dial. Next, click Save Program to save the program with default settings, or click Next to specify algorithm settings and configure a backup connection if required (recommended).
Dialing settings for this POTS audio stream are now complete.
|

Configuring a Failover Connection or Auto Reconnect
At this point in the wizard you can choose to configure Auto Reconnect or create a failover connection for the audio stream you are configuring.
|
Important Note: When Auto Reconnect is enabled, the dialing codec will continue to attempt a connection with the remote codec until Disconnect is pressed either on the dialing codec's keypad, or in the Web-GUI. |
1.Click to select the check-box for Create a Failover Connection. Adjust the parameters and click Next.
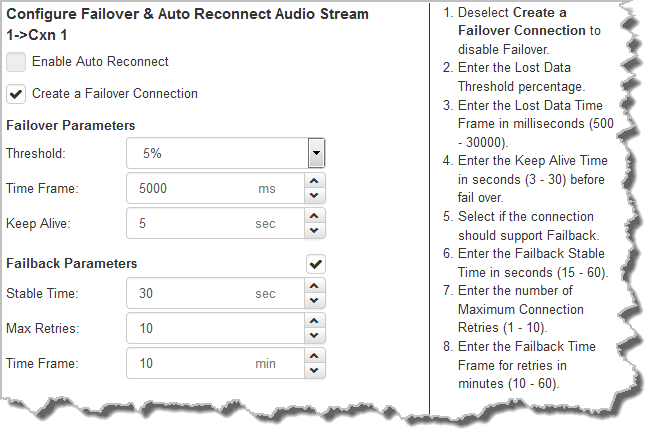
The explanations within the following table can be used to assist with failover connection configuration.
|
Screen Display |
Description |
1 |
Threshold |
The percentage of lost data measured during a given time frame |
2 |
Time Frame |
The time frame against which lost data is measured |
3 |
Keep Alive |
The keep connection alive time before failing over to a backup connection; Tieline RTP pings every second to confirm connectivity |
4 |
Failback Parameters |
Select the check-box to fail back to a higher priority connection |
5 |
Stable Time |
The amount of time a primary connection must remain stable before attempting to fail back from the backup connection |
6 |
Maximum Retries |
The maximum number of fail back retries a codec can try before ending fail back attempts |
7 |
Time Frame |
The time frame used to measure the number of fail back retries attempted |
2.Enter a name for the backup connection and click Next.

3.Click Next to continue through the wizard and configure the backup connection in a similar manner to how you configured the primary connection.
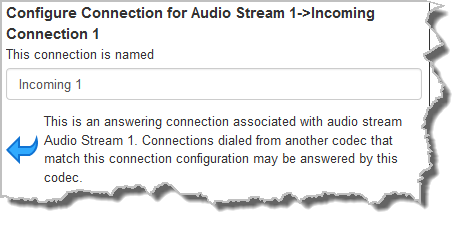
Configuring ViA to Answer Connections
The codec is capable of being configured to accept calls via different transports (e.g. IP, ISDN and POTS), or to accept calls using different audio ports. To answer one or more incoming audio stream connections:
1.Enter a name for the answering connection and click Next.
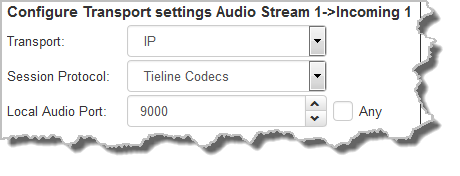
2.Configure the transport settings:
|
For IP select the Session Protocol and Audio Port.
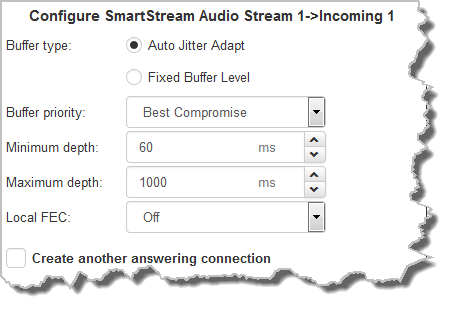
Click Next to specify individual algorithm, jitter buffer and FEC settings, or create another answering connection. Click to configure: •Auto Jitter Adapt and the preferred auto jitter setting using the drop-down arrow for Buffer priority. It is also possible to configure the Minimum depth and Maximum depth of jitter over the connection. See Configuring the Jitter Buffer for more details, or •Alternatively, select a Fixed Buffer Level and enter the Jitter Depth, which must be between 12ms and 5000ms depending on the algorithm you select. •Local FEC settings if required.
|
|
For ISDN, settings are determined by ISDN module answering settings. For more details see Configuring ISDN Answering. |
|
For POTS, settings are determined by POTS module answering settings. For more details see Configuring POTS Answering. |
3.After configuring all settings there are 3 options:
i.If you want to create another answering connection, select the check-box for Create another answering connection and continue through the wizard.
ii.Click Save Program to save the program at this point.
iii.Click Next to configure rules options.
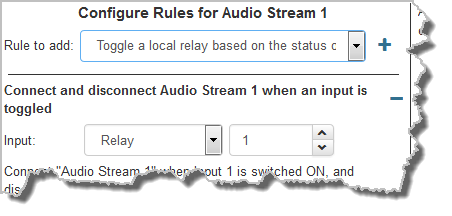
Configuring Rules
1.To configure new rules click the drop-down arrow and select the preferred option from those available. Click the blue Plus symbol  to add a new rule and click the Minus symbol
  to remove a rule.
|
Important Notes for Rules: •Rules for connecting or disconnecting an audio stream are configured in the Program Manager panel. Rules for connecting or disconnecting a program are configured in the Rules panel. See Creating Rules for more information. •A non-WheatNet-IP Tieline codec can be configured to trigger a logic IO (LIO) in a Tieline WheatNet-IP codec. Up to 64 logic IOs are available in Genie Distribution and Merlin PLUS WheatNet-IP codecs, as well as 4 physical CONTROL PORT GPIOs. •Tieline WheatNet-IP codecs require Wheatstone Razor firmware version 1.4.22 or later to support WheatNet LIOs. In addition, the WheatNet-IP codec must have the WNet Enable LIO checkbox enabled in the Options panel of the HTML5 Toolbox Web-GUI. •Connection-related rules are not displayed in Answer only programs. |
2.Click Save Program to save the program.
3.Click Finish to exit the wizard.
The newly created program will be displayed in the left pane within the Program Manager panel and in the Program Loader panel. Select and connect audio streams in a program using the Connections panel, or dial the program manually using the codec front panel.
The newly created program will be displayed in the left pane within the Programs panel and in the Master panel. Select and connect audio streams in a program using the Master panel, or dial the program manually using the codec TOUCH SCREEN.
